One of WordPress’s biggest advantages is the ease of getting started; Get a hosting provider, upload the files, run the installer, start publishing. One, commonly neglected/overlooked step, that should be considered a priority is making your WordPress secure enough so that we can prevent the most common attacks, such as brute force.
On Brute force
Brute force is a type of attack when someone (or rather, something – a computer) tries to login into your WordPress by trying millions of possible combinations of username and password. Since this process is automated, the program is able to try hundreds of combinations every second, which means it can take less than an hour to find a combination that works, especially when you use admin as your default username and one of the most common passwords.
—
There are two plugins I think should be a priority on every WordPress, and in this tutorial, I’ll show you how to set both properly so you decrease the chance of being hacked:
iThemes Security (formerly Better WP Security)
I love iThemes security because apart from being a great plugin in and of itself, it’s also a comprehensive checklist of steps you can (and should) take, to significantly improve the security of your WordPress install.
To get started, first login to WordPress then install and activate the plugin. Once you do, you should see two notifications at the top:

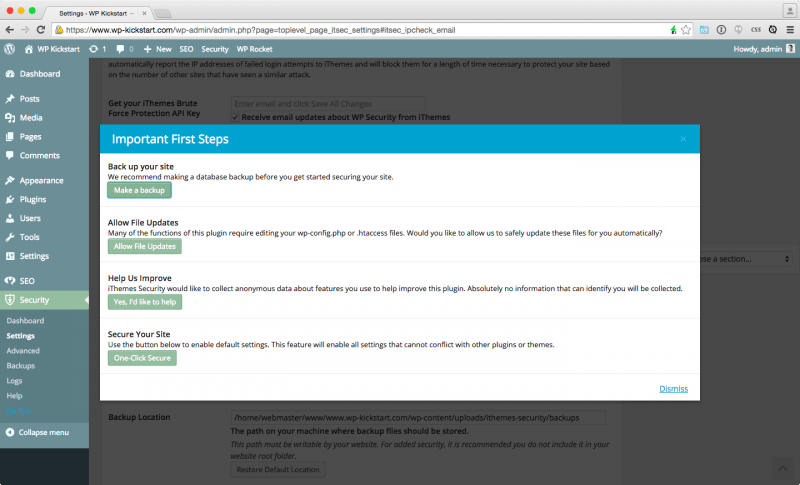
First, you need to get their free api key, so click the button in the upper notification. The process is automatic, so in a few seconds, you should see a modal window, offering a few options:

I recommend you click through all the options, because:
- backing up is always a good idea
- participating with anonymous data helps improve the plugin
- it’ll set up some defaults so you won’t have to worry about them
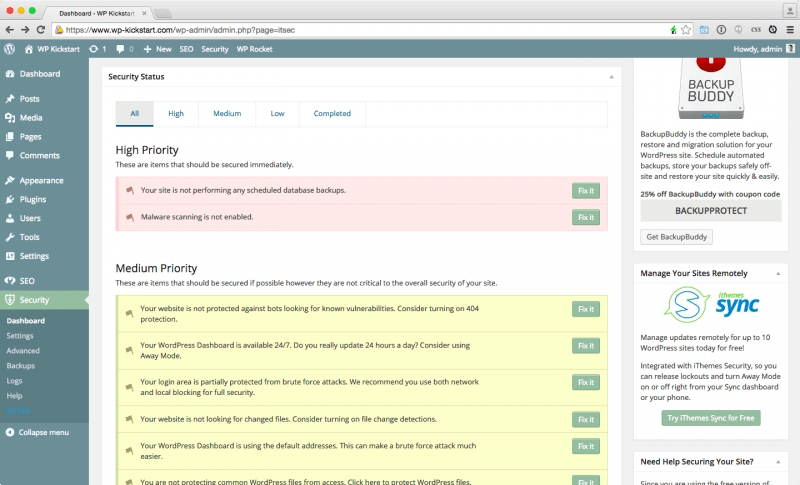
Once done, visit the iThemes Security Dashboard (I’ll refer to it by dashboard from now on) and there, you should see a long list of items (ordered by priority), like this:

Let’s go over each and every and try to clear them off. With every item, click the Fix It button on the right hand side, which’ll redirect you to the corresponding form that you’ll need to fill out according to your needs. I’ll guide you through the fields you need to be aware of – if I leave out any of them it means they are not relevant for security so decide on your own.
Before we get started
There will be some changes made to your WordPress that can temporarily break it, so it you can, try this out in a staging environment first!
Since some of the options can lock you out of WordPress, make sure that you whitelist your IP by visiting the settings tab and clicking “Temporarily Whitelist my IP” (the first option)
If you use nginx as your web server software, you’ll also need to create a config file outside your WordPress root. To do that, SSH on the server and go to the parent directory (In my case, the directory with WordPress is /home/webmaster/www/www.wp-kickstart.com) and create an empty file that iThemes can write to:
$ cd /home/webmaster/www/
$ touch www.wp-kickstart.com.conf
$ sudo chown :www-data www.wp-kickstart.com.conf
Now, we need to tell nginx to include this configuration file, so open the virtual host file for the domain. If you followed my tutorial on installing WordPress, then a command like this should do:
$ sudo nano /etc/nginx/sites-enabled/www.wp-kickstart.com
In the file, just add this line in the server block so that it looks like this (make sure your path is correct):

Now restart nginx ($ sudo service nginx restart) and return to WordPress. In iThemes Security settings scroll all the way down to the label that says “NGINX Conf file*, and enter the path to the file you just created, in my case /home/webmaster/www/www.wp-kickstart.com.conf
Lastly, you want to make wp-config.php temporarily writeable by the web server, so run the following commands to do that:
$ sudo chown :www-data wp-config.php
$ sudo chmod 775 wp-config.php
Don’t forget to change it back to 644 after you’re through with this tutorial.
Change admin user
This form allows you to change both the name and id of the admin. Select a new name for the admin user to anything you prefer, your first name will do just fine (or, if multiple users log in using admin, something like superadmin).
For some reason, using the form didn’t work for me, so I had to resort to some SQL queries. Be sure to backup your database before doing this!
UPDATE wp_users SET ID = 1024 WHERE ID = 1;
UPDATE wp_usermeta SET user_id = 1024 WHERE user_id = 1;
ALTER TABLE wp_users AUTO_INCREMENT = 2048;
UPDATE wp_posts SET post_author = 1024 WHERE post_author = 1;
UPDATE wp_users SET user_login = 'Tomaz' where user_login = 'admin';
There, no more admin user.
Scheduled database backups
First, we need to enable periodic database backups. Chances are that your database is too big to be send over an email, so for the backup method, select save locally only. Of course the default location that’s already in won’t cut it, you need to create a directory outside your WordPress install.
If you have a VPS, SSH onto it and run the following commands:
$ cd /var/backups
$ sudo mkdir www.wp-kickstart.com
$ sudo chown :www-data www.wp-kickstart.com
$ sudo chmod 775 www.wp-kickstart.com
This will create a backup directory (/var/backups/www.wp-kickstart.com), which you now need to enter in the backup location field. As for the rest of the settings, I prefer retaining 10 last backups, each done daily (backup interval field).
Done, let’s go back to the dashboard to check the next item in our list.
Malware scanning
It’s crucial that you can for and remove any Malware on your site. We’ll skip this one, because iThemes already have step-by-step tutorial on how to obtain an API key. Get it, paste it in – done, our high priority list has now been cleared.
Bots protection
We use the term bots when referring to computer programs that crawl the internet and search for URLs with scripts that are vulnerable to attacks. An example of such an attack took place about a month ago and affected more than 100,000 WordPress sites.
While the bot is sniffing for such URLs on your website, it will try a number of pre-set URLs it has in it’s database, and since most of them don’t necessarily exist on your website, a lot of 404 (page not found) errors will be generated.
iThemes security detects this behaviour and bans the bot from accessing your site. The defaults are fine, just check the Enable 404 detection checkbox and you’re done.
Dashboard availability (away mode)
This is not really a security improvement (in terms of preventing your website from being hacked) but I prefer all items being cleared so I just set the away mode to start at midnight and end sometime in the morning, say 8am.
Note that this setting will prevent anyone from logging into WordPress. Yes, even admin.
Login area brute force prevention
We already covered what brute force is, so in this form, just enter your email in the first field. This will generate an API key for you automatically. Apart from that, make sure that Enable local brute force protection is checked, and that’s it.
If you use nginx, you can an also prevent brute force attacks on the web server level. You need to configure what’s called rate limiting, which means the login form can only be accessed a set amount of times per given interval – let’s say once per second.
Open your main nginx config file ($ sudo nano etc/nginx/nginx.conf if you followed my previous tutorial on setting up a server) and add the following two lines to the http block:
limit_req_zone $binary_remote_addr zone=one:10m rate=1r/s;
limit_req_status 444;
Save and close the file, then open your virtual host file and add a location block for the login script:
location = /wp-login.php {
 # Rate limiting so that brute force is prevented
 limit_req zone=one burst=1 nodelay;

 # Make sure to change the lines below to fit your setup
 include fastcgi_params;
 fastcgi_pass unix:/var/run/php5-fpm.sock;
 fastcgi_param SCRIPT_FILENAME $document_root$fastcgi_script_name;
 fastcgi_index index.php;
}
Close the file, restart nginx then logout out of your WordPress, which will redirect you to the login page. Refresh a couple of times in rapid succession and you should be able to see a page not available error. This means it’s working properly!
You can now safely log back in. 🙂
File change detection
(Yes, we have skipped on item, which can’t be cleared unless you buy Backup Buddy)
Turn it on and check Split File Scanning, so that that it doesn’t check all the files in one go – this operation takes some server resources (processor and memory), and we don’t want it to slow down our WordPress’s main purpose: serving content.
Hide login area
After enabling this feature, you’ll be prompted for the login slug – use whatever suits you best, my preference is just ‘wp’.
Save the setting and log out – you’ll be redirected to /wp instead of the default `/wp-admin.
If you use nginx, make sure you restart it, otherwise it will not work.
System tweaks
In this form, check all checkboxes only exclude Filter Non-English Characters if you have those in your URLs.
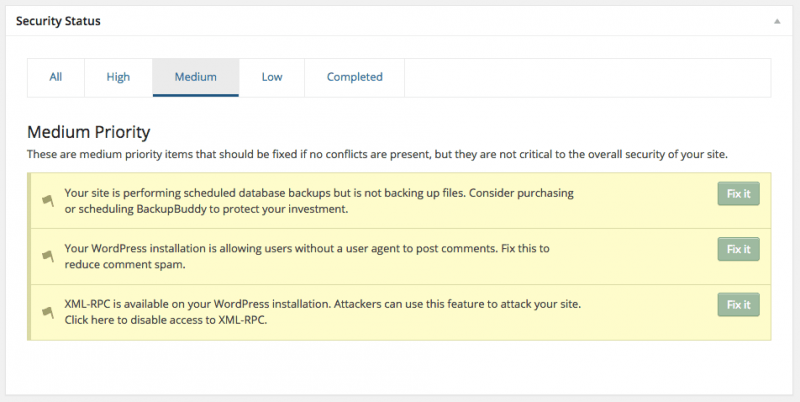
If you followed this far, there are only a couple of items that are left in the Medium Priority list:

Comment spam and XML-RPC
You can clear these two items in the same form. In order to disable comment spam you should of course use the pre-installed Akismet plugin and check the Reduce Comment Spam.
A few fields down, there’s also our last item to clear: XML-RPC. The labels here aren’t the best, because “Off” really means XML-RPC is turned on. If you use any kind of plugins that outside services connect to (such as Jetpack) then it needs to stay turned on – otherwise those services will be blocked.
Update database prefix
Check the checkbox to generate a new prefix, and that’s it!
(I’ve had a few issues with this in the past, because my wp-config.php wasn’t writeable by the web server, so double check if it’s not working)
Excellent – only one last list left to clear!

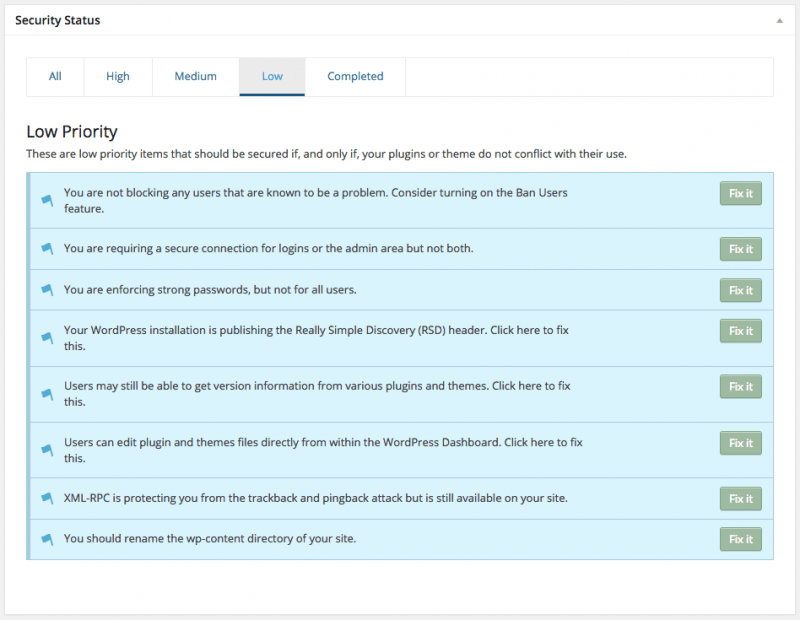
Banned Users
Since you’re just getting started, you probably don’t have any hosts or user agents to ban, so just enable the default blacklist, which will be good enough.
Secure Socket Layer
I’m a huge proponent of HTTPS, regardless of how big or important your website is, so ideally you should check both checkboxes and set the Front End SSL Mode to Whole Site.
To my amazement, the plugin actually tries to discourage you from using SSL across the whole website. Don’t believe that, SSL is good. Always. Everywhere.
Before making any changes to this form, make sure you have a certificate installed working properly, otherwise you will not be able to log in.
Don’t worry if you don’t have a certificate yet, I’ve written a tutorial on that a couple of weeks ago. Come back once you’re done reading it 🙂
You will be logged out and redirected to the secure URL of your admin, after saving the form – in my case that’s https://www.wp-kickstart.com/wp
At this point the item will probably still be on the list, because you need to add the following two lines to your wp-config.php:
define( 'FORCE_SSL_LOGIN', true );
define( 'FORCE_SSL_ADMIN', true );
Strong Passwords
Well this one is a no-brainer, passwords should be long and complex (and not shared with anyone, ever) so turn on the feature and choose the minimum role for this rule to be enforced on.
If you’re in need of a great password storage solution, check out 1Password, it generates (and stores) complex passwords, so you ever have to memorise one – to unlock the application.
Read more with our full guide on how to reset a WordPress admin password.
WordPress Tweaks
The rest of items in our blue, low priority list can be found on this form. Ideally, all checkboxes should be checked and XML-RPC disabled, but as I pointed out earlier, leave it on if external services connect to your WordPress.
Change wp-content directory name
Despite being a low priority, the form appears in the advanced tab, because this part can and will break your site if you’re not careful!
Before you start, duplicate your wp-content folder and name the new directory content or assets (or anything else, completely up to you, I prefer the latter). If you want to do it via command line, then run the following command:
$ cd /home/webmaster/www/www.wp-kickstart.com
$ sudo cp -dpR wp-content assets
Then open wp-config.php, and add the following three lines in, just above the line that says /* That's all, stop editing! Happy blogging. */:
// Skip the following two line if you already defined them.
// Also make sure to change the domain name.
define( 'WP_HOME', 'https://www.wp-kickstart.com/' );
define( 'WP_SITEURL', 'https://www.wp-kickstart.com/' );
define( 'WP_CONTENT_FOLDERNAME', 'assets' );
define( 'WP_CONTENT_DIR', ABSPATH . WP_CONTENT_FOLDERNAME );
define( 'WP_CONTENT_URL', WP_SITEURL . WP_CONTENT_FOLDERNAME );
Now that our WordPress is loading plugins and themes from the newly copied assets folder, rename the old wp-content to something like wp-content-unused. This is a safety measure, if something goes wrong you can remove revert to old configuration.
There’s also one last thing I’d like to warn you about: If you use any caching plugin, check that the paths for cached files are correct – these settings are usually found in wp-content/advanced-cache.php. Also, check you Apache/Nginx configuration if you hardcoded the path anywhere. I’ve missed this numerous times and pulled my hair out over it. 🙂
Now’s the time to change permissions on wp-config.php back to 644
That’s it, you now have a much more secured WordPress site than an hour ago! But we’re not done yet, as you might recall, I mentioned two plugins at the start of this tutorial.
Meet Rublon
Rublon is a free plugin that enables 2-Factor authentication. If you’re not familiar with that, it’s basically a technique that requires you to confirm your identity in two steps:
- by using your username and password
- by confirming your login via email or a mobile device
Many online banking systems require this kind of authentication, which prevents someone from logging in even if they have your username and password (regardless of how they got them).
To my positive surprise setting up Rublon means just a few clicks (you’d be surprised by how much some security measures totally kill the user experience, so this is indeed a breath of fresh air).
Note: If you followed the iThemes part above, then you’ll have to re-visit it and temporarily disable Long URL Strings and Suspicious Query Strings settings in the System Tweaks form, because Rublon creates a suspiciously long query string for activation.
Now install the plugin and upon activation, you’ll be redirected to their service in order to verify the device (your computer) and confirm the email address. If you want to go a step further (depending on how strict you want your security to be), then you can also download their mobile app and verify each login with your device.
That’s all there is to it!
By the way, Rublon also disables XML-RPC by default, just in case you’re wondering why Jetpack can’t connect to your site anymore.
Wrap up
Of course this tutorial can’t possibly cover everything there is to it when it comes to WordPress security (or web security in general) but by following this tutorial you have made your WordPress secure enough – and by doing that, you’ve gone above most WordPress installations out there.
And remember,…
[bctt tweet=”Friends don’t let friends run insecure WordPress sites”]
 Dream It
