Imagine putting countless hours into crafting engaging content, designing an eye-catching layout, and curating captivating images for your WordPress site. Yet, as you eagerly await the flood of visitors, there’s one problem – your website is too slow.
If you’ve found yourself in this frustrating situation, rest assured you’re not alone. Slow loading times have been a perpetual headache for website owners, and they can have far-reaching consequences.
In this article, we’ll dive into the common causes of slow WordPress websites dragging and, more importantly, provide you with actionable steps to get your site back up to speed. Even better, you’ll be introduced to Codeable – a pioneering platform that connects you with top-tier experts possessing a deep understanding of all things WordPress.
Let’s tackle the bottlenecks and transform your online presence into a high-speed WordPress website that keeps them coming back for more!
Understanding the factors behind a slow WordPress site
Did you know that 0.1 additional seconds in page load time cost Amazon 1% in sales?
When it comes to websites, speed matters because visitors have little patience for slow-loading pages. But what is causing your site to be sluggish?
- Bloated themes and plugins: While using resource-heavy themes and plugins may look visually appealing, they often carry a lot of unnecessary code, images, and features that can significantly slow down your site’s loading time. Choose lightweight themes and only essential plugins to keep your site running at optimal speed.
- Unoptimized images: Images are a crucial component of any website, but large, unoptimized images can be a major drag on performance. Uploading high-resolution images without compression can consume valuable bandwidth and increase loading times.
- Inadequate hosting: The quality of your hosting service can make or break your site’s speed. Opting for a cheap or shared hosting plan might save you money, but it can lead to slower loading times as your site competes for resources with others on the same server. Invest in a reliable and robust hosting provider that offers optimized servers for WordPress sites.
- Caching issues: Caching is a technique that stores static versions of your site’s pages, reducing the need for server processing and database queries for every request. If your caching system is not properly configured, it can lead to slower loading times.
- Excessive external HTTP requests: External resources, such as scripts, stylesheets, and fonts, can enhance your website’s functionality and appearance. However, relying on too many of these external sources can also cause delays if those resources are slow to load.
- Database bloat: Over time, the WordPress database can accumulate unnecessary data, such as post revisions, spam comments, and transients. This database bloat can increase the time it takes to fetch and display content.
- Lack of content delivery network (CDN): A Content Delivery Network is a network of servers distributed across different locations worldwide. It helps serve your website’s static content from the nearest server to the user’s location, reducing the physical distance and improving loading times.
A fast-loading website not only keeps visitors engaged but also positively impacts search engine rankings and conversion rates. Take the time to analyze your site’s performance, make the necessary adjustments, and watch your WordPress site soar to new heights of speed and efficiency.
How to determine if your WordPress site is slow
Determining if your WordPress site is slow can be a bit tricky, as various factors come into play. Here are some key indicators and techniques that will help you identify whether your WordPress site needs a speed boost:
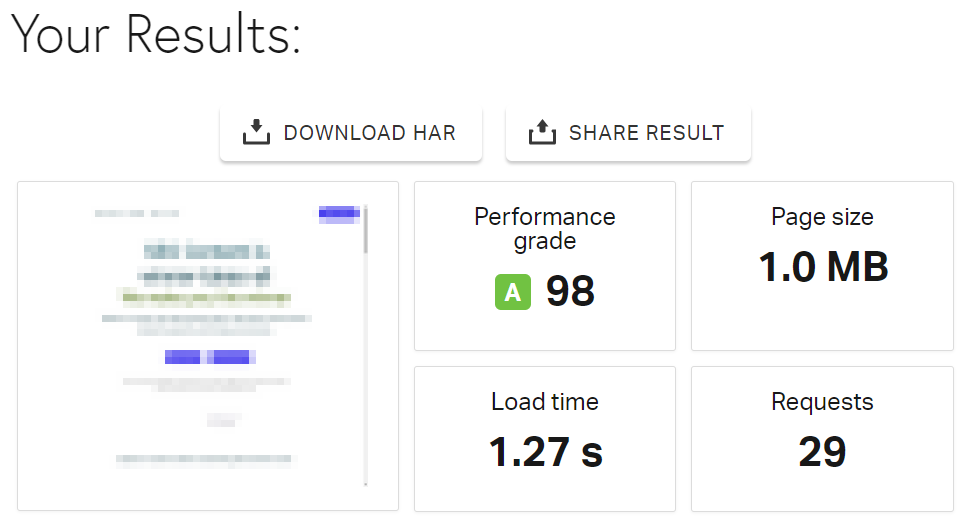
- Assess page load time: Visitors expect pages to load almost instantaneously, and any delay might lead them to abandon your site. To assess page load time, use online tools like GTmetrix or Google PageSpeed Insights. These tools provide valuable insights into the performance of your site and highlight areas that need improvement.

- Observe bounce rates: A high bounce rate can indicate that visitors are leaving your site soon after arriving. Slow-loading pages are a common culprit behind this problem. By analyzing your website’s bounce rate, you can gauge if there is a correlation between slow load times and visitors leaving prematurely.
- Monitor server response time: Server response time refers to the time it takes for your web server to respond to a user’s request. Slow server response times can significantly impact your website’s overall speed. Use tools like Pingdom or WebPageTest to check your server response time and take necessary actions if it exceeds acceptable limits.

- Test mobile responsiveness: Slow-loading pages on mobile devices can lead to a subpar user experience and affect your search engine rankings. Utilize tools like Google’s Mobile-Friendly Test to gauge your website’s responsiveness on mobile devices.
- Examine plugin impact: Unoptimized or poorly coded plugins can strain your server resources and cause delays in page loading. Regularly audit your installed plugins, deactivate any unnecessary ones, and opt for lightweight alternatives when possible.
- Troubleshoot your theme: Test your site’s speed with and without the current theme by temporarily switching to a default WordPress theme. If there’s a significant improvement in page load times with the default theme, it may suggest that your current theme is impacting your site’s speed.
- Use an Application Performance Monitoring tool: Larger, more complex sites can benefit from an APM tool, such as New Relic or Datadog, which will enable you to closely track server and database performance, identifying potential bottlenecks and areas for speed optimization. These tools allow you to set up alerts to receive notifications for performance thresholds, which can help you identify issues and maintain optimal site speed on your WordPress site.
Remember, a fast site not only pleases your audience but also wins favor with search engines, potentially boosting your SEO rankings and expanding your online reach.
Improving your WordPress site’s speed: 4 key strategies
A visually stunning website is essential, but not at the cost of sluggish load times. Embrace these strategies, and your WordPress site will be well on its way to providing an engaging and lightning-fast user experience.
1. Choosing high-quality website hosting
A high-quality hosting service can significantly boost the loading speed of your site, making it a pleasurable experience for your visitors. The are various aspects of website hosting that can impact your site’s speed, such as the following, which can be catered to by top-notch hosting solutions.
Server performance and resources
The performance of your website heavily depends on the server’s capabilities and resources provided by your hosting provider. Shared hosting, although cost-effective, means you’re sharing server resources with multiple other websites. This can lead to slower load times during peak traffic hours or if other sites on the server experience spikes in activity.
On the other hand, premium hosting services, such as virtual private servers (VPS) or dedicated servers, offer dedicated resources, ensuring that your WordPress site has the processing power and memory it needs to deliver faster response times.
Data center location
The physical location of your hosting provider’s data center plays a vital role in determining your website’s speed, especially for a global audience.
If your target audience is predominantly from a specific region, selecting a hosting provider with data centers in or near that region can reduce latency and speed up your site’s loading times for local visitors.
SSL encryption
SSL (secure socket layer) encryption not only ensures the safety of your website and its users but can also improve your site’s speed.
Google and other search engines prioritize secure sites, and SSL certification is now a ranking factor. That’s why many premium hosting providers include free SSL certificates, allowing you to encrypt data and enjoy the performance benefits that come with it.
Customer support and technical expertise
Reliable customer support and technical expertise are crucial when it comes to resolving any hosting-related issues promptly. A high-quality hosting provider should offer 24/7 customer support and a team of experts to assist you whenever needed.
Swift resolution of technical problems can prevent downtime and ensure that your site maintains its optimal speed and performance.
2. Implementing caching for slow WordPress sites
WordPress, being a dynamic content management system, generates web pages on the fly for each user request. This dynamic nature, while flexible and powerful, can lead to increased server processing time and database queries, resulting in slower load times. Caching plays a crucial role here, as it can significantly reduce the number of requests reaching the server.
Caching refers to the process of storing frequently accessed data or web pages in a temporary storage area. By doing so, the server can deliver the requested content faster, as it doesn’t have to recreate the entire page every time a user visits it.
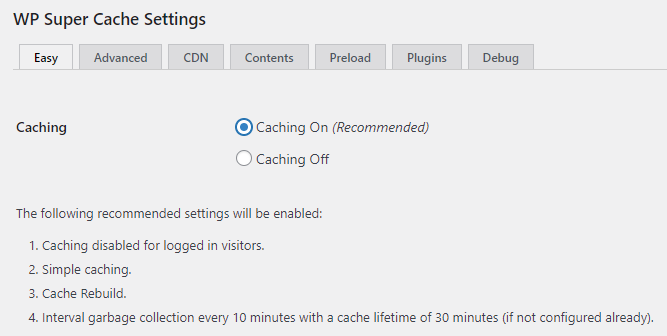
To leverage the power of caching on your WordPress site, you’ll need a reliable caching plugin. Fortunately, the WordPress ecosystem offers a plethora of caching plugins, both free and premium. Some popular options include WP Super Cache, W3 Total Cache, and WP Rocket.
3. Utilizing Cloudflare and content delivery networks (CDNs)
Integrating Cloudflare and a content delivery network with your site can be a game-changer in terms of speed and user satisfaction.
Cloudflare is a reputable content delivery and DDoS protection service that acts as a reverse proxy between your website visitors and your hosting server. It works by caching static content, optimizing images, and routing user requests through the nearest data center. As a result, Cloudflare can significantly reduce the time it takes for your website to load, leading to a faster and more reliable user experience.

On the other hand, a CDN is a network of servers distributed across various geographical locations worldwide. The primary goal of a CDN is to store and deliver static website content, such as images, CSS files, and JavaScript, from the server closest to the user’s location. This proximity reduces the data travel distance, minimizing latency and loading times.
4. Compressing and optimizing images for speed
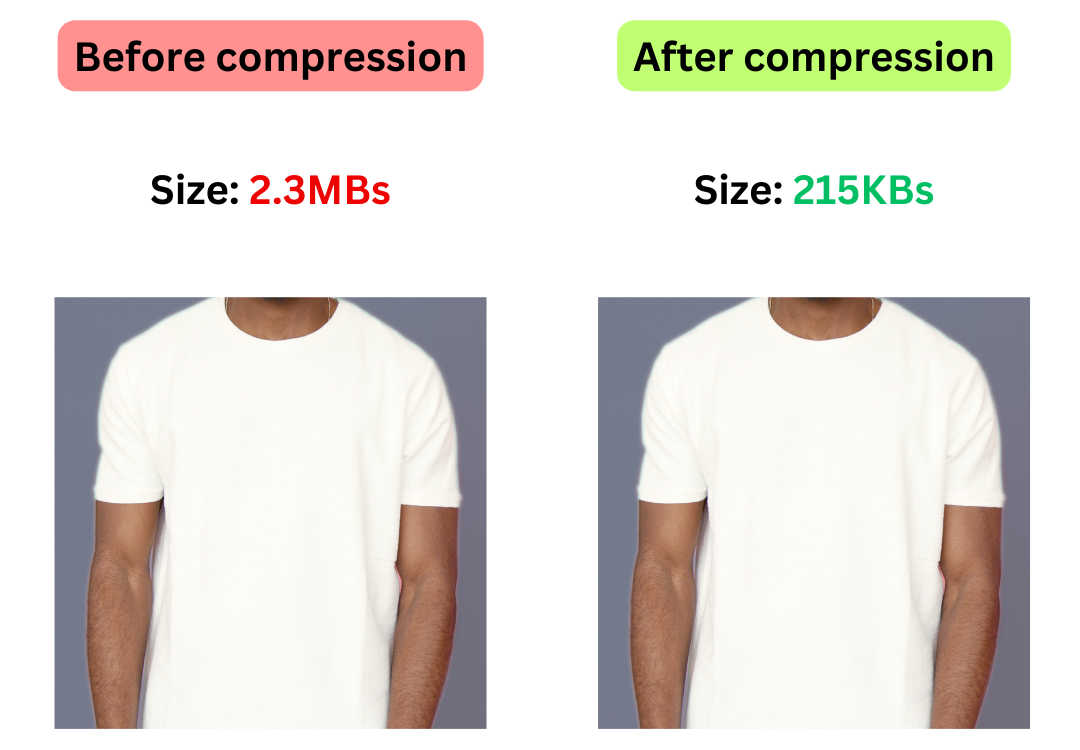
Images play a central role in modern web design, enriching content and captivating users. However, their larger file sizes can lead to sluggish website performance. When users encounter slow-loading pages, they are more likely to abandon the site, resulting in reduced engagement and conversions. Furthermore, search engines consider page load times as a ranking factor, making image optimization essential for search engine optimization (SEO).
Image compression involves reducing the file size of an image without losing its quality significantly. There are two main types of image compression techniques: lossless and lossy compression.
- Lossless compression: This technique reduces the image size without sacrificing quality. It achieves this by removing unnecessary metadata and redundancies within the image file. Common formats for lossless compression include PNG and GIF. Lossless compression is ideal for images that require pixel-perfect accuracy, such as logos and graphics, but it may not provide the best results for photographs or images with complex details.
- Lossy compression: Lossy compression further reduces file size by selectively removing some image data. While this results in a smaller file size, there is a slight loss in image quality. Formats like JPEG are commonly used for lossy compression, as they offer a good balance between size reduction and visual fidelity. To ensure the best compromise between file size and quality, it is crucial to carefully adjust the compression level based on the image content.
Additionally, you can implement these image optimization techniques and best practices:
- Choose the right format: For graphics, icons, and images with transparency, PNG format is a suitable choice due to its lossless compression. For photographs and more complex visuals, JPEG format is typically preferred. Modern image formats like WebP and AVIF offer superior compression capabilities.
- Resize images: Use image editing tools or content management systems to resize images to the exact dimensions required on your webpage. This step prevents the browser from rendering large images and automatically scaling them down, leading to unnecessary data transfer.
- Utilize responsive images: Implement responsive design techniques to serve different image sizes based on the user’s device and screen resolution. This prevents mobile users from downloading unnecessarily large images meant for desktop displays.
Tools like TinyPNG/TinyJPG, ImageOptim, Compressor.io, Kraken.io, and Gzip are excellent tools available for compressing and optimizing images to improve website speed.
5. Limiting ads and scripts across the site
Excessive ads and scripts can significantly contribute to a slower website loading time. Each additional ad or script requires additional server requests and resources, leading to increased page load times. To make sure your WordPress site is running at its peak capacity, it’s important to carefully assess each ad and script running on your page, and whether they are necessary for your site.
For example, you could consider reducing the number of ads displayed on a single page while prioritizing those that contribute the most to your revenue or user engagement. Additionally, regularly audit and eliminate unnecessary scripts that might be slowing down your site. Minimizing the use of third-party scripts and only integrating essential ones can do wonders for your site speed, which may well prove the remedy to your slow WordPress site.
6. Lazy loading large image, video and audio files
Implementing lazy loading for large media files is another great strategy to further improve your WordPress site speed. Lazy loading involves loading images, videos, and audio files only when they come into the user’s viewport rather than loading all media content simultaneously when the page loads.
By adopting lazy loading, you can significantly reduce initial page load times, as the browser will load media files on-demand as users scroll down the page. This approach minimizes the amount of data transferred during the initial page load, providing a faster and more seamless user experience.
To enable lazy loading in WordPress, you can utilize plugins like WP Rocket or Jetpack. More technically-minded users can implement lazy loading manually by adding attributes to their HTML code or by using JavaScript libraries designed for this purpose.
7. Disabling unused plugins
Every plugin installed on your WordPress site introduces additional code and functionality. While well-crafted plugins can be efficient and well-optimized, others may not be as streamlined, leading to slower page loading times and decreased performance.
Additionally, plugins can sometimes conflict with each other, causing errors or unexpected behavior that can adversely affect the user experience. Even inactive plugins can present security risks. Even though they are not currently active, they still reside on your server, and if left unattended, they might become susceptible to vulnerabilities.
By taking the time to disable unused plugins, you can significantly improve your WordPress site’s performance, security, and user experience. A leaner website with only the necessary plugins will load faster, function more smoothly, and be less vulnerable to security breaches.
Always back up your site before making any changes, and be proactive in performing regular plugin maintenance.
8. Using HTTPS to improve site speed
The adoption of HTTPS, the secure version of HTTP, is no longer a mere suggestion – it’s a necessity.
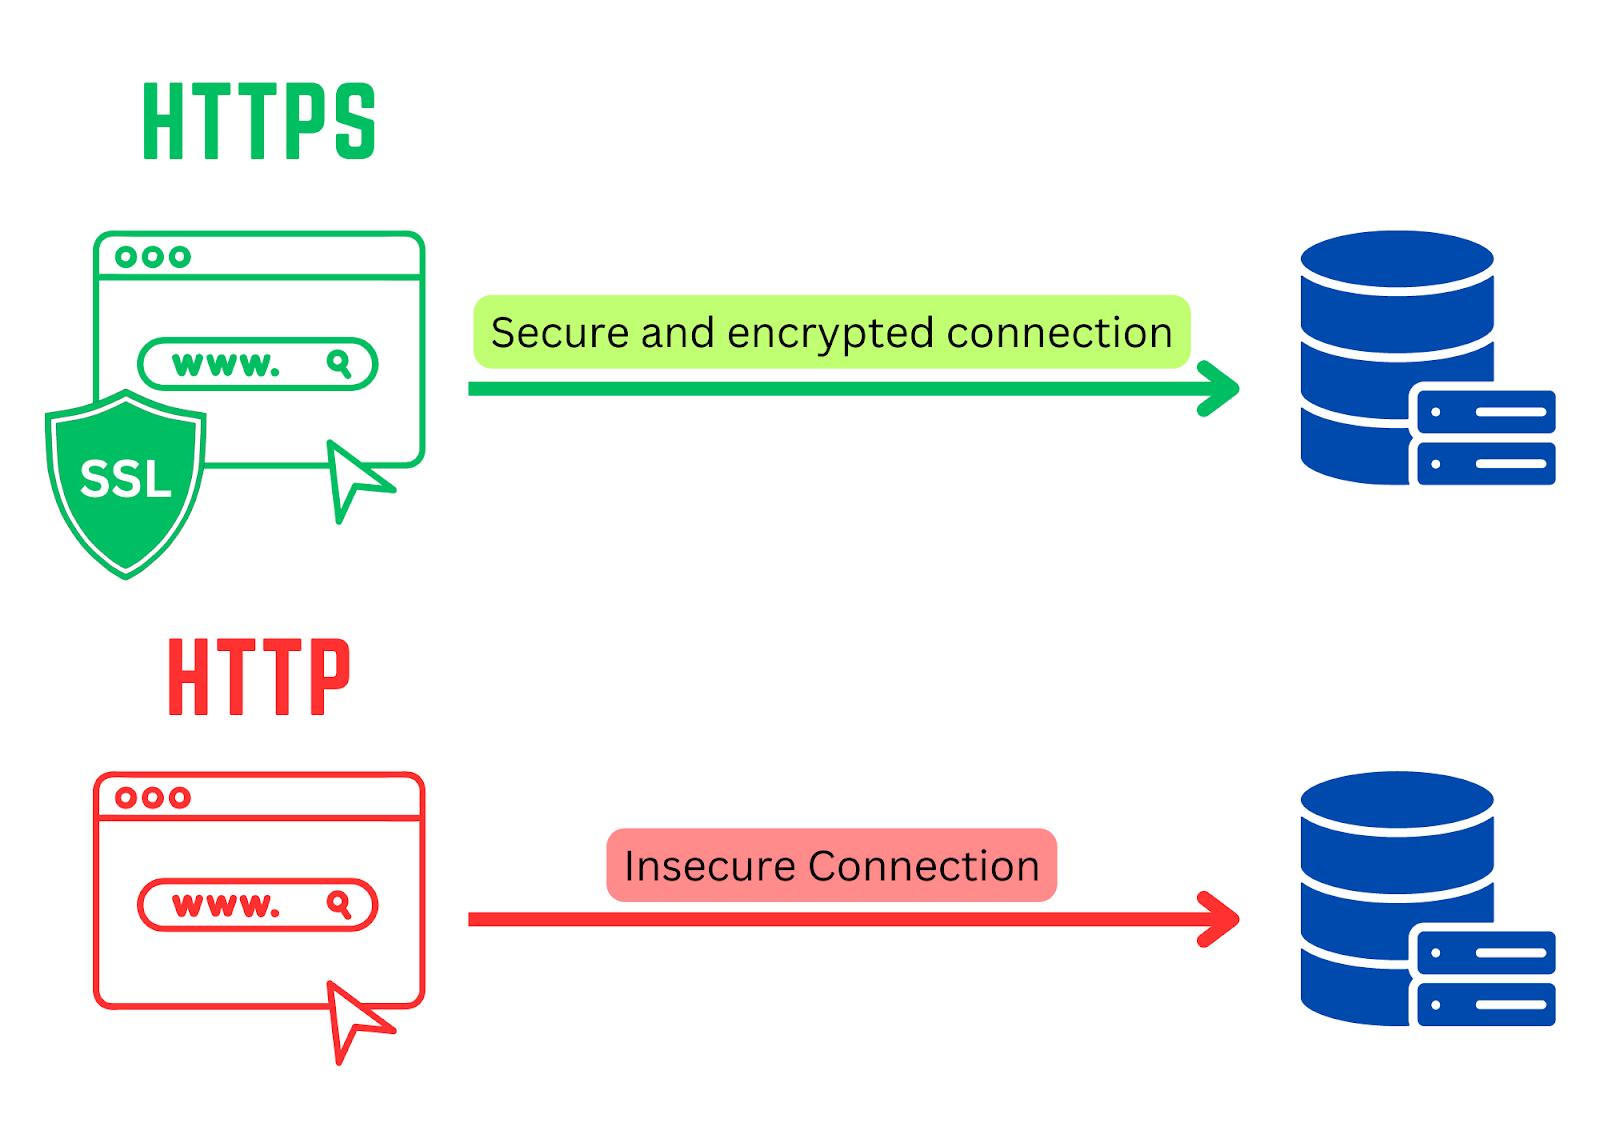
Beyond security benefits, HTTPS can significantly impact the speed and performance of WordPress sites. Here’s why:
- SSL handshake and connection time: HTTPS relies on SSL or transport layer security (TLS) protocols to encrypt data transmitted between the server and the user’s browser. While SSL handshakes can add negligible overhead during the initial connection, it establishes a secure and encrypted channel, ensuring minimal impact on website performance.
- HTTP/2 protocol support: Implementing HTTPS opens the door to HTTP/2 support, the latest version of the HTTP protocol. HTTP/2 significantly improves website speed by allowing multiple resources to be loaded simultaneously over a single connection. This feature, known as multiplexing, drastically reduces latency and speeds up the rendering of web pages.
- Search engine optimization (SEO): Google, the leading search engine, encourages the adoption of HTTPS by using it as a ranking factor. Websites that utilize HTTPS are more likely to rank higher in search results. Since site speed is also a critical factor in search engine rankings, combining HTTPS with other performance optimization techniques can give your WordPress site a competitive edge.
Migrating from HTTP to HTTPS may require some initial effort, but the resulting improvement in speed and user experience makes it well worth the investment.
9. Optimizing your WordPress database
WordPress databases can accumulate unnecessary data over time, leading to slower performance. You can optimize your database by:
- Deleting spam comments: Regularly clear out spam comments that may clog your database.
- Removing unused plugins and themes: Uninstall plugins and themes that you no longer use.
- Cleaning post revisions: Limit the number of post revisions saved in the database.
- Optimizing database tables: Use plugins like WP-Optimize or WP-Sweep to optimize your database tables.
FAQs about slow WordPress websites
For WordPress website owners, encountering performance issues is not uncommon, and there are often many questions surrounding this concern.
Is my WordPress theme causing the slowdown?
Your WordPress theme can indeed impact your website’s speed.
Opt for lightweight and well-coded themes, preferably those specifically designed for performance. Switching to a different theme and retesting your website’s speed can help identify if the theme is the cause of the slowdown.
Will using too many plugins slow down my WordPress website?
Yes, using an excessive number of plugins can slow down your WordPress website.
Each plugin adds extra code and functionality, increasing the processing load on your server. It’s essential to choose and use only necessary tools and ensure they are well-coded and regularly updated.
Remove any unused or redundant plugins to optimize your website’s performance.
Can a poorly coded theme affect my website’s speed even if it’s lightweight?
Yes, a poorly coded theme can still impact your website’s speed even if it claims to be lightweight. While a lightweight theme can be beneficial for performance, poorly optimized code can introduce inefficiencies that slow down your site.
Choose themes from reputable developers known for producing optimized and well-coded designs.
How often should I monitor my website’s speed and performance?
Regular monitoring is essential to maintain optimal website performance. Consistent monitoring helps you detect and address any performance issues promptly.
It’s best to monitor your website’s speed at least once a week, especially after making significant changes, such as installing new plugins or updating your theme.
Can a slow internet connection affect my perception of my website’s speed?
Yes, your internet connection can influence your perception of your website’s speed. If you have a slow internet connection, it may take longer to load websites, including your own.
Therefore, it’s essential to test your website’s speed using various tools and on different devices to get a more accurate assessment of its performance.
Why is my local WordPress install slow?
A slow local WordPress install can be down to bad server configurations, inadequate hardware resources, unoptimized plugins or themes, or even database clutter.
To speed up your local WordPress install, make sure that server settings are correctly configured, allocate sufficient resources, optimize code, and regularly clean the database. You can also choose lightweight themes and plugins to speed up your local development environment.
Speed up your WordPress website with Codeable
Having a fast-loading website is paramount for success. Whether you run a personal blog or a WooCommerce store, visitors demand swift and seamless browsing experiences, which can sometimes be hindered by various factors like poor WordPress hosting, unoptimized images, heavy themes or plugins, and more.
The speed of your website directly impacts user experience, search engine rankings, and overall online visibility.
This can be a daunting obstacle to tackle if you aren’t tech-savvy. However, there is a solution that can help you optimize your WordPress website’s speed and performance – Codeable!
Codeable is a leading platform that connects website owners with a pool of over 700+ talented WordPress experts. Unlike traditional development agencies, Codeable boasts a handpicked team of seasoned WordPress developers, each vetted for their expertise and experience.
The benefits of harnessing Codeable for all your WordPress and WooCommerce projects are endless, including:
- Expert consultation: After submitting your project details, you receive personalized recommendations and an estimated timeframe for completion. Codeable’s experts guide you through the entire process and answer any questions you might have.
- Customized solutions: Codeable’s developers tailor solutions to your specific needs. This personalized approach ensures that the optimizations made align with your website’s unique requirements.
- Plugin and theme audit: Codeable’s developers conduct thorough audits to identify and replace any problematic elements.
- Performance-focused coding: Codeable’s developers optimize the codebase of your WordPress site to improve loading times and overall responsiveness.
- Time and cost-effective: By working with Codeable, you gain access to skilled developers without the overhead of hiring an in-house team or committing to long-term contracts.
- Guaranteed results: Codeable’s developers are committed to delivering tangible speed improvements, providing you with peace of mind.
Say goodbye to loading lags and embrace a faster, more efficient online presence with Codeable’s top-notch speed optimization services. Submit your task and leverage the prowess of Codeable today to transform your WordPress website into a blazing-fast digital powerhouse!
 Dream It