
Elementor is the leading page builder for WordPress users who want control over design without touching code. Its drag-and-drop tools and built-in widgets make it easy to build clean, responsive layouts. But for sites that go beyond the basics, custom widgets might be necessary.
Custom Elementor widgets open the door to advanced features – dynamic content blocks, interactive UI components, API integrations, and third-party data displays. These tools help sites do more than just look good; they create functionality tailored to specific goals, from pulling in live sports scores to displaying user-generated content in real time.
That said, building complex widgets isn’t a beginner’s task. A sloppy widget can slow down performance or introduce security risks.
For custom work that’s fast and secure, expert help from a platform like Codeable makes a difference.
If you’re still interested in learning how to do it yourself, though, we’ve got you covered!
Understanding Elementor’s widget architecture
To build a custom Elementor widget, you need to understand how Elementor structures its components.
At the core, every widget is a PHP class that extends \Elementor\Widget_Base. This base class provides the foundation for defining how the widget appears in the editor and how it behaves on the frontend.
Each widget class typically includes the following methods:
- get_name() returns the unique internal name of the widget.
- get_title() sets the display name shown in the Elementor editor.
- get_icon() defines the icon used for the widget in the editor panel.
- register_controls() registers the widget’s settings and input fields.
- render() outputs the HTML shown on the frontend.
- render_plain_content() provides a stripped-down version for plain text or fallback use.
A clear file structure is arguably just as important as functionality. The plugin should have a main entry file that registers the widget with Elementor and loads dependencies.
Each widget should live in its own class file, and all related assets – JavaScript, CSS, images – should be organized into dedicated folders.
Use namespaces to avoid class name conflicts and ensure your widget integrates cleanly with other plugins.
Proper autoloading, typically using PSR-4 standards, allows the plugin to load classes automatically without manual includes.
Setting up your development environment
A disciplined environment helps avoid common pitfalls like hardcoded paths, missing dependencies, or inconsistent file structures.
Start with a local WordPress installation – tools like Local, DevKinsta, or XAMPP work well. When it’s up and running, install Elementor Pro, as many widget-related hooks and APIs are only available in the Pro version.
Use a modern code editor like Visual Studio Code. It offers syntax highlighting, extensions for PHP and WordPress, and Git integration. Set up a PHP debugger (such as Xdebug) to step through code and catch issues early.
Install WP-CLI for efficient WordPress command-line management – handy for tasks like activating plugins or resetting the database. Use Git for version control, especially when working in a team or planning future iterations.
To save time and enforce best practices, install Elementor’s plugin boilerplate or use a scaffolding tool like Elementor Custom Widget Generator. These tools create a structured starting point with the required class files, asset directories, and loading mechanisms already in place.
Step-by-step guide to creating your first custom widget
Let’s create a custom CTA widget that we’re going to add to our website as a custom plugin.
Step 1: Define the plugin structure
Before writing any code, you need to organize your files properly:
- Create a folder named custom-cta-widget.
- Inside it, create a file named custom-cta-widget.php – this will be your main plugin file.
- Create a subfolder named widgets inside the plugin folder.
- Inside the widgets folder, create a file named class-cta-widget.php to hold your widget class.
Step 2: Set up the main plugin file
Next, create the main plugin file that WordPress will recognize and activate. This file also handles loading your widget class and registering it with Elementor so it becomes available in the editor:
- Open custom-cta-widget.php.
- Add the standard plugin header at the top to identify your plugin to WordPress:
<?php/*** Plugin Name: Custom CTA Widget* Description: A simple CTA box widget for Elementor.* Version: 1.0.0* Author: Your Name*/if ( ! defined( 'ABSPATH' ) ) exit;Create a function to load your widget class and register it with Elementor’s widget manager:function cta_widget_load() {require_once __DIR__ . '/widgets/class-cta-widget.php';\Elementor\Plugin::instance()->widgets_manager->register_widget_type( new \CustomCTAWidget\CTA_Widget() );}add_action( 'elementor/widgets/register', 'cta_widget_load' );
Step 3: Create the widget class
This is the core of your custom widget. You define the widget’s identity, controls (settings users can change), and the output it generates on the page:
- Open widgets/class-cta-widget.php.
- Add the following PHP code, which defines your widget by extending Elementor’s base widget class:
<?phpnamespace CustomCTAWidget;use Elementor\Widget_Base;use Elementor\Controls_Manager;if ( ! defined( 'ABSPATH' ) ) exit;class CTA_Widget extends Widget_Base {public function get_name() {return 'custom_cta';}public function get_title() {return 'Custom CTA Box';}public function get_icon() {return 'eicon-call-to-action';}public function get_categories() {return [ 'basic' ];}protected function register_controls() {$this->start_controls_section('content_section',['label' => 'Content','tab' => Controls_Manager::TAB_CONTENT,]);$this->add_control('headline',['label' => 'Headline','type' => Controls_Manager::TEXT,'default' => 'Your Headline Here',]);$this->add_control('description',['label' => 'Description','type' => Controls_Manager::TEXTAREA,'default' => 'Your description text goes here.',]);$this->add_control('button_text',['label' => 'Button Text','type' => Controls_Manager::TEXT,'default' => 'Click Me',]);$this->add_control('button_url',['label' => 'Button URL','type' => Controls_Manager::URL,'default' => ['url' => '#'],]);$this->end_controls_section();}protected function render() {$settings = $this->get_settings_for_display();$button_url = !empty($settings['button_url']['url']) ? $settings['button_url']['url'] : '#';echo '<div class="custom-cta-box">';echo '<h2>' . esc_html($settings['headline']) . '</h2>';echo '<p>' . esc_html($settings['description']) . '</p>';echo '<a href="' . esc_url($button_url) . '" class="custom-cta-button">' . esc_html($settings['button_text']) . '</a>';echo '</div>';}}
This code might look intimidating at first, but its functionality is pretty straightforward:
- The methods get_name(), get_title(), get_icon(), and get_categories() define how your widget is identified and categorized inside Elementor.
- register_controls() sets up editable fields (controls) that users see in the Elementor editor.
- render() outputs the HTML that displays on the live site, using the user’s input safely escaped for security.
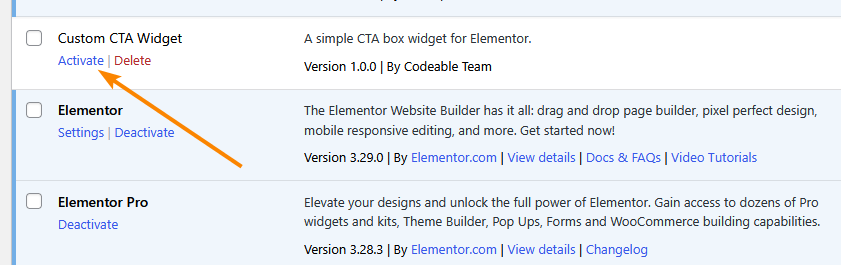
Step 4: Activate and test the widget
Once your code is ready, install and activate your plugin in WordPress, then test the widget inside Elementor:
- Upload the custom-cta-widget folder to your WordPress plugins directory (wp-content/plugins) or zip and install it via the admin panel.
- Activate Custom CTA Widget from the plugins menu.
- Open a page with Elementor and locate Custom CTA Box in the Basic category.
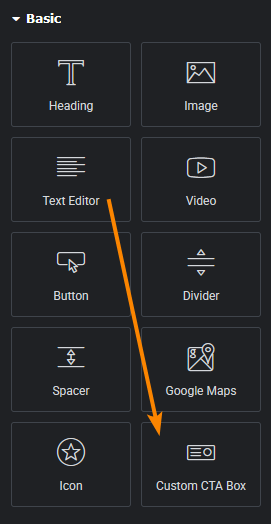
- Drag it onto your page and customize the content in the editor.
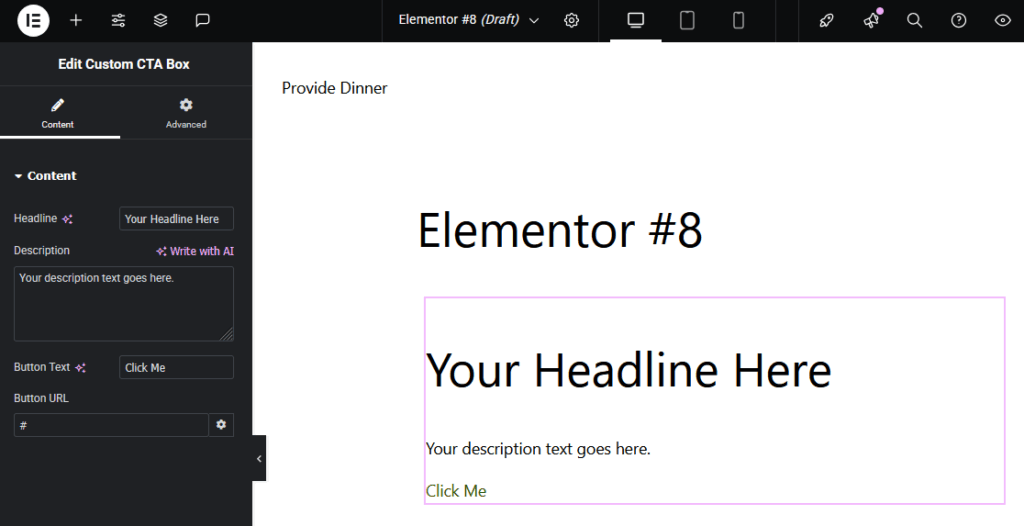
💡 To make your widget responsive across all devices, use responsive controls, like add_responsive_control(), which allow users to set different values for desktop, tablet, and mobile. Combine this with CSS media queries to adjust styles accordingly.
Best practices for efficient and maintainable widget development
Building Elementor widgets goes beyond just extending Widget_Base; to craft high-performing, maintainable components:
- Encapsulate logic inside helper classes to separate rendering from business logic, making your widget class leaner and easier to test or extend. This keeps rendering methods focused solely on output, improving clarity and scalability.
- Register controls conditionally when they depend on external data or settings to reduce unnecessary editor load and avoid user confusion. This can be done inside register_controls() using early return logic or config checks.
- Load assets only when needed by using Elementor’s $this->add_render_attribute() and elementor/frontend/after_enqueue_scripts hooks to enqueue CSS or JS per widget. This keeps frontend performance optimized and avoids redundant script loads.
- Use dynamic tags and integrations when applicable to support Elementor’s broader ecosystem, including custom fields, shortcodes, or WooCommerce data. This enhances widget flexibility without bloating the base code.
- Localize scripts properly using wp_localize_script() to pass PHP data to JavaScript, instead of hardcoding inline data or relying on global JS variables. It keeps your code modular and more secure.
- Respect Elementor’s data sanitization flow by using esc_html(), wp_kses_post(), and sanitize_text_field() consistently in output and input. This prevents injection vulnerabilities and ensures your widget remains secure across updates.
Debugging and troubleshooting common issues
Here are some issues you might encounter when building a custom Elementor widget and how to address them:
- Widgets not appearing in the editor usually mean the widget isn’t properly registered or the main plugin file fails to load it. Confirm your widget class is correctly included, namespaced, and hooked into widgets_registered.
- JavaScript errors or layout issues often come from loading assets globally or conflicting scripts. Enqueue CSS and JS only when needed using elementor/frontend/after_enqueue_scripts and namespace your scripts to avoid clashes.
- Settings panels that won’t save often result from missing unique control IDs or insufficient sanitization. Ensure every control has a unique name and use Elementor’s sanitization callbacks for user inputs.
For stronger debugging workflows, here are a couple of things you should do:
- Use tools like Query Monitor and Debug Bar to track PHP errors, database queries, and hooks affecting your widget. Combine these with browser dev tools to spot CSS or JavaScript problems on the frontend.
- Check compatibility with Elementor updates and PHP versions by testing in staging environments or with Docker. This catches deprecated functions or breaking changes before they affect users.
- Use Xdebug or another PHP debugger alongside browser dev tools and WP-CLI. This setup lets you quickly pinpoint issues during development.
Packaging and distributing your custom Elementor widget
Packaging your Elementor widget as a standalone plugin is the key to reusing, sharing, or selling it:
- Organize your widget code into a proper WordPress plugin structure, including a main plugin file that registers your widget and loads all necessary assets and classes.
- Create a detailed readme.txt file that explains the plugin’s purpose, installation steps, features, and includes a changelog to help users and meet public distribution standards.
- Use semantic versioning (e.g., 1.0.0) to clearly track updates and maintain compatibility across releases.
- If distributing publicly, follow the WordPress Plugin Repository guidelines closely, ensuring your code meets security, licensing, and quality requirements.
- Set up automated testing with unit and integration tests to verify functionality and prevent regressions during future development.
- Implement continuous integration (CI) using tools like GitHub Actions or Travis CI to run your tests automatically on each code change.
- Package all plugin files, assets, and dependencies into a single folder, making installation and updates straightforward for users.
- Regularly update your documentation and version numbers with each release to keep users informed and maintain a professional project workflow.
When to hire an expert Elementor widget developer
It might be better to get help from an expert if your custom Elementor widget:
- Requires complex integrations, such as connecting to external APIs, pulling dynamic data from third-party services, or syncing with platforms like CRMs or payment gateways.
- Needs to handle heavy data processing, optimize load speed under high traffic, or include custom animations and interactive features beyond Elementor’s standard options.
- Must work well with other plugins or customized themes without causing conflicts, ensuring compatibility and stability across your site.
Poorly coded widgets can introduce serious risks. Security vulnerabilities are common when input sanitization and data validation are overlooked, exposing your site to potential hacks or data breaches.
Conflicts arise if scripts and styles aren’t properly enqueued or namespaced, which can break your site’s layout or functionality.
Inefficient code leads to slow page load times and increased server resource usage, harming user experience and search rankings.
An expert developer writes secure and optimized code that prevents these issues and supports future updates without breaking existing functionality.
In short, if your widget needs exceed basic customization or require solid performance and security, hiring a seasoned Elementor developer from a platform like Codeable is a smart investment.
Skip the learning curve: Partner with Codeable’s Elementor experts for your widget needs
Custom Elementor widgets offer incredible power to create truly unique WordPress sites tailored to your exact needs.
But mastering widget development and executing complex, high-quality solutions is no easy task – it requires significant time, skill, and ongoing effort.
Starting small is smart for learning the basics, but as your projects grow or demand advanced features, the learning curve can quickly become overwhelming and costly in time and resources.
Skip the learning curve by partnering with experts who already have the deep knowledge and experience to deliver flawless, secure, and optimized widgets without the trial and error.
Codeable connects you with vetted Elementor developers who have proven their expertise, so you can avoid common pitfalls and costly mistakes.
Submit your first project today and accelerate your path to a standout website!

20 000+ businesses of every shape and size have already trusted us to hire WordPress developers and scale their growth.
 Dream It