Webflow initially dazzles with its sleek design tools and visual editor, drawing in users who crave creative freedom without a single line of code. But as your site grows, the cracks in its foundation begin to show: limited customization, constrained scalability, and an ecosystem that feels more gated than open. Add to that the platform’s recent price hikes, and the shine of Webflow starts to fade.
Enter WordPress – a powerhouse that offers design flexibility and a vast array of tools to build, optimize, and grow your site without compromise. With WordPress, you’re given a solid foundation for everything from SEO to eCommerce to advanced functionalities, all while maintaining full ownership of your digital real estate. Switching from Webflow to WordPress is an undeniable upgrade. Let’s talk about how to make it happen.
Can you convert a Webflow site to WordPress?
Let’s start by tempering expectations. Converting a Webflow site to WordPress is a hassle, full stop. Webflow’s a walled garden by design – they lock you in because that’s how they make money.
The most reliable way to get an exact replica of your site in WordPress is through a manual 1:1 rebuild. If your design is intricate – think animations, dynamic elements – you’ll probably need tools like React to even come close. It’s time-consuming, technical, and not something you want to do yourself unless you’re a pro.
The smarter move is to hire a WordPress expert through a platform like Codeable to handle the rebuild. They’ll recreate your site properly, without the headaches.
Your other option is to export your Webflow content and start fresh in WordPress with a new design. It’s less expensive, but obviously, it won’t be a pixel-perfect clone. We’ll walk through how to approach that in the next section.
How to migrate from Webflow to WordPress
Migrating from Webflow to WordPress involves exporting your content from the old platform and importing it into the new one. Let’s cover the exact steps you’ll need to go through:
Before you start: pre-migration checklist
- SEO preservation: Document your current URL structure before touching anything. If any slugs will change during migration – for example, from /blog/post-name to /post-name – note them now. You’ll need to set up 301 redirects in WordPress using a plugin like Redirection. A 301 redirect preserves link equity and signals Google that a page has permanently moved.
- Asset backup: Save a Webflow backup via Site Settings → Backups, then manually download your images from Webflow’s asset manager. CSV exports link to Webflow-hosted image URLs rather than downloading the files themselves – if your Webflow hosting lapses, those links will break.
- Forms and interactions: Webflow’s native forms and custom interactions won’t function after migration. Identify any forms on your site now and plan their WordPress replacements – WPForms is the standard go-to for most setups.
Step 1: Set up your WordPress hosting environment
Before you can migrate your site, you need to choose the right hosting environment. The decision largely depends on your site’s traffic, growth trajectory, and resource needs.
If your site is outgrowing Webflow’s limitations and experiencing a surge in traffic, basic shared hosting won’t cut it. You’ll need a hosting solution that scales with you: VPS (Virtual Private Server) or dedicated WordPress hosting.
VPS hosting offers a balanced mix of performance, flexibility, and cost-effectiveness, giving you dedicated resources and more control over server configurations.
For even higher traffic or mission-critical sites, managed WordPress hosting, from providers like Kinsta or WP Engine, provides premium performance, automatic scaling, and enhanced security without the hassle of server management. These providers are purpose-built for WordPress and optimized for speed and reliability, making them ideal for serious site owners.
On the other hand, if you’re early in your WordPress journey and simply want more customization than Webflow allows, shared hosting could suffice. Look for plans with easy upgrade paths, as your hosting needs may escalate quickly.
Step 2: Choose your WordPress theme
Free themes like Kadence are excellent for beginners and site owners who need something fast, flexible, and easy to customize. They provide just enough functionality without bogging down performance.

If design continuity is a priority, custom WordPress theme development is the route to take. A skilled developer can build a WordPress theme that mirrors your existing Webflow aesthetic – worth the investment when brand consistency is non-negotiable.
Step 3: Export your content from Webflow
Fortunately, Webflow offers built-in tools to export site data, but the process isn’t entirely seamless. You’ll primarily export content like blog posts, pages, and collections, but be prepared for some manual adjustments post-import.
Start by exporting your Webflow CMS content as a CSV file. Navigate to Webflow’s CMS Collections and use the export feature. This will give you a structured file containing your posts, titles, body content, categories, and tags. Keep in mind, however, that Webflow won’t export dynamic elements like sliders, custom layouts, or images embedded in rich text fields. You’ll need to manually re-upload those later.
It’s also worth noting that custom Webflow designs won’t transfer over, so you’ll need to recreate those within your WordPress theme or via a page builder like Elementor if you want to keep them.
Step 4: Import your content into WordPress
After exporting your content from Webflow, the next step is importing it into WordPress. You have two main options: manual migration or using content migration tools. Manual migration involves copying and pasting content page by page, which is time-consuming and error-prone but offers full control over formatting. On the other hand, content migration tools streamline the process and are far more efficient.
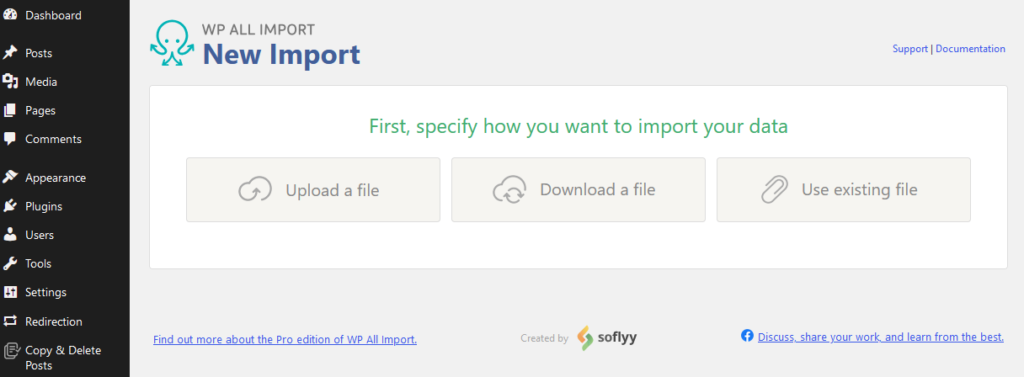
The WP All Import plugin is widely regarded as one of the best tools for content migration. It’s versatile, allowing you to import data from CSV or XML files, and it gives you full control over how your data is mapped to WordPress fields.
Here’s how to use it:
- Go to Plugins > Add New from your WordPress dashboard and search for WP All Import. Install and activate it.
- Upload your CSV: Open the plugin from All Import on the dashboard, then click on Upload a file, and select the CSV file you exported from Webflow.
- Map your fields: Use the drag-and-drop interface to match Webflow fields to WordPress fields – for example, drag the post body to Post Content and post title to Post Title.
- Once mapping is complete, run the import process. The plugin will automatically populate your WordPress database with the content.
- Fix your images: Webflow hosts images on its own CDN, so after importing, those image URLs break in WordPress. Install the Auto Upload Images plugin – it scans your imported posts for external image URLs, downloads them to your WordPress media library, and updates all links automatically.
After importing, check your site thoroughly. Look for broken links, missing images, or formatting issues. Address these promptly to ensure a seamless transition.
You might also encounter tools like Udesly Nexus, a tool that converts Webflow exports directly into WordPress themes. Udesly Nexus works well for simpler sites without complex dynamic elements or custom interactions – for those builds, it’s a reliable option. For more complex sites, manual migration gives you greater control over the final result.
Pinegrow is a professional-grade alternative that converts exported Webflow HTML directly into a fully functional WordPress theme with PHP support – a strong fit if you want to preserve your existing code without routing everything through a third-party web app.
For most users, sticking with WP All Import is the safest, most reliable way to migrate your content. It minimizes errors, saves time, and allows you to focus on refining your WordPress site.
Step 5: Configure your permalinks and point your domain to your WordPress website
Once your content is safely migrated, it’s time to get your URLs and domain aligned. This step ensures visitors can find your content and that search engines know where your pages now live.
Properly configuring permalinks and pointing your domain helps maintain your SEO rankings, avoids broken links, and provides a polished, professional experience. Let’s break it down into actionable steps.
Start by setting up your permalinks. Permalinks define your URL structure, which impact SEO and user experience. Here’s how to set them up:
- Go to Settings > Permalinks in your WordPress dashboard.
- Select the Post Name option for SEO-friendly URLs.
- Save the changes.
Use a plugin like Redirection to set up redirects for any old URLs from Webflow to prevent broken links and maintain SEO continuity.
- Resubmit your sitemap: After your DNS switch is complete, log into Google Search Console and resubmit your sitemap (typically found at yourdomain.com/sitemap.xml). This tells Google where your new WordPress pages live and speeds up reindexing.
- Check for broken internal links: Run a quick crawl using Screaming Frog or the free Broken Link Checker plugin. Any internal links pointing to old Webflow URLs that haven’t been redirected will return 404 errors – catch and fix them before they dent your rankings.
Next, point your domain to your new WordPress site. This ensures users can find your site at the correct web address. It also lets you maintain your SEO rankings and brand consistency. Here’s how to do it:
- Log in to your WordPress hosting provider and find the DNS settings to get the A record (IP address) and CNAME record if applicable.
- Access your domain registrar and update the A record to point to your hosting provider’s IP address.
- Modify the CNAME record for the www subdomain if required, following your host’s instructions.
- Wait a few hours for the DNS changes to propagate globally.
Once propagation completes, visit your domain to confirm it’s live and loading your WordPress site. Double-check for any broken links or missing assets.
Troubleshooting common migration issues
Broken images after import: If the Auto Upload Images plugin doesn’t catch everything, re-upload missing files via the WordPress media library and update the relevant posts. If broken images appear across many posts, check that your Webflow hosting is still active – source URLs need to be live for the plugin to fetch the files.
Permalink conflicts: If pages return 404 errors after migration, go to Settings → Permalinks and click Save Changes without modifying anything. This flushes the rewrite rules and typically resolves the issue immediately.
Plugin activation errors: If a plugin fails to activate or causes a white screen, deactivate it and check PHP compatibility. Most modern WordPress plugins require PHP 7.4 or higher – your hosting provider can confirm and upgrade if needed.
Ready to migrate? Get expert WordPress help from Codeable
Converting your Webflow site to WordPress can be as straightforward or as complex as you want it to be.
A poorly executed migration risks broken functionality, lost traffic, and endless troubleshooting. Investing in expertise ensures your WordPress site is migrated properly, set up for ongoing maintenance, and long-term growth from day one.
One caveat for ecommerce users: if your Webflow site sells products, the migration is materially harder than a content-only move. You’re not just transferring pages – you’re moving product catalogs, customer records, order history, and (for subscription stores) recurring billing data and payment tokens. WP All Import won’t handle most of that, and a botched ecommerce migration can mean lost orders, broken checkouts, or customers locked out of their accounts.
For this case, Codeable runs dedicated WooCommerce Migration Packages with fixed pricing tiered by complexity – from small stores under 100 SKUs through to enterprise migrations covering marketplaces, B2B, and subscription continuity. Every package includes a free upfront assessment, SEO-preserving redirects, and post-launch training, which matter more for ecommerce than they do for a content site.
Whichever migration route you choose, working with an expert from a platform like Codeable ensures the transition is efficient, professional, and tailored to your needs. An expert saves you hours of frustration and ensures the underlying code is optimized for performance, scalability, and SEO.
When you’re ready to start your new life with WordPress, submit your project to Codeable and get matched with an expert!
Frequently asked questions
Is WordPress better than Webflow for growing sites?
For most growing sites, yes. WordPress gives you full ownership of your hosting, codebase, and data. Its plugin ecosystem is vastly larger, making it easier to add functionality as your needs evolve – from eCommerce to membership sites to advanced SEO tools. Webflow is excellent for smaller, design-focused sites, but its pricing tiers and ecosystem limitations tend to create friction as traffic and complexity grow.
How long does a Webflow to WordPress migration take?
It depends on site size and complexity. A content-only migration using WP All Import can be wrapped up in a day or two. A full 1:1 rebuild with custom theme development typically takes one to four weeks depending on scope. Budget additional time for post-migration tasks: image fixes, 301 redirect setup, and SEO verification.
Do I need a developer to migrate from Webflow to WordPress?Not necessarily. If you’re comfortable with WordPress basics, the steps in this guide are manageable to do yourself. But if you want to preserve your Webflow design, build custom functionality, or simply want the transition done cleanly without the risk of broken code, working with a vetted WordPress developer through a platform like Codeable is the smarter investment.

20 000+ businesses of every shape and size have already trusted us to hire WordPress developers and scale their growth.
 Dream It