CSS plays a vital role in shaping the visual aspects of web pages, controlling everything from colors to layouts. In WordPress, themes typically handle CSS, providing the overall design for your site. However, themes don’t always offer all the customization options you might need. This is where custom CSS comes in, allowing you to fine-tune your site’s appearance beyond theme settings.
This article will guide you through the world of custom CSS in WordPress. You’ll learn why you might want to use custom CSS and how to add it to your website effectively. Whether you’re looking to make minor tweaks or significant style changes, understanding custom CSS can help you achieve the exact look you want for your WordPress site.
Why use custom CSS in WordPress? Exploring the benefits
Custom CSS expands your WordPress site’s design possibilities beyond theme limitations. Here are the key advantages:
- Branding consistency: Fine-tune colors, fonts, and layouts to precisely match your brand guidelines across all pages.
- Unique design: Modify theme elements to create a distinct look that sets your site apart from others using the same theme.
- Improved user experience: Adjust navigation menus, button styles, and content layouts to enhance site usability and user engagement.
- Mobile responsiveness: Tailor your site’s appearance for specific devices, ensuring optimal display across smartphones, tablets, and desktops.
- Performance optimization: Purge unused theme styles and streamline CSS to reduce file sizes and improve page load speed.
- Custom functionality: Add hover effects, animations, and interactive elements without relying on resource-heavy plugins.
- Plugin compatibility: Adjust plugin output to match your site’s design, ensuring a cohesive look across all features.
- Design flexibility: Make precise adjustments to padding, margins, and element positioning beyond theme customizer options.
- Accessibility enhancements: Increase color contrast, adjust font sizes, and improve form field styles to meet WCAG standards.
- Quick design fixes: Implement immediate style changes without waiting for theme updates or risking core file modifications.
- Skill development: Practice CSS techniques to gradually improve your web development proficiency.
How to add custom CSS to WordPress
Now that you’ve seen the advantages of bespoke CSS, you’re probably eager to start customizing your WordPress site’s theme.
💡 For these activities, it’s better to edit a child theme rather than the main theme directly. A child theme, as the name suggests, is a sub-theme that inherits the main theme’s look and feel. Crucially, it isn’t affected by vendor updates, so your changes aren’t undone. To create one, just search for “[your theme’s name] + child theme”, and it’ll usually be available directly from the vendor. Just install and activate it like a normal theme.
💡 Instead of waiting until you’ve written a ton of code before checking that it is correct, test each method at the very start by implementing a simple but noticeable customization, like changing the colors to something loud.
Method 1: Using the WordPress Theme Editor
The WordPress Theme Editor is a built-in tool that allows you to modify your theme’s CSS directly from the WordPress dashboard. It provides a straightforward way to customize your site’s appearance without external software.
To use the editor, follow these steps:
- From the menu on the left of your admin dashboard, go to Appearance > Editor.
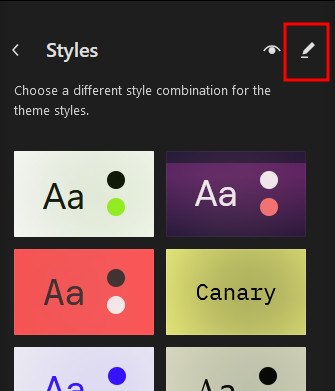
- When the editor interface opens, click on Styles from the menu on the left.
- Click the pencil icon – it should say Edit styles when you hover over it.
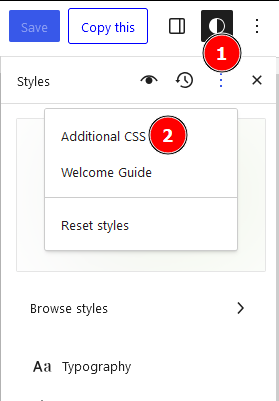
- Click on the three dots at the top right corner, then on Additional CSS.
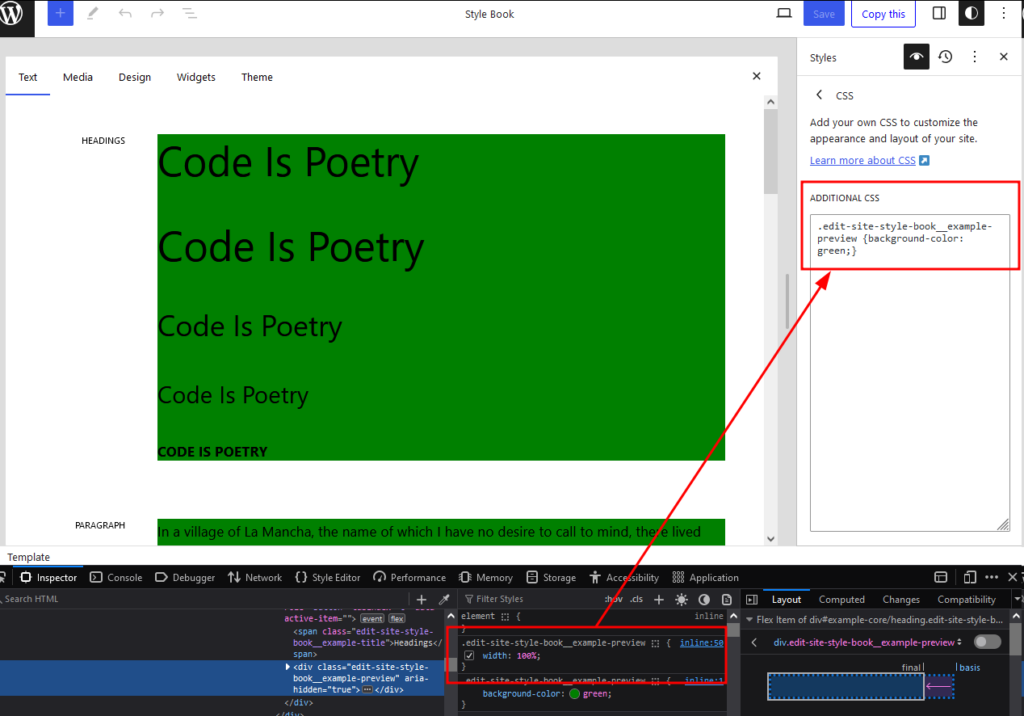
- Add the CSS you want to the text area that shows up.
💡 Use the inspection tools in your browser to find the specific class names for what you want to customize, as shown below.
- When you’re done, click on Save at the top right corner of the page.
Benefits of using the Theme Editor:
- Provides easy access to theme files directly from your WordPress dashboard.
- Offers immediate visual feedback on changes, allowing for quick adjustments.
- Eliminates the need for external software or SFTP access.
Precautions when using the Theme Editor:
- Changes made directly affect your live site, so caution is necessary.
- Incorrect modifications can break your site’s layout or functionality, so make sure to create a full backup of your website before doing any edits.
- It’s better to use a child theme so your edits don’t get lost when you update your theme.
Method 2: Adding inline CSS
Inline CSS involves adding style attributes directly to individual HTML elements. It’s typically used for making quick, specific changes to single elements without affecting the entire site’s styling.
In WordPress, you can use inline CSS within the content editor of individual posts or pages without affecting other parts of your site by following these steps:
- Create a new post or open an existing one for editing to access the editor.
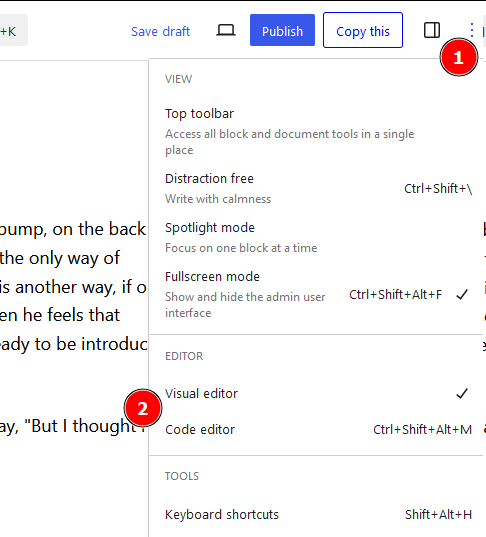
- Click on the three dots at the top right corner, then, under the Editor section, switch from Visual editor to Code editor.
- Add CSS using a global <style> tag at the top of the document or to individual elements as you see fit. If you use the second option to scope the style to a specific element, as shown below:
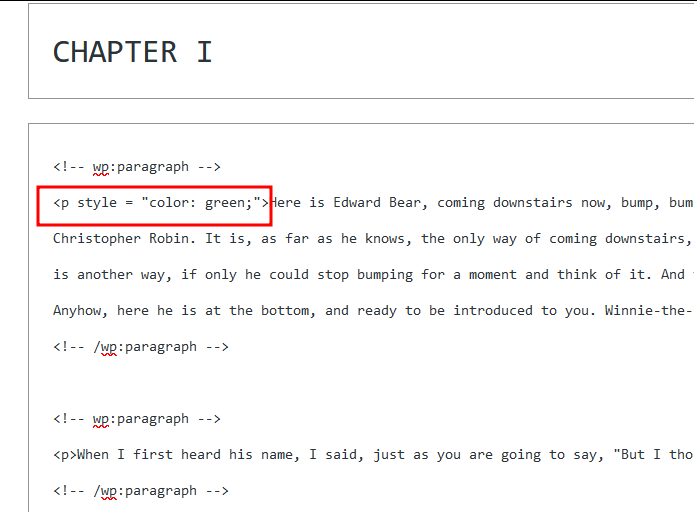
You should get something that looks like:

Benefits of using inline CSS:
- Allows for quick and direct style adjustments to specific elements.
- Simplifies the process of making unique changes to individual posts or pages.
- Provides immediate results without modifying theme files.
Precautions when using inline CSS:
- Can become difficult to manage for larger projects or extensive style changes.
- May lead to code redundancy if the same styles are repeated across multiple elements.
- Potentially makes site-wide style consistency more challenging to maintain.
Method 3: Editing the stylesheet
The next option involves adding custom code to your theme’s styles directly. It’s definitely the most complicated method and carries the most risk, but you can, of course, mitigate the latter issue by using a child theme.
Follow these steps to edit the stylesheet:
- Access your WordPress site’s installation directory via SFTP, the control panel, or file management plugins like WP File Manager. If you don’t have your SFTP credentials or aren’t sure how to get into your website’s control panel, contact your hosting provider.
- Go to wp-content/themes and find the folder with your child theme in it.
- In the root folder of the child theme, look for a style.css file, which should be the stylesheet, ready for you to edit with your preferred text or code editor.
Benefits of editing the stylesheet:
- Offers maximum control and flexibility over your site’s appearance.
- Allows for comprehensive style changes that affect the entire website.
- Provides a centralized location for all custom CSS, making it easier to manage.
Precautions when editing the stylesheet:
- Changes may be lost during theme updates if not done properly.
- Editing the wrong file can break your site’s design or functionality.
- Requires more technical knowledge compared to other methods.
Method 4: Using plugins
CSS plugins bridge the gap between basic theme customization and advanced code editing. Popular options like Simple Custom CSS and Simple Custom CSS and JS provide intuitive interfaces for implementing custom CSS without direct file editing.
Follow these steps to customize CSS on your site with the Simple Custom CSS and JS plugin:
- Install and activate the plugin.
- From the dashboard, go to Custom CSS & JS > Add Custom CSS.
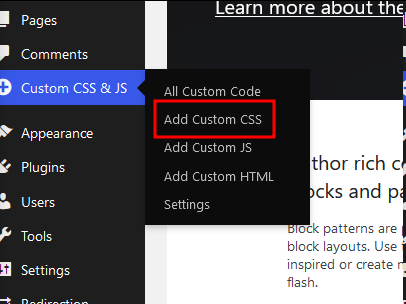
- Add your CSS into the code area. Unfortunately, advanced functionality like live previews, scoping the CSS to specific pages, and using preprocessors is locked behind a paywall. Luckily, you’re still able to add as much site-wide vanilla CSS as you want.
- Hit Publish at the top right corner to save your changes.
Benefits of using CSS plugins:
- Provide a user-friendly interface for adding custom CSS without coding knowledge.
- Often include additional features like version control and code highlighting.
- Allow for easy management and organization of custom styles.
Precautions when using CSS plugins:
- Check plugin compatibility with your WordPress version and theme to avoid conflicts.
- Review plugin ratings and user feedback to ensure reliability and performance.
- Be aware that some plugins may add unnecessary bloat to your site if not optimized well.
Method 5: Working with a WordPress developer
Sometimes, complex customizations or lack of time and technical skills may require professional help. Hiring a WordPress developer for custom CSS can be beneficial in several ways:
- You work someone who is an expert in WordPress and CSS best practices.
- Efficient implementation of custom styles.
- A good developer will ensure compatibility and avoiding conflicts with your plugins and theme.
- A good developer will be able to choose the most appropriate method for each customization.
If this all sounds appealing, you should consider hiring an expert WordPress developer using Codeable. The platform vets developers and matches you with experts suited to your specific project needs.
Troubleshooting common issues with custom CSS in WordPress
Even with careful implementation, you may encounter issues when using custom CSS. Here are some common problems and their solutions:
- Styles not applying as expected: Clear your browser cache and reload the page. Check for specificity, hierarchy, and cascade-related conflicts. Use browser developer tools to inspect the element and see which styles are being applied. As a last resort, use the !important declaration sparingly.
- Slow performance: Remove any unused CSS. Consider minifying your CSS using plugins like WP-Rocket or Autoptimize.
- Responsive design issues: Test your changes across various devices before releasing them live. Utilize media queries to apply different styles based on screen size. Use modern CSS layout techniques like Flexbox and Grid. Consider using a responsive framework like Bootstrap for complex layouts.
- Unintended global changes: Scope your CSS using specific IDs and classes. Use more specific selectors and pseudo-classes.
- Conflicts with plugins and themes: Increase the specificity of your selectors. Use !important if necessary, but sparingly.
- Browser compatibility issues: Test your changes across multiple browsers, including older versions. Use vendor prefixes for newer CSS properties and include fallbacks for older browsers.
For general troubleshooting, leverage built-in browser debugging tools to inspect elements, view applied styles, and make real-time changes. Alternatively, for complex problems or advanced customizations, consider working with a WordPress developer. Their expertise can save you time and ensure effective, maintainable solutions.
Take your website’s visuals to the next level with custom CSS and Codeable
Custom CSS empowers you to elevate your WordPress site’s appearance and functionality. From enhancing navigation and branding to improving the user experience and overall performance, CSS customization significantly impacts your website’s impact.
However, implementing CSS changes can be challenging, especially for those without technical expertise. The process can be time-consuming and complex, and it carries the risk of introducing errors that could affect your site’s functionality.
This is where Codeable comes in. The platform connects you with vetted, experienced WordPress developers, offering a reliable solution to these challenges. These professionals can efficiently handle your CSS customization tasks, reducing the risk of errors and saving you valuable time.
Take your website’s visuals to the next level. Submit a project to Codeable today and let expert developers bring your design vision to life!
 Dream It
