
Editing your WooCommerce My Account page is the ultimate cheat code for unlocking your store’s hidden potential. While most store owners obsess over product pages and checkout flows, this overlooked dashboard is secretly determining whether customers return or disappear forever.
Just a few strategic tweaks to these crucial touchpoints can transform a standard account page into a personalized hub that keeps customers engaged, simplifies their journey, and dramatically increases repeat purchases.
Ready to discover how this simple modification can deliver outsized returns for your WooCommerce business?
This guide cuts through the confusion.
Here’s what you’ll learn:
- Using plugins for quick customizations.
- Adding new endpoints and custom content.
- Managing user roles and permissions.
- Ensuring plugin compatibility.
- Advanced coding techniques for full control.
Let’s dive in!
The benefits of editing your WooCommerce My Account page
A well-edited WooCommerce My Account page improves customer experience by providing easy access to important account information and features. Here’s what it typically does:
- Provides a clean, organized dashboard where customers can view their order history, manage their profile, and access other account-related functions.
- Offers intuitive navigation between different sections like orders, downloads, addresses, and account details.
- Allows customers to manage payment methods, view subscription information (if applicable), and track order statuses.
- Creates a personalized experience with customer-specific information and recommendations.
- Streamlines the checkout process for returning customers by storing shipping and billing information.
- Improves sales and retention, a well-edited My Account page encourages customers to explore more products. With thoughtful layout and content customizations, you can strategically highlight related products, special deals, or loyalty rewards that drive repeat purchases.
Over the years, we’ve seen so many examples of clunky My Account pages that feel like searching through an overstuffed junk drawer – customers clicking endlessly, getting lost in navigation, and abandoning their carts out of frustration.
💡 A well-designed My Account page is like a well-designed Swiss Army knife: it transforms a bulky, overwhelming collection of tools into a sleek, pocket-sized companion that unfolds exactly what you need, precisely when you need it.
What’s the standard WooCommerce My Account page structure?
The default WooCommerce My Account page is built with a navigation menu and several default endpoints (sections) that customers can access:
- Dashboard: The main landing area when customers log in.
- Orders: Where customers can view their order history and details.
- Downloads: For accessing digital purchases.
- Addresses: Where customers manage their billing and shipping information.
- Account details: For updating personal information and password.
- Logout: Allows users to sign out of their account.
These components are rendered through template files located in the WooCommerce plugin directory at wp-content/plugins/woocommerce/templates/myaccount/. Understanding this file structure is essential when you want to make code-based edits to your My Account page.
Where can I find the WooCommerce My Account page?
The My Account page is created using the [woocommerce_my_account] shortcode. This shortcode can be embedded in any page on your website to display the My Account content.
To locate or create a My Account page:
- Navigate to your WordPress dashboard.
- Go to Pages > All Pages to find your existing My Account page, or
- Create a new page by going to Pages > Add New and inserting the [woocommerce_my_account] shortcode.
Method 1: Best plugins for editing your WooCommerce My Account page
Plugins offer a code-free approach to customizing your My Account page – perfect for store owners who want powerful results without diving into PHP. Here’s a comparison of the top 5 solutions:
| Plugin | Key Features | Best For | Unique Advantage |
| Customize My Account for WooCommerce | • Live front-end editor • Custom endpoints • Tab sorting by priority • Complete design control • Role-based access | Store owners who want visual editing and extensive customization | Preview changes instantly with the visual editor; no CSS knowledge required |
| JetWooBuilder | • Elementor integration • Menu management • Dashboard management • Modify Login and Registration • Show New and Completed orders | Elementor users looking for My Account customization as well as other customization options across the WooCommerce user experience. | Additional features for checkout page, cart page, shop page, catalog page and product listing pages. |
| My Account Page Editor | • Basic endpoint creation • Endpoint grouping • Custom icons and titles • User role assignments • Color customization | Beginners needing simple, fast customization | Quick setup with essential features and minimal learning curve |
| YITH WooCommerce Customize My Account Page | • Unlimited menu items • Promotional content integration • Tutorial/instruction embedding • Horizontal/vertical layouts • Security features | Marketers focused on cross-selling and engagement | Turns the My Account page into a marketing tool with promotional elements |
| IconicWP WooCommerce Account Pages | • WordPress page-based endpoints • Standard editor compatibility • Page builder support • Role-based restrictions • Familiar WordPress interface | Users who prefer working with native WordPress tools | Leverages existing WordPress knowledge—create endpoints as regular pages |
| PowerPack’s WooCommerce My Account Widget | • Elementor integration • Table and form styling • Layout switching • Section visibility controls • Error message customization | Elementor users wanting complete design control | Maintains consistent editing experience for Elementor users with 70+ additional widgets |
Each plugin offers a different approach to customizing your My Account page. Choose based on your technical comfort level, existing tools, and specific business needs.
Method 2: How to edit the WooCommerce My Account page using code
While plugins offer a straightforward way to edit your WooCommerce My Account page, code-based customization provides more flexibility and control. This approach requires a solid understanding of PHP, HTML, and CSS, but allows for precise modifications tailored to your specific needs.
1. Create a child theme
Before making any code changes, it’s essential to create a child theme to ensure your customizations won’t be lost when your parent theme is updated:
A. Create a new directory in your WordPress themes folder (wp-content/themes) with a unique name, such as “my-child-theme.”
B. Inside the new directory, create a “style.css” file with the following header:
/*
 Theme Name:   My Child Theme
 Theme URI:	http://example.com/my-child-theme
 Description:  A custom child theme for the Parent Theme
 Author:   	Your Name
 Author URI:   http://example.com
 Template: 	parent-theme-directory
 Version:  	1.0.0
*/
/* Add custom styles below */
Replace “parent-theme-folder-name” with the actual folder name of your parent theme.
C. Create a “functions.php” file in the child theme directory and add the following code to enqueue the parent theme’s stylesheet:
function my_child_theme_enqueue_styles() {
	// Enqueue parent theme stylesheet
	wp_enqueue_style( 'parent-style', get_template_directory_uri() . '/style.css' );

	// Enqueue child theme stylesheet
	wp_enqueue_style( 'child-style', get_stylesheet_directory_uri() . '/style.css', array( 'parent-style' ) );
}
add_action( 'wp_enqueue_scripts', 'my_child_theme_enqueue_styles' );
D. Activate the child theme by going to Appearance > Themes in your WordPress dashboard and selecting the new child theme.
2. Override WooCommerce My Account templates
To customize the My Account page, you’ll need to override the WooCommerce template files responsible for their layout and content. You can find these files in the “woocommerce/templates/myaccount” directory of your WooCommerce plugin.
Copy the files you want to edit from the WooCommerce plugin directory to a new “woocommerce” folder inside your child theme directory, maintaining the same folder structure. For example, if you want to edit the “dashboard.php” file, copy it to “my-child-theme/woocommerce/myaccount/dashboard.php.”
3. Edit the template files
Now that you have the template files in your child theme, you can start editing them to customize the My Account page. Open the files in a code editor and make the necessary changes, such as adding new sections, modifying the layout, or styling elements.
For example, to add a new section to the dashboard, you can edit the “dashboard.php” file and insert the following code where you want the new section to appear:
<section class="my-custom-section">4. Add custom CSS
To style your custom sections and elements, you can add custom CSS to your child theme’s “style.css” file. For example, to style the custom section added in the previous step, you can add the following CSS:
.my-custom-section {your_preferred_styles}5. Adding and editing endpoints
Understanding Endpoints
In WooCommerce, endpoints are the URL identifiers that define each section of the My Account area. They control both:
- The URL structure (example.com/my-account/orders/).
- The content displayed in each section.
While the default endpoints handle essential functions, the real power comes from creating custom endpoints tailored to your specific business needs. Custom endpoints allow you to integrate new features directly into your customers’ account experience, – creating a seamless journey that keeps them engaged with your brand.
Adding Custom Endpoints
Adding custom endpoints is a powerful way to expand your My Account page with new functionality tailored to your business needs.
To add new endpoints to your WooCommerce ‘My Account’ page, follow these steps:
- Open your theme’s functions.php file from your WordPress dashboard (ideally in your child theme). You can usually find this by navigating to Appearance > Theme Editor and then finding the functions.php file in the right-side file list.
- Add a function that uses the add_rewrite_endpoint() function to create a new endpoint:
Here’s an example of how to add a ‘My Wishlist’ endpoint:
add_action( 'init', 'my_custom_my_account_endpoint' );- Add this new endpoint to the ‘My Account’ menu. It can be done using the woocommerce_account_menu_items filter:
add_filter( 'woocommerce_account_menu_items', 'my_custom_my_account_menu_items' );- To show custom content when a user navigates to ‘My Wishlist’, use the woocommerce_account_{ENDPOINT}_endpoint action. In our case, this will be ‘my-wishlist’:
add_action( 'woocommerce_account_my-wishlist_endpoint', 'my_custom_endpoint_content' );When creating custom endpoints, consider organizing them into logical groups. For example, group all support-related endpoints under a ‘Support’ parent tab, or combine all documentation endpoints under a ‘Resources’ section. This improves navigation and reduces cognitive load for users.
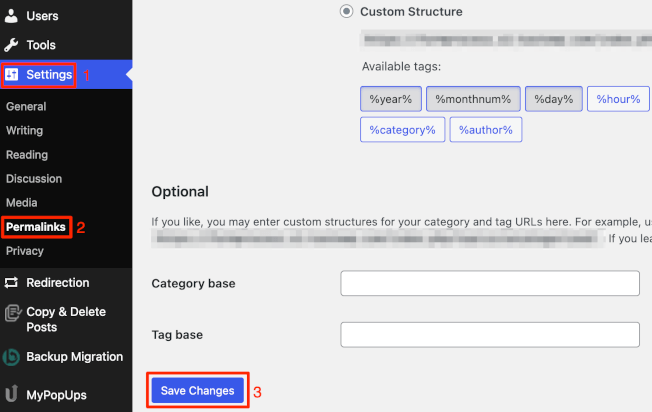
💡 After adding or modifying endpoints, remember to refresh your permalinks by going to Settings > Permalinks and clicking “Save Changes” to ensure your new endpoints work correctly.
6. Editing the WooCommerce My Account menu and layout
Beyond adding new endpoints, you can further customize your WooCommerce My Account page by modifying the menu structure, adding icons, and adjusting the overall layout. These enhancements can significantly improve user experience and reinforce your brand identity.
Reordering Menu Items
You can change the order of menu items in the My Account navigation using the woocommerce_account_menu_items filter:
function custom_reorder_account_menu_items($items) {
	// Extract logout item
	if (isset($items['customer-logout'])) {
    	$logout = $items['customer-logout'];
    	unset($items['customer-logout']);
	}


	// Reorder other items (Example: Move "Dashboard" to the first position and sort others alphabetically)
	$ordered_items = array();


	// Move "Dashboard" to the start (if it exists)
	if (isset($items['dashboard'])) {
    	$ordered_items['dashboard'] = $items['dashboard'];
    	unset($items['dashboard']);
	}


	// Sort the remaining items alphabetically by their keys
	ksort($items);


	// Merge the ordered items with the rest of the menu items
	$ordered_items = array_merge($ordered_items, $items);


	// Add the logout item back at the end
	if (isset($logout)) {
    	$ordered_items['customer-logout'] = $logout;
	}


	return $ordered_items;
}


add_filter('woocommerce_account_menu_items', 'custom_reorder_account_menu_items');
This code extracts the logout item (typically placed at the end), reorders all other items, and then adds the logout item back at the end.
Adding icons to menu items
Adding icons to your My Account menu items can improve visual recognition and navigation. You can accomplish this by using custom CSS and pseudo-elements:
/* Add Dashicons to the My Account menu items using the ::before pseudo-element */
.woocommerce-account .woocommerce-MyAccount-navigation li a::before {
	font-family: 'Dashicons'; /* Set font to Dashicons */
	display: inline-block;
	margin-right: 10px; /* Space between icon and text */
	font-size: 16px; /* Icon size */
	vertical-align: middle; /* Align icon with text */
}


/* Dashboard Icon */
.woocommerce-account .woocommerce-MyAccount-navigation li a[href*="dashboard"]::before {
	content: '\f334'; /* Dashicon for Dashboard */
}


/* Orders Icon */
.woocommerce-account .woocommerce-MyAccount-navigation li a[href*="orders"]::before {
	content: '\f217'; /* Dashicon for Cart */
}


/* Downloads Icon */
.woocommerce-account .woocommerce-MyAccount-navigation li a[href*="downloads"]::before {
	content: '\f105'; /* Dashicon for Download */
}


/* Addresses Icon */
.woocommerce-account .woocommerce-MyAccount-navigation li a[href*="addresses"]::before {
	content: '\f124'; /* Dashicon for Location */
}


/* Account Details Icon */
.woocommerce-account .woocommerce-MyAccount-navigation li a[href*="edit-account"]::before {
	content: '\f308'; /* Dashicon for Users */
}


/* Logout Icon */
.woocommerce-account .woocommerce-MyAccount-navigation li a[href*="customer-logout"]::before {
	content: '\f132'; /* Dashicon for Exit/Logout */
}
In this example, we’re using WordPress Dashicons. You can also use other icon libraries like Font Awesome by including the appropriate stylesheet and using their icon codes.
Adjusting the layout structure
The default WooCommerce My Account page typically uses a two-column layout with navigation on the left and content on the right. You can modify this layout by overriding the my-account.php template and adjusting the CSS:
/* My Account Page: Two-Column Layout */
.woocommerce-page .woocommerce-MyAccount {
	display: grid;
	grid-template-columns: 250px 1fr;  /* Left column for navigation, right column for content */
	gap: 20px; /* Space between the columns */
}


/* Navigation (Account Menu) */
.woocommerce-page .woocommerce-MyAccount-navigation {
	background-color: #f4f4f4;  /* Light background for navigation */
	padding: 20px;  /* Add padding inside the navigation */
	border-radius: 8px;  /* Round the corners */
}


/* Content Area */
.woocommerce-page .woocommerce-MyAccount-content {
	background-color: #ffffff;  /* White background for content */
	padding: 20px;  /* Add padding inside the content */
	border-radius: 8px;  /* Round the corners */
	box-shadow: 0 4px 8px rgba(0, 0, 0, 0.1);  /* Slight shadow for better separation */
}


/* Make navigation stick to the top when scrolling */
.woocommerce-page .woocommerce-MyAccount-navigation {
	position: sticky;
	top: 20px;
}


/* Style the navigation links */
.woocommerce-page .woocommerce-MyAccount-navigation ul li a {
	font-size: 16px;
	color: #333;
	padding: 10px;
	display: block;
	text-decoration: none;
	border-radius: 4px;
}


/* Hover effect for navigation links */
.woocommerce-page .woocommerce-MyAccount-navigation ul li a:hover {
	background-color: #007cba;
	color: #fff;
}


/* Add margin to the bottom of each link */
.woocommerce-page .woocommerce-MyAccount-navigation ul li {
	margin-bottom: 10px;
}
Then add custom CSS to your stylesheet.
💡For more advanced layouts, you might want to completely override the my-account.php template by copying it to your child theme’s woocommerce folder and making more substantial changes to the HTML structure.
7. Managing user roles and permissions in the My Account page
Managing user roles and permissions on your WooCommerce My Account page allows you to control access to different sections and customize the user experience based on specific roles. This level of personalization can significantly enhance your customer satisfaction by delivering targeted content and features.
Role-specific content display
To add role-specific content or restrict access to certain endpoints, you’ll need to use WordPress’s built-in user role functions. Here’s an example of how to display content only for a specific user role:
add_action( 'woocommerce_account_dashboard', 'add_vip_content_to_dashboard' );
function add_vip_content_to_dashboard() {
    if ( current_user_can( 'vip_customer' ) ) {
        echo '<h3>VIP Customer Content</h3>';
        echo '<p>Welcome to your exclusive VIP section!</p>';
    }
}
You can also restrict access to custom endpoints based on user roles. Here’s how you might modify the previous example of adding a custom endpoint:
add_filter( 'woocommerce_account_menu_items', 'add_vip_endpoint_for_specific_role' );
function add_vip_endpoint_for_specific_role( $items ) {
    if ( current_user_can( 'vip_customer' ) ) {
        $items['vip-area'] = 'VIP Area';
    }
    return $items;
}


add_action( 'woocommerce_account_vip-area_endpoint', 'vip_area_content' );
function vip_area_content() {
    echo '<h2>VIP Area</h2>';
    echo '<p>This content is only visible to VIP customers.</p>';
}
Creating custom user roles
For more granular control, you can create custom user roles with specific capabilities:
<?php
add_action('init','register_premium_customer_role');
function register_premium_customer_role(){
	add_role(
    	'premium_customer', // internal role slug
    	'Premium Customer', // human-readable role name
    	[
        	'read'                 	=> true,
        	'manage_woocommerce'   	=> true,
        	'view_woocommerce_reports' => true,
        	'edit_products'        	=> true,
    	]
	);
}
Dynamic content based on purchase history
You can display different content based on a customer’s purchase history or other attributes:
<?php
if ( is_user_logged_in() && wc_customer_bought_product( '', get_current_user_id(), 123 ) ) {
	// user has bought product ID 123
	echo '<p>Thanks for buying product 123! Here’s your VIP code: VIP2025</p>';
}


$customer = new WC_Customer( get_current_user_id() );
if ( is_user_logged_in() && $customer->get_total_spent() >= 200 ) {
	// user has spent at least $200
	echo '<p>You’ve unlocked Platinum Tier benefits! <a href="/platinum">Learn more</a></p>';
}
?>
Protecting sensitive information
When displaying sensitive information in role-specific areas, ensure you have proper validation:
<?php

// Shortcode to display sensitive info only to Premium Customers

add_shortcode( 'sensitive_info', function() {

// 1) Must be logged in

if ( ! is_user_logged_in() ) {

     return '';

}

// 2) Must have the 'premium_customer' role (or any capability you choose)

if ( ! current_user_can( 'premium_customer' ) ) {

     return '';

}

// 3) Fetch your sensitive data (e.g. from user meta or elsewhere)

$raw = get_user_meta( get_current_user_id(), 'sensitive_field', true );

// 4) Sanitize/escape before output

$safe = esc_html( $raw );

return '<div class="sensitive-info">' . $safe . '</div>';

} );
8. Common compatibility issues when editing My Account page
When customizing your WooCommerce My Account page, it’s crucial to ensure compatibility with other plugins you’re using to prevent errors.
Testing compatibility with existing plugins
First, check if your customizations interfere with any existing plugins. You can do this by temporarily deactivating your custom code or new plugins and observing any changes in functionality. It will help you isolate the source of any conflicts.
Version-specific compatibility
If you’re using custom code to edit your My Account page, make sure it’s compatible with your version of WooCommerce. You can implement version checks to ensure your code runs correctly across different WooCommerce versions:
function check_woocommerce_version() {
    if ( class_exists( 'WooCommerce' ) ) {
        global $woocommerce;
        if ( version_compare( $woocommerce->version, '3.0', ">=" ) ) {
            // Your custom code for WooCommerce 3.0 and above
        } else {
            // Your custom code for earlier versions of WooCommerce
        }
    }
}
add_action( 'init', 'check_woocommerce_version' );
Avoiding endpoint conflicts
When adding new endpoints or modifying existing ones, be aware that other plugins might be using similar slugs. To avoid conflicts, use unique identifiers for your custom endpoints:
add_action( 'init', 'add_custom_endpoint' );
function add_custom_endpoint() {
    add_rewrite_endpoint( 'my-unique-custom-endpoint', EP_ROOT | EP_PAGES );
}
💡Consider prefixing your endpoint names with your business name or a unique identifier to further prevent collisions.
Managing hook and filter priorities
If you’re using hooks and filters to customize the My Account page, ensure they don’t conflict with other plugins. Use priority parameters in your add_action() and add_filter() functions to control the order of execution:
add_filter( 'woocommerce_account_menu_items', 'custom_my_account_menu_items', 20 );
💡The priority number (20 in this example) determines when your function runs relative to others using the same hook. Higher numbers run later, which can be useful for overriding settings from other plugins.
Regular testing and updates
As you install new plugins or update existing ones, regularly test your My Account page edits and customizations to ensure continued compatibility. Set up a testing routine that includes:
- Checking all custom endpoints.
- Verifying that role-specific content displays correctly.
- Testing the complete user journey through your customized account pages.
By maintaining awareness of these common compatibility issues and implementing preventative measures, you can ensure your customized WooCommerce My Account page works flawlessly alongside other plugins in your WordPress ecosystem.
Best practices for editing your WooCommerce My Account page
After exploring the technical aspects of customization, it’s time to focus on what truly matters: creating an account page that converts browsers into loyal customers and drives real business growth.
The difference between a basic My Account page and one that genuinely enhances your bottom line comes down to these proven best practices:
Focus on a clean, intuitive layout: Create a clean layout that enables users to easily navigate the My Account page. Remember, usability is vital – as many as 38% of users may stop engaging with a site if its content or layout is shabby.
Enable custom avatar uploads: Allow users to upload a custom avatar, especially for websites with a social element. A profile picture is a form of self-expression that indicates the user cares about how they’re perceived on your site. The more they feel at home on your website, the more likely they’ll engage with your brand.
💡Pro Tip: Pair this with loyalty programs and other social content for maximum ‘My Account’ page engagement.
Optimize for mobile devices: With more than half of global web traffic coming from mobile devices, ensure your edited My Account page is fully responsive. Test your customizations on various screen sizes to confirm that navigation remains intuitive, buttons are easily tappable, and content is readable without zooming.
Encourage customer engagement: Use your edited My Account page to foster customer relationships and drive repeat purchases by:
- Collecting email addresses for marketing campaigns.
- Adding a short survey section to learn about customer experience.
- Offering limited-time discount codes exclusive to registered users.
Simplify customer support: Make it easy for customers to get help when they need it by creating a custom support endpoint in the My Account page. This can dramatically reduce frustration and improve customer satisfaction.Ensure consistency with your brand: Any edits you make to the My Account page should maintain visual and tonal consistency with the rest of your site. Use the same color schemes, typography, and design elements to reinforce your brand identity.
Next steps for tailoring your My Account page to perfection
You’ve seen the potential of a well-customized WooCommerce My Account page. But let’s face it: advanced customization can be complex and time-consuming. Why not leverage expert knowledge to achieve the perfect result?
Enter Codeable – your gateway to top-tier WordPress and WooCommerce professionals. With Codeable, you will have access to top-tier developers who will deliver tailored solutions that perfectly align with your brand and business needs. Imagine a My Account page that not only looks great but also boosts user engagement, streamlines operations, and drives conversions. That’s the power of professional customization.
Ready to elevate your WooCommerce store? Don’t let technical challenges hold you back. Take the next step and connect with a Codeable expert today. Your perfect My Account page – and the enhanced user experience it brings – is just a click away.Invest in your store’s future, get started with Codeable now, and watch your vision come to life!
 Dream It

