Important Note: for the purpose of this article, I have used export files from the Yahoo Miva Merchant platform to import products into Woocommerce, but the practices can be used for any xlsx-based export/import
Important Note 2: Please test importing on a staging site, and take a backup before doing it on live, as it is hard to reverse, especially if you are importing thousands of products
WordPress is taking the world by storm. It now powers 25% of the web. Behind that powerful rise has emerged an awesome e-commerce solution… WordPress plugin Woocommerce now also taking the world by storm, one online storefront at a time. Woocommerce is a great plugin, very well written and very easy to use, but what really sets it apart is its extensibility.
Table of contents
- Why users switch to WooCommerce: Customizability
Switching from Miva or other platforms using CSV and XLSX files
How to create a CSV file
How to import products to WooCommerce using native functionality
How do I import a product spreadsheet to WooCommerce?
How to import products to WooCommerce using a plugin
Why users switch to WooCommerce: Customizability
I am not gonna get into the subject of how Woocommerce was derived from WP-Ecommerce (or did I just? Never mind) as it is irrelevant to this article, but Woocommerce has been built with a view to making it possible to extend and customise it in any number of ways.
Its developers Woothemes have built hundreds of plugins for it, shipping methods from carriers around the globe, payment methods from Stripe, to Alipay (China) and around the globe, and many many more doing things from allowing price calculation by weight, and show off color swatches in picker fashion for things like wallpaper stores, and a whole plethora of other things. On top of that, there are hundreds (if not thousands) of other extensions by other people available online for free or for a fee, and if someone else hasn’t built it already you can build it yourself or hire someone to do it. This is one of the main reasons why Woocommerce is becoming the number one ecommerce solution on the planet.
So, of course, many people running online stores are keen to come over to the WP side, move their site to WordPress if it isn’t there already, and set up their store in WooCommerce. For most, this isn’t too difficult. There is already the Woocommerce CSV (comma-separated values) import suite extension from Woothemes that allows you to map CSV data fields from your stores export CSV file, to the Woocommerce field equivalents, like saving Item_Number from your store to SKU in Woo. Woo-hoo.
Switching from Miva or other platforms using CSV and XLSX files
For others, this is not possible for one reason or another. One such case is those trying to move from the Yahoo Miva platform, and the reason is two-fold: A the export file is an xlsx file which cannot be parsed like a CSV, and B: because they use category codes for their categories, whereas in WordPress it is category ids and slugs. As a result, their export is split into two xlsx files, one for the products, which contains references to category codes only, and then another file of the category codes giving you the corresponding category name, etc.
Part of my role as an in-house developer is to help contractors when they need it. Last week one of our contractors was running behind on a job because he realised that he could not use the Woothemes import extension to import products into WooCommerce from his client’s Miva store, and he didn’t have time to build the custom importer at the same time as finishing up on the site build.
So I came in to get these products imported into Woocommerce for him. I have been dying to have a go with the WP All Import plugin for ages, but I didn’t have time here to learn something new, so I went with what I knew and built a custom CSV parsing plugin built specifically to parse the 2 CSV’s and import the products and categories from them into WordPress. For my next article, I am going to do the same import but using the WP All Import plugin and its feature of allowing you to embed custom php functions for use during the import.
How to create a CSV file
A CSV (Comma Separated Values) file is a type of plain text file that stores tabular data, such as spreadsheets or databases, in a structured format.
CSV files can be easily created, opened, and edited using any text editor, spreadsheet software, or database application and are widely used for data exchange between different systems, as they are easy to read, write, and parse.
Creating a CSV file for WordPress and WooCommerce is a common task when importing or exporting data, such as products, customers, orders, or inventory.
Let’s take a look at some of the best practices for filling out a CSV file for WordPress and WooCommerce:
- Use the correct file format: CSV files should be saved in plain text format with the extension .csv. Make sure that your CSV file is not saved as a rich text format (RTF) or other file formats that may cause errors or formatting issues.
- Follow the required file structure: Before creating a CSV file, make sure to check the required file structure for the data you are importing or exporting. For example, WooCommerce has specific column headers for product data, such as SKU, name, description, price, and so on. Make sure to use the correct column headers and data types.
- Use consistent formatting: Consistency is key when creating a CSV file. Use the same formatting for all the data in your file, such as date formats, currency symbols, and decimal places. This will help prevent errors when importing or exporting data.
- Avoid special characters: Avoid using special characters, such as quotation marks, commas, and semicolons, in your data. These characters can cause issues with parsing your data and may lead to errors or data loss.
- Use unique identifiers: Use unique identifiers, such as SKU or product ID, to avoid duplicates when importing or exporting data. This will help ensure that your data is accurately imported or exported.
- Test your CSV file: Before importing or exporting your CSV file, make sure to test it using a sample dataset. This will help identify any issues or errors in your file, such as incorrect data types or missing fields.
- Backup your data: Always back up your data before importing or exporting it using a CSV file. This will help prevent data loss or corruption in case of errors or issues during the import or export process.
WooCommerce also suggested some guidelines for formatting CSV files. These include:
- CSVs should be in UTF-8 format.
- Dates are to be defined as per the store’s local timezone.
- Assign 1 or 0 in your CSV to respective field values. (true or false)
- Multiple values in a field are to be separated with commas.
- Add the ID: prefix to the product if referencing an existing product ID. No prefix is needed if referencing an SKU. For example, id:100, SKU101
- Plain text custom meta is supported. WooCommerce does not support JSON or Serialized data.
- Taxonomy term hierarchy is denoted with >, and terms are separated with commas.
- It is not possible to assign a specific post ID to the product on import. Products will always use the next available ID, regardless of the ID included in the imported CSV.
Creating a CSV file for WordPress and WooCommerce involves following specific file structure and formatting best practices to ensure successful data import and export. By following these best practices, you can save time and avoid errors when working with large datasets on your WordPress site.
How to import products to WooCommerce using native functionality
One of the best native features of WooCommerce is the ability to import products in bulk using a CSV file. This is a great way to save time and effort when adding a large number of products to your online store.
Here’s how to import products to WooCommerce using the default functionality:
1: Prepare your CSV file
The first step is to prepare your CSV file. Make sure that your CSV file follows the required file structure for product data in WooCommerce. This means using the correct column headers and data types and ensuring that the data is consistent and free of errors.
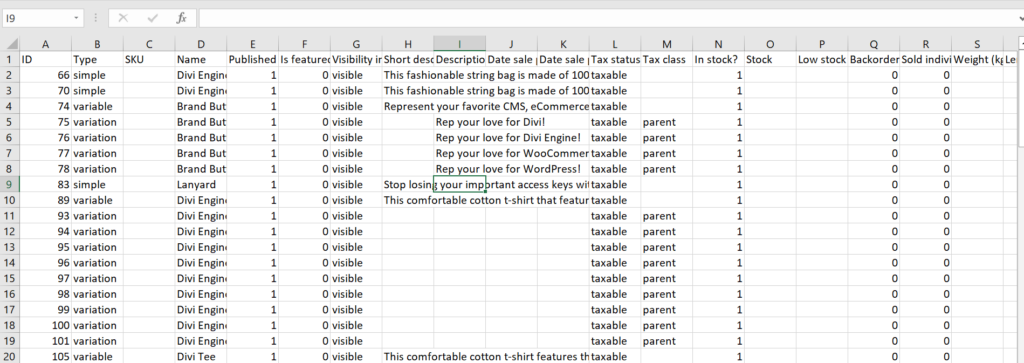
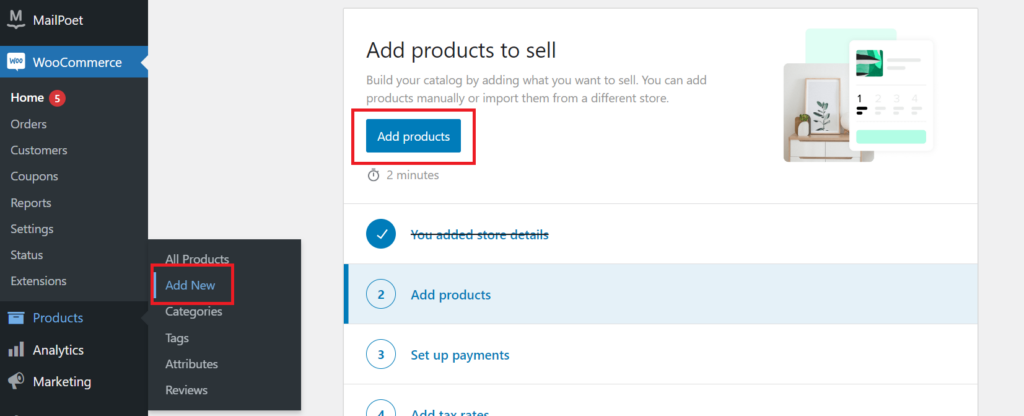
2. Navigate to the WooCommerce Import Products page
Once your CSV file is ready, navigate to the WooCommerce Products page. To get there, go to your WordPress dashboard and click on WooCommerce > Add Products.
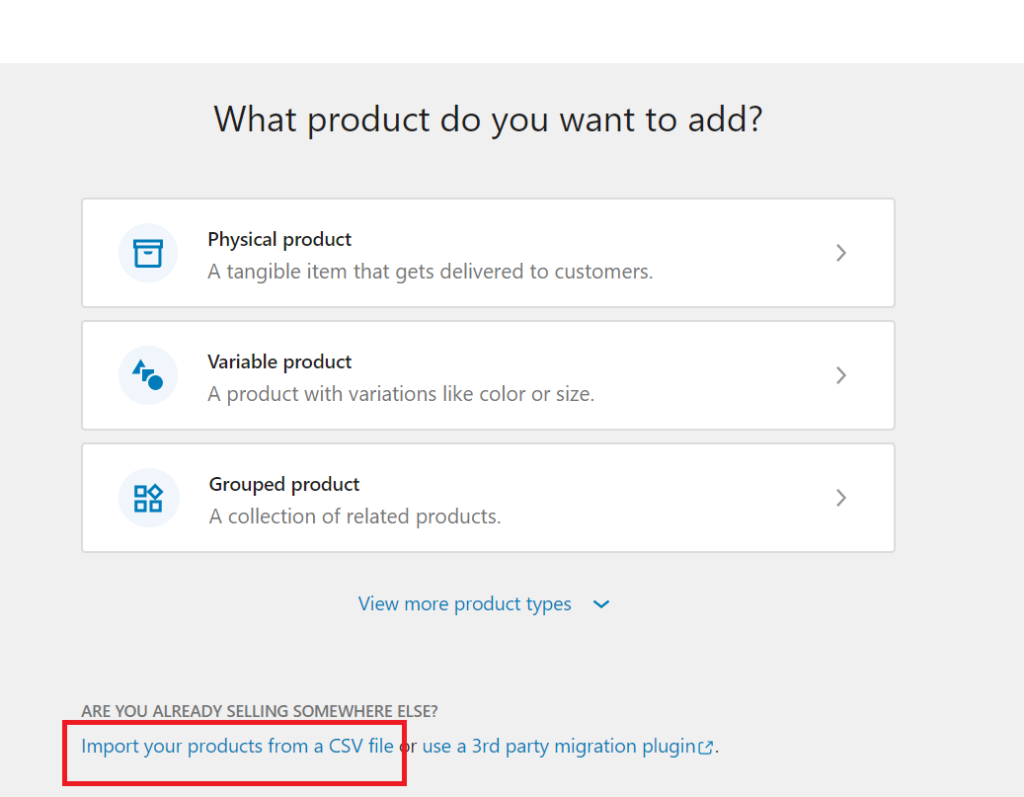
3. Choose your CSV file
On the Products page, choose the option to import products through a CSV file.
You’ll be asked to choose a CSV file.
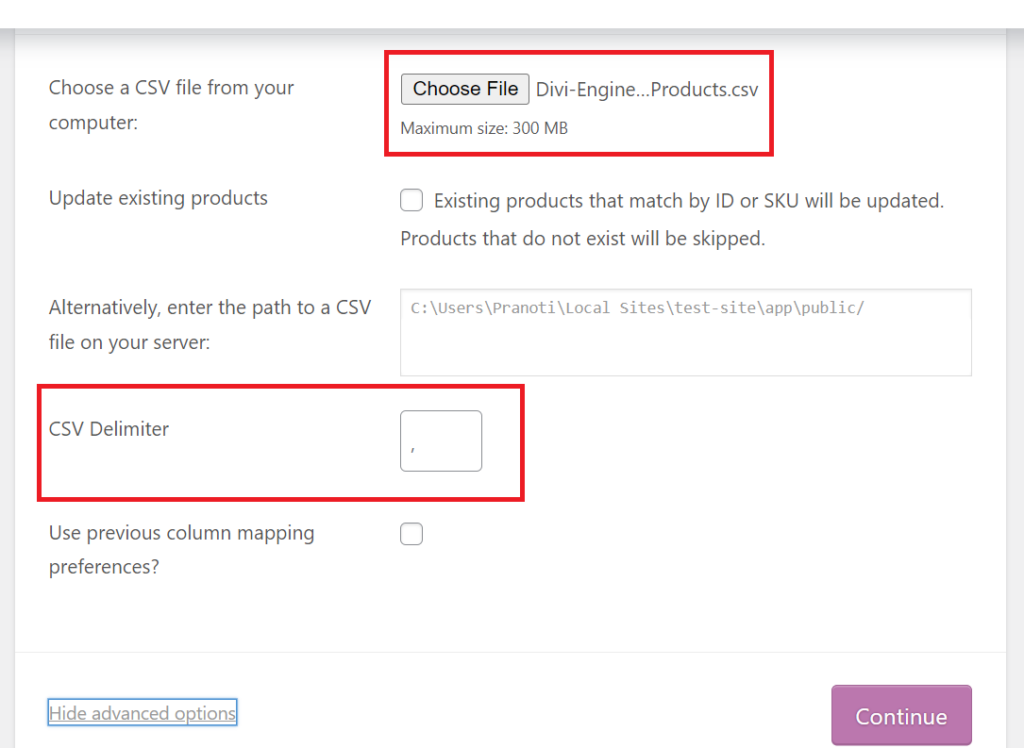
You can also choose the delimiter character used in your CSV file, which is typically a comma.
4: Map your CSV columns to WooCommerce fields
Next, map your CSV columns to the WooCommerce fields. WooCommerce will automatically try to match your CSV columns to the corresponding fields in WooCommerce, but you can also manually map the fields if needed.
[Link to video: Product Import into WooCommerce Website Using Native Functionality.mp4]
Make sure to map all the required fields, such as SKU, name, price, and stock status.
5: Review and import your products
Once you have mapped your CSV columns to the WooCommerce fields, review the product data and make any necessary changes. You can also choose to update existing products by selecting the “Update existing products” option.
When you’re ready, click on the Run Importer button to import your products. Depending on the size of your CSV file and the number of products being imported, this process may take a few minutes.
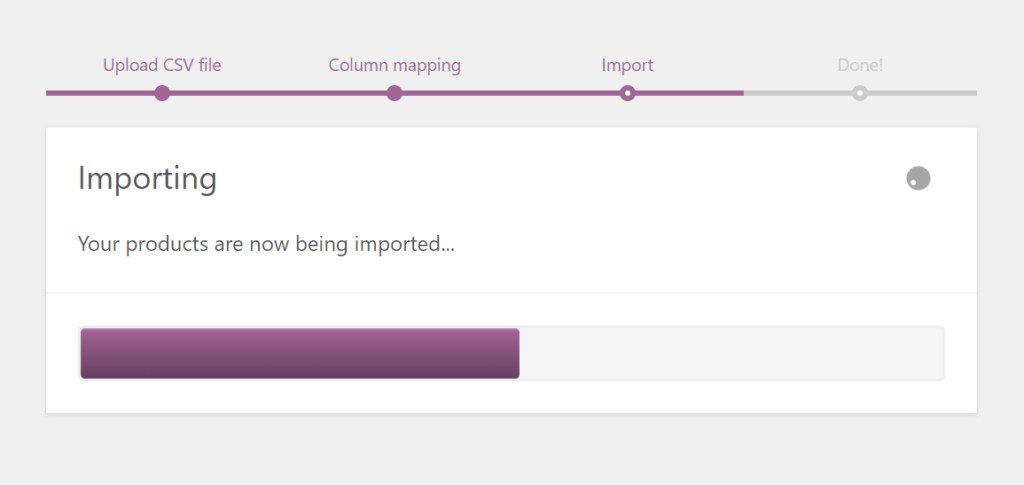
6: Check your imported products
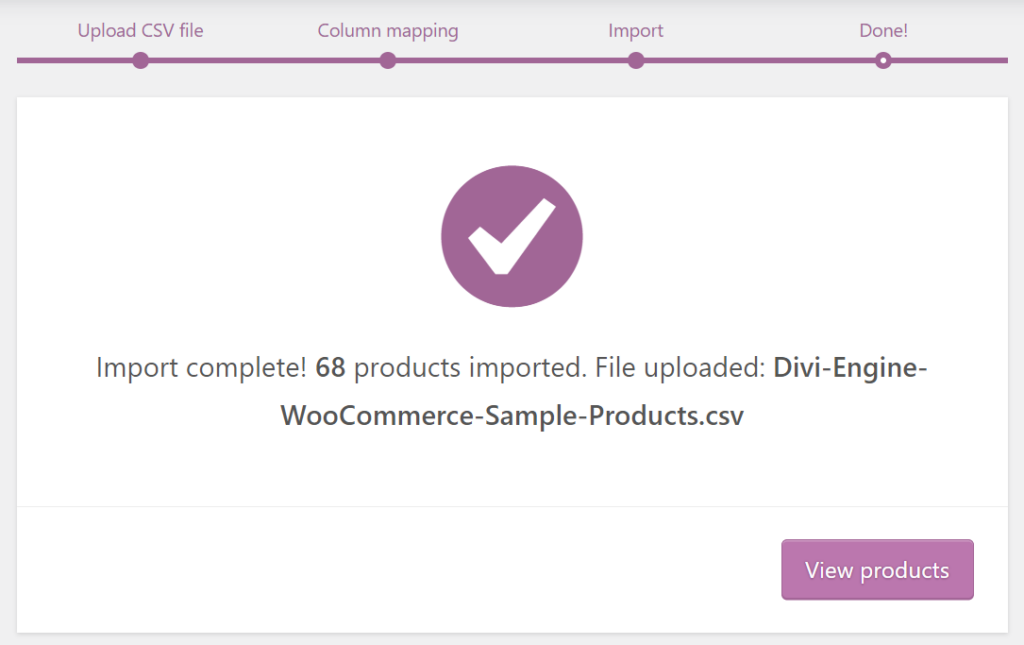
After the import process is complete, check your imported products to make sure that they have been added correctly.
You can do this by going to your WordPress dashboard and clicking on Products > All Products.
Congratulations! You have successfully imported products to WooCommerce using native functionality.
How do I import a product spreadsheet into WooCommerce?
Please note you can simply host the spreadsheets on Google Drive or OneDrive or any other cloud solution, or your own server and simply edit the php files to use the URLs if you wish, but I know how to code the WordPress uploader, so that is the approach I took. It is not really part of this tutorial, so I referenced this article to add the WordPress uploader.
You will need a page for the uploader to go on, and you can add this like so:
//hook into the admin_menu hook with the function adding the page

add_action('admin_menu',array($this,'setup_page'));
Now to add the page – I will put the parameters one per line and tell you what each is doing
function setup_page() {
 add_submenu_page(
 'edit.php?post_type=product',//this will add it under the Products link
 'CSV Parse',//Title of link in menu
 'CSV Parser',//Title of page
 'manage_woocommerce',//The permission level needed to view the page
 'parse_csv',//The slug (page=slug) in url
 array($this, 'uploader_page') //The function run when the page is viewed
 );
}
In the uploader_page function you will put the form from the tutorial linked above. In that function, I added 2 separate input fields with uploader buttons beside them, one labelled for the products spreadsheet and one for the categories. When the user selected or uploaded the file using the uploader, it inserted the URL of the file into the input field. I then had a submit button to submit the file URLs.
Process the Data
And now, finally, we are going to parse those files…
As we are submitting a form we can hook onto the admin_init hook like so:
add_action('admin_init',array($this,'parse_xlsx_files'));
And the function is as follows:
function parse_xlsx_files() {
/*Check if our form was submitted
*submit_ccsvp_csvs is the name=”” attribute of the submit button on the files form
*/
 if (isset($_POST['submit_ccsvp_csvs'])) {
 $this->extract_data();
 $this->build_categories();
 $this->map_data();
 $this->import_products($products);

 }
}
1. Start Importing products into Woocommerbe by extracting data from the XLSX
So you can see that I have split it into 4 other functions for simplicity, so I will now cover those one-by-one.
The extract data function is very simple:
function extract_data() {
/* When you upload xlsx files in WP you only get the filename in your text field, so given that
* and the fact that some server configs don’t allow PHP to access the data from a url I opted
* to use the path so first we get the path
*/
 $uploads = wp_upload_dir();
 $path = $uploads['path'];
//Then we use the path with the post variables (the filenames) sent through from our form
 $this->products = $this->parse_xlsx($path . "/" . $_POST['products_csv'] . ".xlsx");
 $this->catsandsubcats = $this->parse_xlsx($path . "/" . $_POST['catsandsubcats_csv'] . ".xlsx");

 }
Note the use of the parse_xlsx function. This function came from https://gist.github.com/searbe/3284011 – it takes the xlsx file (which is an MS application format) extracts the data, and puts it into an array keyed by the column headers. I changed it slightly at the end:
Where it builds the row (lines 57 and 58) I saved the rows into an array like so:
$values = array_pad($arr, count($headers), '');
$row = array_combine($headers, $values);
$data[] = $row;
And then, at the end of the function, I return the data array before deleting the file:
return $data;
@unlink($dir);
@unlink($inputFile);
2: Create the product categories
Now that we have the data in a nice array, we can use it. The next function from our main process_form function is $this->build_categories() which is as follows:
function build_categories() {foreach ($this->catsandsubcats as $wp_key => $value) {$this->output[] = "Starting on term " . print_r($value, true);//Don’t try and insert categories with no text as then you get horrible number categoriesif (empty($value['parent_name']))continue;//Don’t insert it if you already have//The insert function would prevent duplicates anyway but this saves processing timeif (!term_exists($value['parent_name'])) {//Insert the term using the values from the xlsx//starting with the parent terms only$term_id = wp_insert_term($value['parent_name'], 'product_cat', array('description' => $value['miva_category_parent_code']));$this->output[] = "Term " . $value['parent_name'] . " inserted with ID " . print_r($term_id, true);} else {$term = get_term_by('name', $value['parent_name'], 'product_cat');$term_id = $term->term_id;$this->output[] = "FOUND TERM WITH ID " . print_r($term_id, true);}//Build a new array mapping WP categories to Miva cat codes for use when parsing the products$this->cats[$value['miva_category_parent_code']] = $value['miva_category_parent_code'];//Now that we have the term_id for the parent use it to insert the child categories$child_id = wp_insert_term($value['sub_category_name__'], 'product_cat', array('description' => $value['miva_sub_category_code'], 'parent' => $term_id));//Again saving it to the array$this->cats[$value['miva_sub_category_code']] = $value['sub_category_name__'];$this->output[] = "Inserting child term " . $value['sub_category_name__'] . " with child id = " . print_r($child_id, true) . " AND parent = " . $term_id;}$this->output[] = "Categories Built";}
3. Map data keys from export to WooCommerce
So now you have all your Miva categories saved into WordPress in their correct hierarchy.
Now we will import products into WooCommerce, but first, we need to map the array keys (the column headings from the Miva xlsx) to their WP counterparts. For the most part, you simply link the key -> key, but in the meta_fields some meta data is needed for Woocommerce that is not in the Miva export, so for those, we simply use enter_value::value and send the value through. The “::” gives us something to identify these so that we can enter the value. We also have func_fields, for which the key is the name of a function we call and pass in the data from Miva.
function map_data() {
 $this->meta_fields = array(
 '_sku' => 'product_code',
 '_downloadable' => 'enter_value::no',
 '_virtual' => 'enter_value::no',
 '_visibility' => 'enter_value::visible',
 '_stock' => 'enter_value::999',
 '_stock_status' => 'enter_value::instock',
 '_backorders' => 'enter_value::no',
 '_manage_stock' => 'enter_value::yes',
 '_price' => 'price',
 '_regular_price' => 'price',
 '_wc_cog_cost' => 'cost',
 );

 $this->post_fields = array(
 'post_title' => 'product_name',
 'post_excerpt' => 'description',
 'post_content' => 'description',
 );
 $this->func_fields = array(
 'map_categories' => 'category_codes',
 'save_images' => 'image_url',
 'get_status' => 'active',
 );
 }
4. Import Products into WooCommerce
So now, finally, we get to the import_products function:
function import_products() {
 foreach ($this->products as $header => $value) {
//First we build the post data array for insertion
 $post_data['post_type'] = "product";
//There was no function calls in the post data fields so it is simple...
 foreach ($this->post_fields as $wp_key => $miva_key) {
 $post_data[$wp_key] = $value[$miva_key];
 }
//So we check if the product exists first and if it does we grab the id
 $post_id = $this->product_exists($value['product_code']);
//If it doesn’t we insert it and if it does we are going to update it
 if ($post_id === false) {
 $post_id = wp_insert_post($post_data);
 $this->output[] = "Post created " . print_r($post_id, true);
 } else {
 $this->output[] = "Updating post $post_id";
 }
//The meta_fields has only the enter_value function so we...
 foreach ($this->meta_fields as $wp_key => $miva_key) {
//check for the “::” string we mentioned earlier
 if (strstr($miva_key, "::")) {
//if found split it at the “::”
 $parts = explode("::", $miva_key);
//$parts is now array(0 => ‘enter_value’,1 => $value);
//then save
 update_post_meta($post_id, $wp_key, $parts[1]);
 } else {
//if no “::” then it is just a straight grab of the data from the products array using the miva_key
 update_post_meta($post_id, $wp_key, $value[$miva_key]);
 }
 }
 wp_set_object_terms($post_id, 'simple', 'product_type', false);
 foreach ($this->func_fields as $wp_key => $miva_key) {
//site_url() is a wp function giving the url of your site, if you are importing to a new domain
//then you would insert the previous url (the url of the miva store)
//as the xlsx file only contains the path.
 if ($miva_key == "image_url")
 $value[$miva_key] = trailingslashit(site_url() . basename($value[$miva_key]);
//then we call the function and pass in the post_id and the value from miva
 $this->{$wp_key}($post_id, $value[$miva_key]);
 }
 }
 }
 }
So from the map data function, we have the following functions that were used above.
'map_categories' => 'category_codes'- This one simply gets the WP category using the category code from the products data and finding it in the array we saved earlier, and then saves the post (product) into that category.
function map_categories($post_id, $codes) {
 $set_terms = array();
 foreach (explode(",", $codes) as $code) {
 if (!isset($this->cats[$code])) {
 $this->output[] = "Cat $code not found";
 } else {
 $set_terms[] = $this->cats[$code];
 }
 }
 $this->output[] = "
Setting ” . print_r($set_terms, true) . ” to $post_id”; if (!empty($set_terms)) wp_set_object_terms($post_id, $set_terms, ‘product_cat’, false); }
'save_images' => 'image_url'- This one takes in the passed image url and saves it to a fully fledged post attachment. As it is only 1 image per product then we make it the featured image as well.
function save_images($post_id, $url) { $tmp = download_url($url); $file_array = array( 'name' => basename($url), 'tmp_name' => $tmp ); $this->output[] = "Starting on image $url " . print_r($file_array, true); // Check for download errors if (is_wp_error($tmp)) { @unlink($file_array['tmp_name']); return $tmp; } $id = media_handle_sideload($file_array, $post_id); $this->output[] = "Sideload handled: " . print_r($id, true); // Check for handle sideload errors. if (is_wp_error($id)) { @unlink($file_array['tmp_name']); return $id; } update_post_meta($post_id, '_thumbnail_id', $id); $this->output[] = "$image_url save to $post_id with image_id $id"; } - And last but not least…
'get_status' => 'active' - This takes the value of the active column from Miva and use it to set the WordPress post_status like so:
function get_status($post_id, $active) {
 $post_status = $active == 1 ? "publish" : "draft";
 if ($post_status != get_post_status($post_id)) {
 wp_update_post(array('ID' => $post_id, 'post_status' => $post_status));
 }
}
Finally, you may choose to have some output, so you know this all worked. I have built an array of output in the code above so you would just make your parse_xlsx_files:
function parse_xlsx_files() {
 if (isset($_POST['submit_ccsvp_csvs'])) {
 $this->extract_data();
 $this->build_categories();
 $this->map_data();
 $this->import_products();
 echo implode("<p/>",$this->output);
 }
}
How to import products to WooCommerce using a plugin
While WooCommerce’s native functionality for importing products via CSV file is useful, it may not be sufficient for more complex import scenarios. This is where third-party plugins can come in handy.
There are many plugins available for importing products to WooCommerce, each with its own unique set of features and functionalities.
Some of the popular WooCommerce product import plugins include:
Product Import Export for WooCommerce: This freemium plugin is a simple and user-friendly solution for importing and exporting products to WooCommerce. It has support for custom fields and taxonomies and can handle multiple images for each product.
Product CSV Import Suite: Developed by WooCommerce, this plugin allows you to import products, categories, tags, and other data to your WooCommerce store.
WP All Import: A powerful tool that allows you to import any XML or CSV file to WooCommerce. It has a drag-and-drop interface, advanced mapping options, and support for custom fields and taxonomies.
Let’s look at how you can import products using the Product Import Export plugin for WooCommerce.
1: Install and activate your chosen plugin
In this case, we will be installing the free version of the Product Import Export plugin, developed by WebToffee.
Go to your WordPress Dashboard > Plugins > Add New
Search for, install, and activate the plugin.
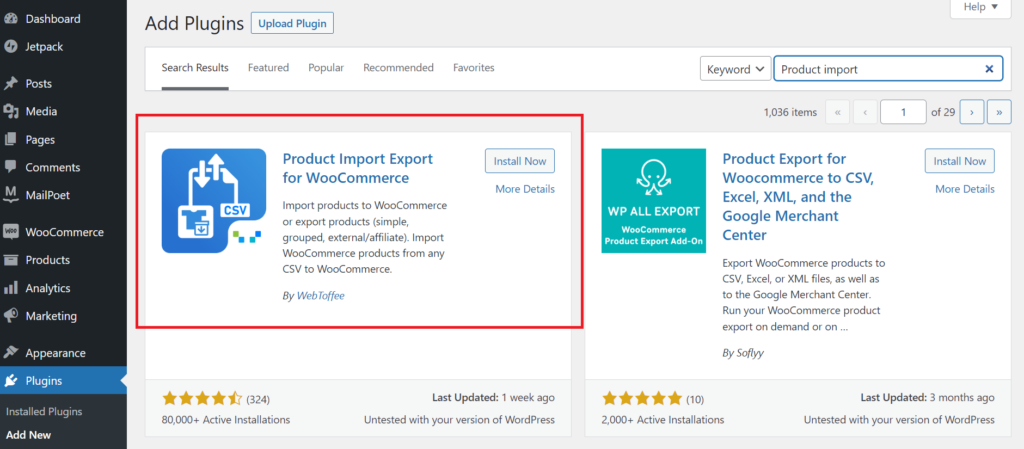
2: Create a CSV file and Configure Plugin Settings
Prepare your CSV file following the required file structure for product data in WooCommerce. Configure the plugin settings to match your import requirements.
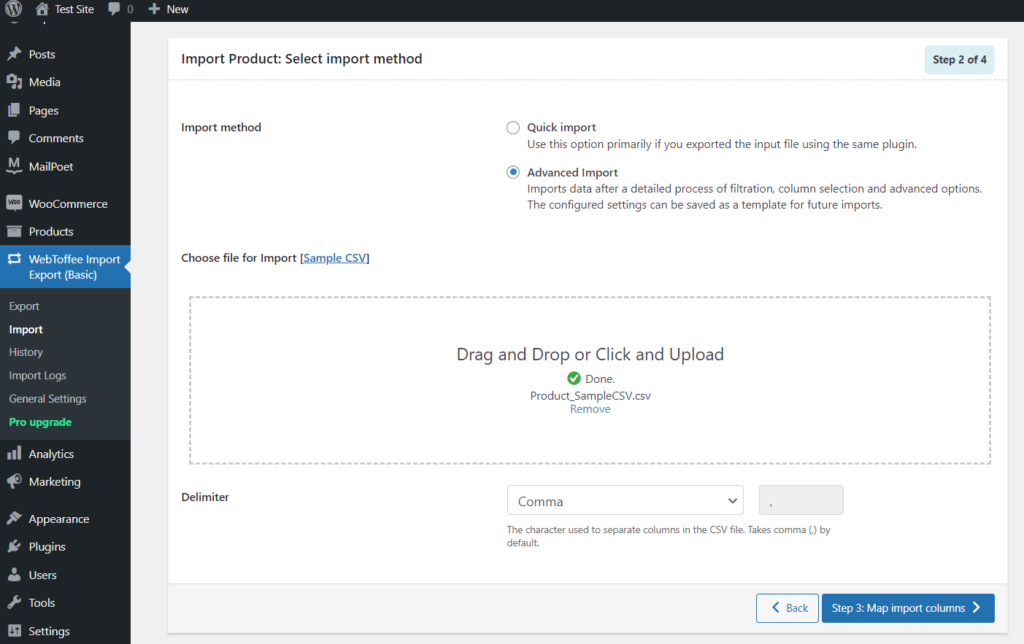
This includes mapping your CSV columns to the WooCommerce fields, setting up custom fields and taxonomies, and choosing import options, such as whether to update existing products or add new ones.
3: Import products
Once you have configured the plugin settings, import your products by uploading your CSV file and clicking on the Import button. The plugin will handle the rest of the process, including validating your data, updating existing products, and adding new products.
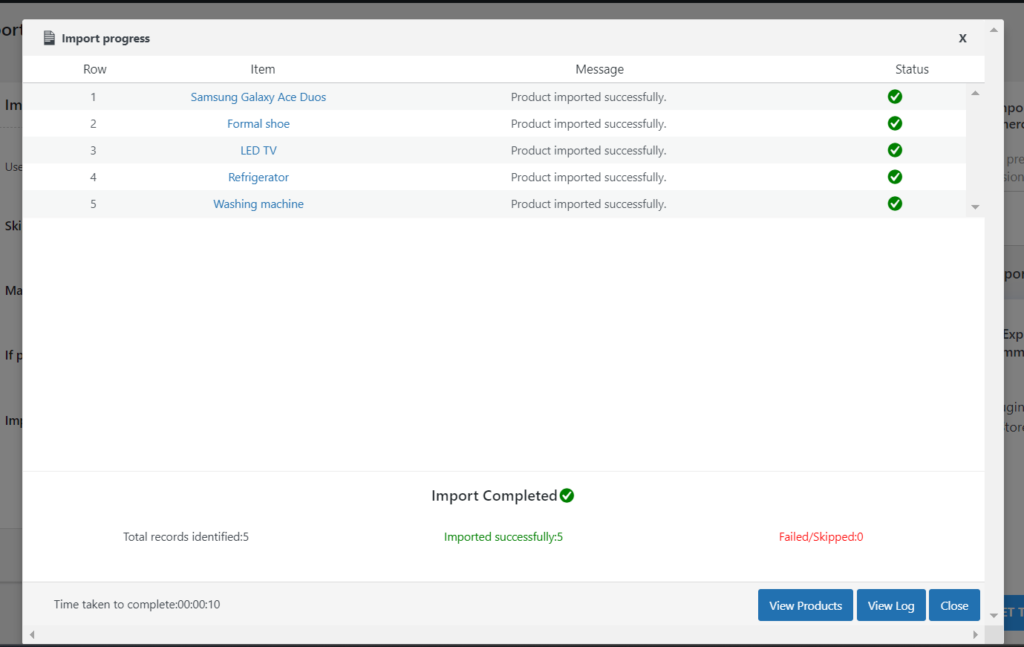
4: Check your imported products
After the import process is complete, check your imported products to make sure that they have been added correctly. You can do this by going to your WordPress dashboard and clicking on Products > All Products.
Importing products to WooCommerce using a plugin can save you time and effort, especially for more complex import scenarios.
By following these simple steps and using a recommended plugin, you can easily import products to your WooCommerce store and start selling in no time.
Start importing products into WooCommerce
So that’s it. Now you can not only parse an xlsx file, but you can import products from xlsx files into WooCommerce – and from multiple files at that. I hope you have enjoyed this tutorial/article. Please share it, so I know you want me to write more like it.
PS: I added the plugin created out of this to a GitHub repo so you can see all the code in one place. In the actual use case, the contractor had already manually downloaded the images from the old site and uploaded them to WP, so I had to do a sideload from there during import, but I have put that use case as commit 1 and then changed it to more common needed download images from URL, so you can see the changes needed to do it whichever way. Hope you like it.

 Dream It
