Managing a static HTML website can become a time-consuming task as your site grows. Updating content, adding new pages, and maintaining site consistency can quickly become a full-time job. This challenge often leads website administrators to explore more efficient ways to manage their online presence.
WordPress offers a solution to these issues. If you converted your existing HTML frontend into a WordPress theme, you could maintain your site’s familiar look while gaining the benefits of a robust content management system. This approach combines the visual appeal of your current design with WordPress’s powerful functionality and ease of management.
If this sounds good to you, strap in for a detailed guide on how to convert static HTML to a WordPress theme. You’ll learn about both manual conversion methods and automated tools that can simplify the process.
Reasons to convert HTML to WordPress
Still on the fence about converting your HTML site to WordPress? Here are six compelling reasons to make the switch:
- Ease of content management: WordPress offers a user-friendly WYSIWYG editor, allowing content creation without extensive coding knowledge. It supports multiple users and roles, facilitating collaborative work while maintaining security. This system simplifies updates and content management compared to static HTML sites.
- Scalability and flexibility: WordPress can handle websites of all sizes, from small blogs to large corporate sites. Its extensive plugin library allows for the easy addition of new functionalities as your site grows. Major organizations like BBC America, TIME, and Microsoft News use WordPress, demonstrating its capability to manage complex, high-traffic websites.
- SEO friendliness: Built-in SEO features and powerful plugins like Yoast SEO make optimizing your site easier. WordPress simplifies the process of customizing meta tags, URLs, and content structure. It also generates sitemaps and supports structured data integration, boosting search engine visibility more efficiently than static HTML sites.
- Community support and resources: WordPress boasts a large, active community offering extensive resources and support, including forums, tutorials, and documentation. This support network proves invaluable for troubleshooting issues or learning new skills, making it easier to manage and improve your site over time.
- Cost-effectiveness: As an open-source platform, WordPress is free to use and modify, potentially lowering maintenance costs. The availability of free themes and plugins further contributes to its cost-effectiveness compared to maintaining a static HTML site.
- Security: WordPress regularly updates its core software to address vulnerabilities. It also supports numerous security plugins like Wordfence, Shield Security PRO, and Sucuri, offering features such as malware scanning and firewall protection.
How to convert HTML to WordPress
Now that you’ve seen the benefits of WordPress, it’s time to roll up your sleeves and get your site converted.
💡 Before diving in, here’s a quick tip: For the best performance post-conversion, consider WordPress-specialized hosting from providers like WP Engine or Kinsta.
Method 1: Manual conversion
The first option entails creating a custom WordPress theme by moving some code around. It’s definitely the most involved but if you follow these steps, you should be able to pull it off:
1. Set up your text/code editor of choice. Free options like VSstatic Code and Notepad++ should be more than enough.
2. Create a folder and give it the name you want your theme to have.
3. In this folder, add the following files with the exact extensions listed: style.css, header.php, index.php, footer.php, and sidebar.php. You’ll be using your text/code editor to open and edit these files.
4. Open the style.css file and paste the following at the top:
/*Theme Name: [The name of the theme]Theme URI: [Where to find more information about the theme]Author: [Who made the theme?]Author URI: [Where to find more information about the creator]Description: [A short description of the theme with things like purpose, usage rights, important notes, etc.]Version: [Theme version, in this case should be 1.0]*/
5. Paste the CSS from your existing site’s stylesheet below this and save the file.
6. Copy everything above your existing site’s index.html file’s <main> tag into the header.php file and save it.
7. If your site has a sidebar, copy everything in the <aside> into sidebar.php and save it.
8. Copy everything in the <main> tag of the index.html file into the index.php file and save.
9. Copy everything in the <footer> of the index.html file into footer.php and save.
10. Paste the following to the top of the index.php file so it knows to look for the header.php file:
<?php get_header(); ?>11. Paste the following into the content area of the index.php file so it’s able to display content to site visitors:
<?php if ( have_posts() ) : ?><?php while ( have_posts() ) : the_post(); ?><div id="post-<?php the_ID(); ?>" <?php post_class(); ?>><div class="post-header"><div class="date"><?php the_time( 'M j y' ); ?></div><h2><a href="<?php the_permalink(); ?>" rel="bookmark" title="Permanent Link to <?php the_title_attribute(); ?>"><?php the_title(); ?></a></h2><div class="author"><?php the_author(); ?></div></div><!--end post header--><div class="entry clear"><?php if ( function_exists( 'add_theme_support' ) ) the_post_thumbnail(); ?><?php the_content(); ?><?php edit_post_link(); ?><?php wp_link_pages(); ?> </div><!--end entry--><div class="post-footer"><div class="comments"><?php comments_popup_link( 'Leave a Comment', '1 Comment', '% Comments' ); ?></div></div><!--end post footer--></div><!--end post--><?php endwhile; /* Rewind or continue if all posts have been fetched */ ?><div class="navigation index"><div class="alignleft"><?php next_posts_link( 'Older Entries' ); ?></div><div class="alignright"><?php previous_posts_link( 'Newer Entries' ); ?></div></div><!--end navigation--><?php else : ?><?php endif; ?>
12. Paste the following to the bottom of the index.php file so it knows to look for sidebar.php and footer.php:
<?php get_sidebar(); ?><?php get_footer(); ?>
13. Make sure you’ve completed every step up until this point and save index.php along with all the other files. Remember to ensure they’re all in the same folder.
14. Upload the folder to your WordPress installation directory under /wp-content/themes.
15. Go into your admin dashboard then Appearance > Themes and locate the theme with the name you used when saving it.
16. Activate the theme and you’re done!
Again, this method is the most complex. After you’ve completed the steps above, you’ll still need to do some extra work in the following areas:
- Handling dynamic content: Adapt static pages to WordPress’s dynamic post and page system, especially for complex layouts or frequently updated sections.
- Ensuring responsive design: Modify existing CSS and HTML to create a fluid layout that works across all devices and screen sizes.
- Maintaining SEO settings: Carefully transfer meta tags, preserve URL structures, and implement redirects to retain search engine rankings and traffic.
- Preserving functionality: Replicate custom HTML/JavaScript features using WordPress plugins or write custom PHP code within the WordPress framework.
- Data integration: Migrate static content into WordPress’s database structure, including posts, pages, and custom post types.
- Performance optimization: Implement caching, optimize images, and minimize plugin usage to maintain or improve site speed in the WordPress environment.
Method 2: Using a child theme
As the name suggests, a child theme is created from a main theme and inherits its aesthetics and functionality. You can then edit it freely without worrying about your changes getting overwritten later by WordPress updates to the main theme.
For the task at hand, this method involves editing the child theme to give it the look and feel of your previous static HTML site. It’s a less complicated version of full manual conversion, but it’s still ideal for major theme customization.
Ideally, you’d want to start with a very barebones theme or one that’s close to what you’re trying to replicate so you’re not doing too much work. Use plugins like WP Child Theme Generator or Child Theme Configurator to create a child theme. This walkthrough will use the latter:
1. Install and activate the Child Theme Configurator plugin.
2. From the dashboard, go to Tools > Child Themes.
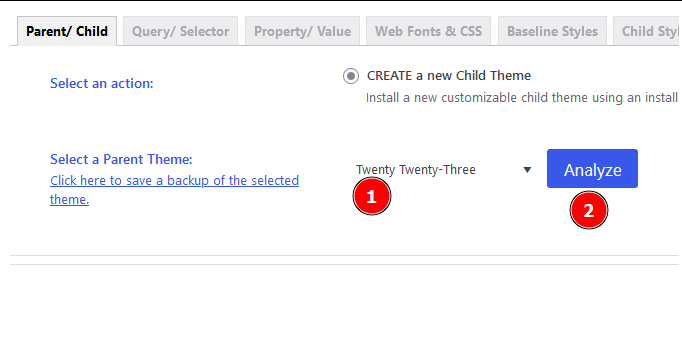
3. Under the Parent/ Child tab, select the theme you want to create a child for then click Analyze.
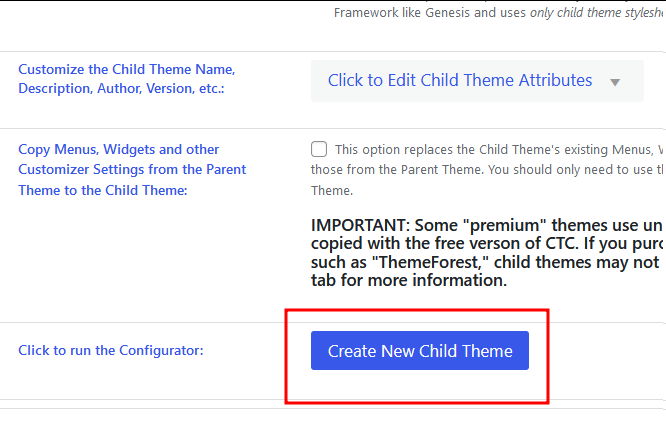
4. If the plugin finds the theme you selected is compatible, go through all the options it presents, and then scroll to the bottom of the page and click on Create New Child Theme.
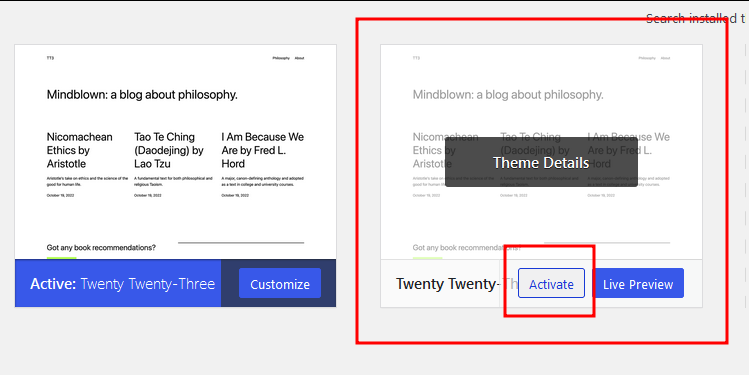
5. Activate the child theme by going to Appearance > Themes and selecting it from there.
6. Now you can go into /wp-content/themes and find the child theme folder. Here you’ll see .php and .css files, where you can add custom code using your code/text editor.
Method 3: Using a plugin
You can also use a plugin like HTML Import 2 or WP File Manager to import your static HTML pages into your WordPress site.
Depending on what exactly you’re trying to achieve, converting HTML into a full-on theme might be overkill, and that’s where this method makes the most sense.
For example, suppose you have a couple of static landing pages and a few others for things like the about, services, and FAQ sections but you also want a blog. You can import the existing pages into WordPress as is, and create a separate blog section, which you can manage with WordPress.
You’ll usually need to do each page individually, but it’s more beginner-friendly than any other option on this list so far.
Here’s how to import HTML pages into your WordPress site with WP File Manager:
1. With the plugin installed and activated, go to your admin dashboard and click on WP File Manager from the menu on the left.
2. Click on the root folder of your installation then create a new folder using the icon along the top menu.
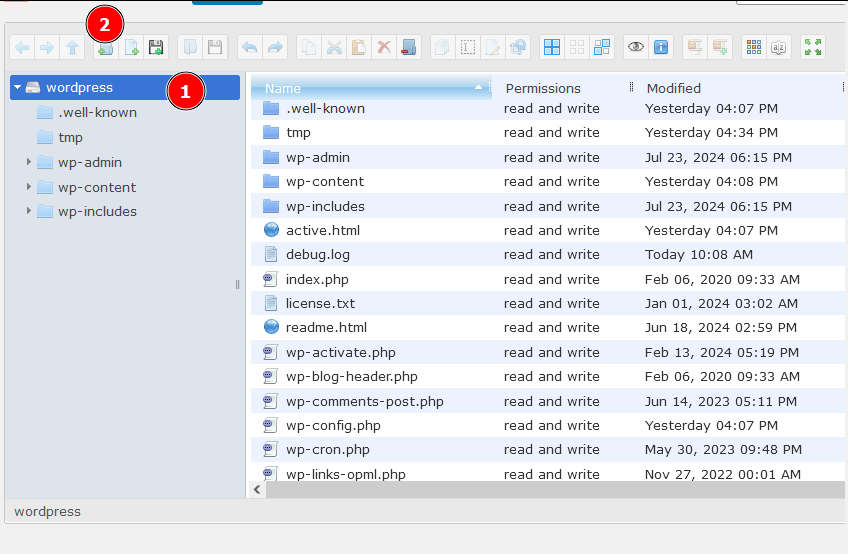
⚠ Don’t assign the new folder the same name as a page that already exists on your WordPress site because that might cause a conflict.
3. Drag and drop the files and folders for each static HTML page into the corresponding folder.
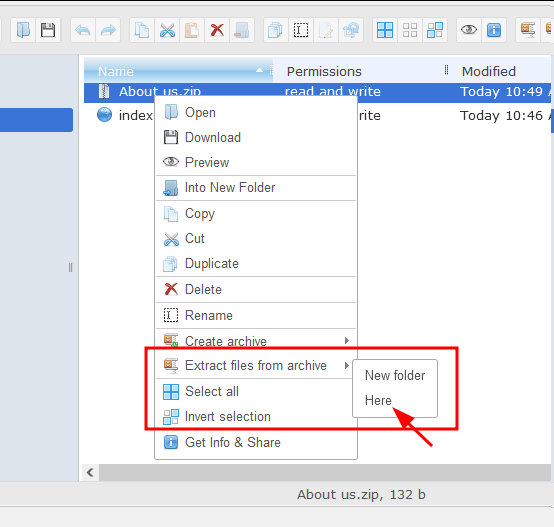
💡 Depending on what browser you’re using, you might need to copy them over in a .zip archive and then unzip them. To do this, just right-click on the archive then go to Extract files from archive > Here > Yes.
4. Navigate to https://yoursite.com/folder-name, and you should see the static page there.
Method 4: Leveraging expert help
Manual conversion complexity and automated tool limitations can be overwhelming. Hiring professionals alleviates these challenges while offering significant advantages:
- Time savings: Experts complete the conversion quickly, freeing you to focus on core business activities.
- Custom theme benefits: Professional developers create tailored themes, offering more control and flexibility.
- Efficiency and expertise: Experienced developers ensure clean code, follow best practices and optimize for performance and security.
- Future-proofing: Professionals build scalable solutions that accommodate future growth.
- SEO preservation: Experts maintain your site’s search rankings during the transition.
While this method may have higher upfront costs, it often proves cost-effective by avoiding common pitfalls and ensuring a high-quality result.
The next section will guide you through finding and hiring qualified WordPress developers for your conversion project.
Bring the power of WordPress to your HTML site with Codeable
Converting your static HTML site to WordPress opens up a world of possibilities. Whether you choose manual conversion, use a child theme, leverage plugins, or hire expert help, the end-result is a more dynamic and manageable website.
A WordPress site offers numerous advantages over static HTML. You’ll enjoy easier content management, greater scalability, and access to thousands of plugins. This flexibility can significantly enhance your site’s user experience and potentially boost your SEO performance.
While the conversion process can be complex, you don’t have to navigate it alone. Codeable connects you with vetted WordPress experts who can handle your conversion efficiently and correctly. These experienced developers ensure a smooth transition, maintaining your site’s design and functionality while unlocking WordPress’s powerful features.
Working with Codeable’s experts helps you save time and avoid common pitfalls in the conversion process. You’ll get a professionally converted site that’s optimized for performance and ready for future growth.
Ready to transform your HTML site into a dynamic WordPress powerhouse? Submit your project to Codeable today and take the first step towards a more flexible and powerful online presence.
 Dream It
