You’ve poured your heart and soul into your WordPress site. The design is sharp, the content is compelling, and you’re ready to wow your audience. But there’s a ghost in the machine: the dreaded loading spinner. You click a link, and you wait. And wait. You can almost feel your visitors’ patience wearing thin before they click away for good.
Fortunately, you don’t have to settle for a site that runs at a snail’s pace. Transforming your website from slow to speedy is completely within your reach.
And that’s exactly what we’ll be doing here. We’re going to walk you through 10 powerful and practical WordPress speed optimization steps that deliver real results.
We’ve designed these steps so you can tackle them yourself. However, sometimes it’s possible that you follow all the rules and still hit a wall, or you uncover a complex issue that a simple plugin can’t fix. When you need to bring in a specialist to look under the hood and provide a tailored solution, a Codeable expert is ready to help.
But for now, let’s roll up our sleeves and get started.
Get matched with the developer
that is perfect fit for your WordPress or WooCommerce needs.
Start a project
1. Upgrade to high-performance hosting

Before you touch a single plugin or optimize an image, let’s start with the real foundation of your website’s speed: your hosting. The server and hosting environment are the bedrock of speed, setting a performance ceiling that no other tweaks can overcome.
Making the right choice involves two key decisions: first, the server type that allocates your resources, and second, the level of technical management you want the provider to handle.
- Shared Hosting: This is the budget-friendly entry point where your site shares server resources with many others. While affordable, it can suffer from the “noisy neighbor” effect, where a traffic spike on another site slows yours down.
- Virtual Private Server (VPS): A significant step up, a VPS gives you a dedicated slice of a server with guaranteed resources. This provides more power and solves the noisy neighbor problem.
- Dedicated Server: The most powerful option, where you rent an entire physical server for your exclusive use. Like a VPS, this can be unmanaged or fully managed.
Management Level: Unmanaged vs. Managed
On top of the server type, you choose a management level.
An unmanaged plan gives you full control but requires you to handle all the technical management and security yourself.
A managed plan is the premium, specialized solution where the provider handles the complex server administration for you. For WordPress sites, the best option is Managed WordPress Hosting. These providers fine-tune the entire environment specifically for WordPress, handling security, backups, updates, and advanced server-level caching so you don’t have to. This delivers superior speed and peace of mind, making it the optimal choice for businesses that want to focus on growth rather than server administration.
For any serious website, the goal is a Time to First Byte (TTFB) of under 200 milliseconds. To achieve this, look for a host that provides modern, performance-focused technology, such as NVMe SSDs for fast data access, NGINX or LiteSpeed web servers, and support for the latest network protocols like HTTP/2.
2. Implement multi-layered caching
At its core, WordPress is dynamic; every time someone visits a page, your server has to run code and query the database to build that page from scratch. Caching solves this by creating a ready-made, static HTML version of your pages. When a visitor arrives, your server can hand them this lightweight file instantly, bypassing the slow, resource-heavy process completely.
Having said that, a truly effective strategy doesn’t rely on a single tool but instead uses a multi-layered approach to optimize every part of the process.
- Page caching. This is the most fundamental and impactful type of caching. It stores a full, static HTML copy of your pages, which is then served to visitors instead of forcing WordPress to regenerate it each time. This is the primary function of popular performance plugins like WP Rocket or W3 Total Cache and is responsible for substantial reductions in server load.
- Browser caching. This technique cleverly offloads work to your visitor’s own device. It instructs their web browser to store local copies of your site’s static assets, like images, stylesheets (CSS), and scripts (JavaScript). When they visit another page or return to your site later, these assets load directly from their computer, resulting in significantly faster load times for repeat visitors.
- Object caching. This is a more advanced, server-side method that uses powerful in-memory storage like Redis or Memcached. While page caching is great for logged-out visitors, it’s often bypassed for dynamic content like shopping carts or logged-in user dashboards. Object caching speeds up these scenarios by storing the results of common database queries, making the whole experience, including your admin area, feel much more responsive.
The most effective setups layer these methods. A request might first be served by the browser’s cache. If not, it could be caught by efficient server-level caching provided by a managed host. Only if that misses does a caching plugin step in to generate and serve the page. This layered system ensures that requests are always handled by the fastest possible mechanism.
3. Deploy a content delivery network (CDN)
No matter where your website is hosted, its server is in one physical place. If a visitor from the other side of the world tries to access it, the data has a long way to travel, which causes delays known as latency.
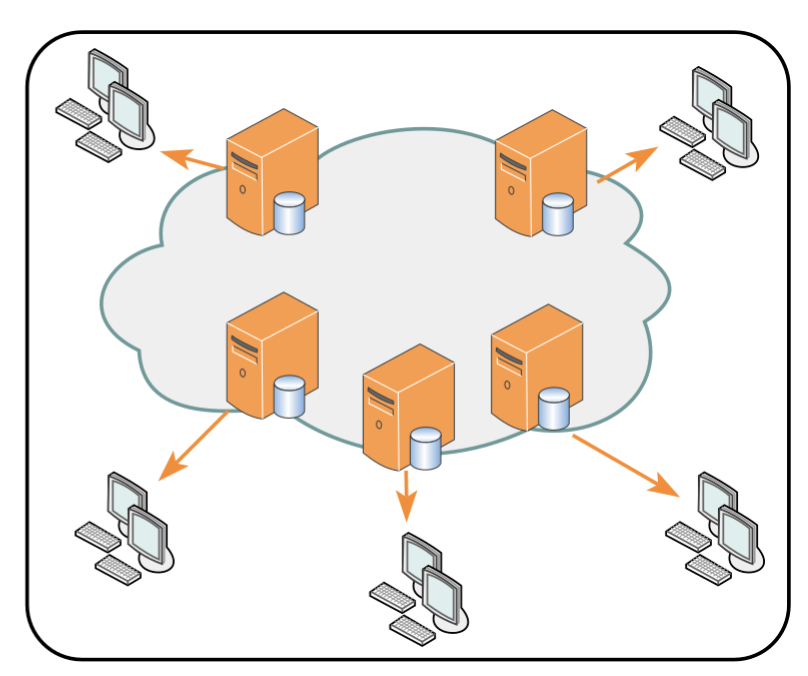
A Content Delivery Network (CDN) solves this problem. It’s a global network of servers, called Points of Presence (PoPs), that stores copies of your site’s static assets, like images, CSS, and JavaScript files. When a user visits your site, the CDN serves these files from the PoP that is geographically closest to them, drastically reducing the travel time for data and accelerating page loads for your entire audience.
While the speed boost is its main draw, a CDN offers several other powerful advantages that make it an essential tool for any serious website.
- Reduces server load. By offloading the delivery of heavy files, a CDN significantly cuts down on the requests your hosting server has to handle, lowering its workload and saving you money on bandwidth costs.
- Enhances security. A CDN acts as a security guard for your website. Its network can absorb large-scale Distributed Denial-of-Service (DDoS) attacks, while its Web Application Firewall (WAF) can block common hacking attempts before they ever reach your server.
- Improves reliability. Because a CDN has cached copies of your site, it can often keep serving your pages to visitors even if your main server temporarily goes offline for maintenance.
Getting started is easy, and using a free CDN plan, like the one from Cloudflare, should be considered a non-negotiable first step for the baseline security and performance benefits it provides.
However, for businesses where every millisecond counts, investing in premium CDN features is a necessary step. Advanced services, such as full-page caching (which caches the dynamic HTML itself) and intelligent traffic routing, unlock top-tier global speed and give you a true competitive edge.
4. Update to the latest PHP version
Think of PHP as the engine that runs your entire WordPress site. It’s the programming language working behind the scenes to build your pages and process data. Using an outdated version of PHP is slow, inefficient, and a major security risk.
Updating to a modern version is one of the single most impactful optimizations you can make. Benchmarks consistently show that newer PHP versions can handle two to three times as many requests per second as their predecessors, offering a massive performance boost for free.
Beyond speed, updating is a critical security mandate. When a PHP version reaches its “End of Life” (EOL), it no longer receives security patches. This means any new vulnerabilities discovered will remain unpatched, leaving your site exposed to hackers. Your own WordPress dashboard will even warn you in the “Site Health” section if your site is running on an unsupported version.
The main reason people hesitate to update is the fear of breaking their site, as an old theme or plugin might not be compatible with the newer PHP versions. To avoid this, follow a safe upgrade procedure:
- Create a staging environment. First, make a complete copy of your live site in a safe staging area, a feature offered by most quality hosts.
- Update PHP on the staging site. In your hosting control panel, switch the staging site to the latest stable PHP version, such as 8.1 or newer.
- Test everything. Thoroughly browse the staging site, testing forms, checkout processes, and all key features to ensure nothing is broken.
- Update the live site. Only after confirming full compatibility should you update the PHP version on your live production server.
This process also serves as an excellent quality check. A theme or plugin that is incompatible with modern PHP is, by definition, using outdated and suboptimal code. It’s a major red flag that the product may be poorly coded or abandoned. Choosing software that stays current with PHP is a key part of keeping your site healthy and fast for the long term.
5. Optimize your database regularly
Your WordPress database is where nearly all of your content and settings are stored, from posts and pages to theme options and user information. Over time, this gets cluttered with unnecessary data, like old drafts, junk mail, and outdated notes.
This digital clutter forces your server to sift through more information than needed, which slows down query times and can degrade the performance of your entire site. Regularly cleaning out this “digital detritus” is a critical maintenance task for keeping your website running efficiently. The most important areas to focus on are:
- Delete or limit post revisions. By default, WordPress saves a new copy of a post every time you click update, which is one of the most common sources of database bloat. These excessive revisions should be periodically deleted, and you can add a simple line of code to your wp-config.php file to limit how many are stored in the future.
- Clean up comments and transients. Regularly purge spam, unapproved, and trashed comments to reduce the size of your comments table. You should also clean out expired “transients,” which are temporary bits of data that plugins sometimes fail to delete correctly.
- Mind your autoloaded data. This is a pro-level tip. The wp_options table in your database stores site-wide settings, and some of this data is marked as “autoloaded,” meaning it gets loaded into memory on every single page view. If this autoloaded data becomes excessive (more than 800KB), it can create a major performance bottleneck.
The good thing is that you don’t need to be a database expert to handle this. Several user-friendly plugins like WP-Optimize and WP-Sweep can perform most of these cleanup tasks with a few clicks. Many all-in-one performance suites, including WP Rocket, also provide tools to schedule these optimizations to run automatically, keeping your database lean and fast without you having to think about it.
6. Choose lightweight themes and quality plugins
The vast ecosystem of themes and plugins is WordPress’s greatest strength, but it’s also the most common source of performance problems. It’s a common myth that the number of plugins is the problem. In reality, it’s the quality that matters most. A single, poorly coded plugin can hurt your site’s speed more than a dozen well-optimized ones.
Your theme forms the foundation of your site, and choosing a bloated one can doom your performance from the start. Avoid “multipurpose” themes that are packed with every feature imaginable, as this kitchen-sink approach almost always results in a slow, heavy codebase.
Instead, seek out themes specifically marketed as “lightweight” or “performance-optimized,” which often have a file size under 1MB. Well-regarded, fast options include Astra, GeneratePress, and Kadence.
A disciplined approach to your plugins is just as crucial for maintaining a fast website.
- Audit plugins regularly. Conduct a regular review of your plugins and delete any that are not absolutely essential to your site’s core function. Quality always wins over quantity.
- Be cautious with heavy plugin types. Certain categories of plugins are known to be resource-intensive. Be extra careful when considering page builders, sliders, or carousels, and plugins that perform continuous background tasks, like security scanners.
- Delete inactive plugins completely. Simply deactivating a plugin is not enough. You must completely delete unused plugins, as even inactive ones can leave behind clutter and pose a security risk if they are not maintained.
7. Optimize images and media
Images are frequently the single heaviest component of a webpage, making them a primary target for optimization. Large, unoptimized images can drastically slow down your site, especially for users on mobile devices, and harm key performance scores like Largest Contentful Paint (LCP).
Tackling image optimization involves a few key techniques that work together to shrink file sizes while protecting visual quality.
- Compress your images. This process reduces an image’s file size, and a “lossy” compression level of 75-85% often provides the best balance between size and quality. This can be automated by plugins like Smush or Imagify, which compress images as you upload them.
- Resize to the correct dimensions. A common mistake is uploading a massive image and simply scaling it down on the page with code. The browser still has to download the huge original file. The correct practice is to resize your images to their maximum required display dimensions before you upload them to WordPress.
- Use modern file formats. Next-generation formats offer far better compression than JPEGs and PNGs. WebP, developed by Google, can create files that are 25-35% smaller than an equivalent JPEG. The newer AVIF format can achieve reductions of up to 60%. Many optimization plugins can convert your images to these formats automatically.
- Implement lazy loading. This powerful technique improves initial load times by deferring the loading of images and videos that are “offscreen” (i.e., not yet in the user’s view). Instead of downloading everything at once, media is only loaded when a user scrolls down the page.
However, a smart strategy is crucial for lazy loading. You must exclude images that appear “above the fold” (visible without scrolling), especially your main hero image. Lazy loading this critical image would intentionally delay its appearance, harming your LCP score and making the site feel slower. The best approach is to lazy load everything below the fold while ensuring your most important above-the-fold images load immediately.
8. Optimize code and asset delivery
Even with a fast server and optimized images, your site can still feel slow if the browser is forced to handle code inefficiently. The CSS and JavaScript files that control your site’s appearance and interactivity can act as “render-blocking resources.” This means the browser has to pause the process of building the visible page while it downloads and reads these files, leading to a frustrating wait for the user.
Optimizing how this code is delivered is a highly effective, though technical, step. The goal is to get the most important visual information to the user as quickly as possible. This involves several advanced techniques:
- Minify your code files. Minification is the process of removing all unnecessary characters from code without changing its function, including whitespace, comments, and line breaks. This reduces the overall file size of your CSS, JavaScript, and HTML, resulting in faster downloads.
- Defer non-critical JavaScript. By default, when a browser encounters a script, it stops everything to download and execute it. Deferring a script tells the browser to download it in the background while it continues to render the rest of the page. This prevents non-essential scripts from blocking the initial view.
- Remove unused CSS. Most themes load one large stylesheet across your entire site, but any single page might only use a small fraction of those style rules. Modern performance tools can scan a page and generate a much smaller, page-specific stylesheet containing only the CSS that is actually being used.
- Inline critical CSS. This is a key strategy for achieving the fastest possible “first paint.” It identifies the absolute minimum CSS required to style the content visible “above the fold” and places it directly (“inlined”) into the HTML document. This allows the browser to start rendering the visible portion of the page almost instantly, without waiting for an external file to download, which provides a massive boost to perceived performance and LCP scores.
These code optimizations are hallmarks of top-tier performance plugins and are essential for earning excellent scores on modern web performance benchmarks.
9. Reduce HTTP requests and server overhead
Think of your browser loading a webpage like ordering a meal from several different restaurants at once. Every single element – each image, script, and stylesheet – requires a separate HTTP request to fetch it. When you add third-party scripts for analytics, ads, or chat widgets, it’s like sending a new delivery driver to another restaurant for each one. Every trip adds time and creates a potential point of failure; if one service is slow, it can delay your entire site from loading. Reducing these requests and lightening your server’s background workload is a crucial optimization step.
A rigorous audit of your site’s requests is the best place to start. For every external script, you must weigh the value it provides against its performance cost. Beyond that, several other techniques can trim the fat.
- Minimize external scripts and host assets locally. Instead of loading fonts from a service like Google Fonts on every page view, they can be hosted directly on your own server, which eliminates the external request. Delaying non-essential third-party scripts until a user interacts with the page is also highly effective.
- Optimize WordPress’s background processes. On high-traffic sites, WordPress’s default task scheduler (WP-Cron) can trigger too frequently, adding unnecessary server load. A more robust solution is to disable the default behavior and set up a true system cron job on your server to run tasks at a fixed interval.
- Turn off non-essential core features. WordPress includes several features that many modern sites don’t need. You can safely disable pingbacks and trackbacks, which are a common source of comment spam. You can also disable the extra JavaScript file that WordPress loads to support emojis, removing one HTTP request from every single page.
10. Structure content for better performance
The final pillar of optimization focuses not just on raw speed, but on perceived performance, or how fast your site feels from the user’s perspective. You can make your site feel much faster by strategically structuring your content to deliver a usable and interactive page as quickly as possible, even while some elements are still loading in the background.
This is all about prioritizing what the user sees first and reducing the initial amount of content the browser has to load.
- Use excerpts on archive pages. On your main blog page or category archives, you should never display the full content of each post. Doing so forces the browser to load all the text and images for ten or more articles at once, leading to extremely slow load times. Configure WordPress to show only a short summary, or excerpt, for each post to make these crucial pages much faster to browse.
- Paginate your comments. If a post attracts a large number of comments, loading all of them at once can significantly drain performance. A post with hundreds of comments and their associated user avatars adds substantial weight to the page. WordPress has a built-in feature in the “Settings > Discussion” menu that lets you break comments into pages; setting this to 25 or 50 comments per page is essential for any site with an active community.
- Split long posts into multiple pages. For extremely long articles, like comprehensive guides or tutorials, consider splitting the content across several pages using the WordPress “ tag. This can significantly improve the initial load time for each section of the content.
Finally, it’s critical to eliminate performance-killing gimmicks. Image sliders and carousels, especially in the main hero section of a homepage, are notorious performance killers. They are built with heavy JavaScript, require loading multiple large images (which harms LCP), and can cause distracting layout shifts (which harms CLS).
Studies also show they have very low user engagement. Replacing a heavy slider with a single, well-optimized static hero image and a clear call-to-action is one of the most effective changes you can make to improve both speed and usability.
Optimize your web performance with Codeable’s help
While this guide provides a powerful playbook for you to follow, sometimes you’ll hit a stubborn bottleneck that a plugin just can’t solve. Your site might have unique complexities from custom code, e-commerce functions, or third-party integrations that require a deeper, more tailored approach.
This is where a Codeable expert can be your most valuable asset. Our vetted WordPress performance specialists go beyond basic optimizations. They can perform deep-level audits to pinpoint the true source of a slowdown, fine-tune server configurations, refactor inefficient code, and provide custom solutions that are built specifically for your website’s needs.
To make it easier to get started, Codeable offers structured packages designed around the exact challenges covered in this guide.
If you suspect hidden performance issues are dragging your site down, a WordPress audit puts a vetted specialist on the case. Three tiers are available based on your setup:
- Standard ($599) for core WordPress sites.
- WooCommerce ($999) for online stores that need checkout and catalog analysis on top of the full review.
- Enterprise (from $1,500) for high-traffic or complex multi-site environments.
Each audit covers performance, security, and code quality, so you walk away with a prioritized list of exactly what to fix.
Once your site is running the way it should, you’ll want to keep it there. Codeable’s maintenance packages handle ongoing plugin updates, uptime monitoring, database optimization, and regular backups so performance doesn’t quietly degrade over time. Plans start at Basic ($140/mo) for smaller sites, with Advanced ($590/mo) and Enterprise ($1,000+/mo) options for stores and businesses that need more hands-on attention.
Not sure where to begin? A $69 expert consultation lets you talk through your site’s specific performance issues with a WordPress specialist. You’ll get personalized guidance on which optimizations to prioritize before committing to a full audit or ongoing plan.
If you’re ready to stop tinkering and get serious, professional results, our experts are here to help you build a site that is fast and exceptionally effective at achieving your business goals.
Get a free, no-obligation estimate from a Codeable performance expert today.

20 000+ businesses of every shape and size have already trusted us to hire WordPress developers and scale their growth.
 Dream It

