fullPage.js is an immensely powerful free jQuery-based JavaScript library, offering (as the name suggests) an ability to create very attractive, dynamic and responsive full-screen scrolling websites. The library was created by Spanish developer Álvaro Trigo and it is being used by some of the world’s top brands.
The library itself is very easy to use, even though for some customizations and changes you need to go through the code. But everything is “where it should be” and well commented.
Given the popularity of Advanced Custom Fields plugin and the way the library works – specifically menu items and sections – I was thinking about finding an easy way to create all the sections only from one page using Repeater field, at the same time allowing people to add new menu items easily without the need of any programming knowledge. The code I created is indeed lightweight and quite different than other themes, even though I didn’t care much to search if anyone had the same idea regarding ACF/fullPage.js integration. Please note that Repeater field is part of ACF PRO, which means you’ll have to pay some money for it.
Need help with your WordPress theme? Hire Bruno Kos and let him work his magic for you!
Create a blank page
I’ve created this theme only to be used as a full page layout, using the library. That’s why some pretty standard WordPress stuff has been left out, such as standard loop within index.php template. No worries – wp_head() and wp_footer() are both included. The code is indeed minimal, while CSS has been taken from Twenty Sixteen theme. I’ve also added a smaller amount of my own CSS, but design, in general, is not important throughout this tutorial as it is likely that whoever will use this theme will design their own stuff.
So, here’s the deal – create a blank page and make sure that you set it as a static page within Settings -> Reading menu item. This is our starting point and without this, it will not work.
Adding scripts
The second step is to add scripts to work with our WordPress theme – you can download the latest fullPage.js version from the official website. The inclusion is pretty standard:
add_action(‘wp_enqueue_scripts’, ‘bbird_scroller_scripts’); function bbird_scroller_scripts() { wp_enqueue_style( ‘basic-css’, get_stylesheet_uri() ); wp_enqueue_style( ‘font-awseome’, get_stylesheet_directory_uri().’/css/font-awesome.min.css’ ); wp_enqueue_style( ‘fullpage-css’, get_stylesheet_directory_uri() . ‘/css/jquery.fullPage.css’); wp_enqueue_script(‘fullpage-js’, get_stylesheet_directory_uri() . ‘/js/jquery.fullPage.js’, array(‘jquery’)); wp_enqueue_script(‘fullpage-initialize’, get_stylesheet_directory_uri() . ‘/js/fullpage.initialize.js’, array(‘jquery’)); }
Besides Font Awesome I’ve included for my own fun, I’m sure you’ll notice fullpage.initialize.js script as well – we will get to that later.
Creating menus and custom walker class
If you check the menu generated by fullPage.js library on their demo site, you find some custom data attributes, namely data-menuanchor, which on the other hand is connected to sections (full-screen pages) via data-anchor attribute.
This is how fullPage.js navigation works. Given that custom data attributes as of this writing are not yet implemented into WordPress menus, we will need to create one of my favorites within the whole WordPress ecosystem – custom walker class. I’ve purged the class from all the comments and this is how it looks like:
[code lang=’php’] function increment() { static $i = 1; return $i++; } class bbird_scroller_walker extends Walker_Nav_Menu { function start_el( &$output, $item, $depth = 0, $args = array(), $id = 0 ) { $indent = ( $depth ) ? str_repeat( “t”, $depth ) : ”; $classes = empty( $item->classes ) ? array() : (array) $item->classes; $classes[] = ‘menu-item-‘ . $item->ID; $args = apply_filters( ‘nav_menu_item_args’, $args, $item, $depth ); $class_names = join( ‘ ‘, apply_filters( ‘nav_menu_css_class’, array_filter( $classes ), $item, $args, $depth ) ); $class_names = $class_names ? ‘ class=”‘ . esc_attr( $class_names ) . ‘”‘ : ”; $id = apply_filters( ‘nav_menu_item_id’, ‘menu-item-‘. $item->ID, $item, $args, $depth ); $id = $id ? ‘ id=”‘ . esc_attr( $id ) . ‘”‘ : ”; $slider_value = ‘slide’ . increment(); $output .= $indent . ‘
- ‘; $atts = array(); $atts[‘title’] = ! empty( $item->attr_title ) ? $item->attr_title : ”; $atts[‘target’] = ! empty( $item->target ) ? $item->target : ”; $atts[‘rel’] = ! empty( $item->xfn ) ? $item->xfn : ”; $atts[‘href’] = ! empty( $item->url ) ? $item->url : ”; $atts = apply_filters( ‘nav_menu_link_attributes’, $atts, $item, $args, $depth ); $attributes = ”; foreach ( $atts as $attr => $value ) { if ( ! empty( $value ) ) { $value = ( ‘href’ === $attr ) ? esc_url( $value ) : esc_attr( $value ); $attributes .= ‘ ‘ . $attr . ‘=”‘ . $value . ‘”‘; } } $title = apply_filters( ‘the_title’, $item->title, $item->ID ); $title = apply_filters( ‘nav_menu_item_title’, $title, $item, $args, $depth ); $item_output = $args->before; $item_output .= ‘<a’. $attributes=”” .’=””>’; $item_output .= $args->link_before . $title . $args->link_after; $item_output .= ”; $item_output .= $args->after; $output .= apply_filters( ‘walker_nav_menu_start_el’, $item_output, $item, $depth, $args ); } } [/code] </a’.>
You will not find many changes here, but with an exception – the function increment(). What does it do? This is an extremely simple function which adds increments for each new “slide” – this was my personal preference simply in order to keep the whole code clean. You can use any other name instead of “slide”, even though I don’t see the purpose of changing it.
So let’s examine only the part where I’ve added an increment:
$slider_value = ‘slide’ . increment(); $output .= $indent .
As you can see, I’ve only created a new variable **$slider_value** which is used for our custom attribute. Finally, we need to register a menu as well:
// Register Navigation Menus function bbird_scroller_register_menus() { $locations = array( ‘Primary’ => __( ‘Main and only menu in the theme’, ‘text_domain’ ), ); register_nav_menus( $locations ); } add_action( ‘init’, ‘bbird_scroller_register_menus’ );
Initializing fullPage.js
Before we step into the dashboard, let’s initialize the library. This is also pretty straightforward and the purpose of this initialization is actually (at least what I think it is) is that you can easily override all the settings that ship with the library, without needing to overwrite the core file which is updated pretty regularly. This is just one of the many examples of how our initializing function can look like:
jQuery(document).ready(function($) { $(‘#fullpage’).fullpage({ //Navigation menu: ‘#menu’, //Add more anchors if required, but i think that 10 will do for the most projects 🙂 anchors:[‘slide1’, ‘slide2’, ‘slide3’, ‘slide4’, ‘slide5’, ‘slide6’, ‘slide7’, ‘slide8’, ‘slide9’, ‘slide10’], navigationPosition: ‘right’, navigationTooltips: [‘Home’, ‘About’, ‘Portfolio’, ‘slide4’, ‘slide5’, ‘slide6’, ‘slide7’, ‘slide8’, ‘slide9’, ‘slide10’], showActiveTooltip: false, //Scrolling css3: true, scrollingSpeed: 700, autoScrolling: true, fitToSection: true, fitToSectionDelay: 1000, scrollBar: false, //Accessibility keyboardScrolling: true, //Design controlArrows: true, paddingTop: ‘3em’, paddingBottom: ’10px’, fixedElements: ‘#header, .footer’, responsiveWidth: 0, responsiveHeight: 0, }); });
If you check the core file, you will also find all these options, but there is one we are particularly interested in – anchors (a bit more) and navigationTooltips (a bit less). Without these anchors, our menu would not work so the visitor would be able to scroll through pages only via mouse wheel or keyboard. Therefore, we need to add several anchors – for this purpose, I’ve added 10 of these which is I think sufficient for most projects, even though you can add more if required. But I seriously doubt that you will have 15, 20 or more menu items – pages.
When it comes to navigationTooltips, these are simply the titles that appear over navigation buttons (you can disable those as well) and as such are not important for this tutorial. The JavaScript above is located within fullpage.initialize.js file which we called through bbird_scroller_scripts() function.
Creating ACF repeater field and subfields
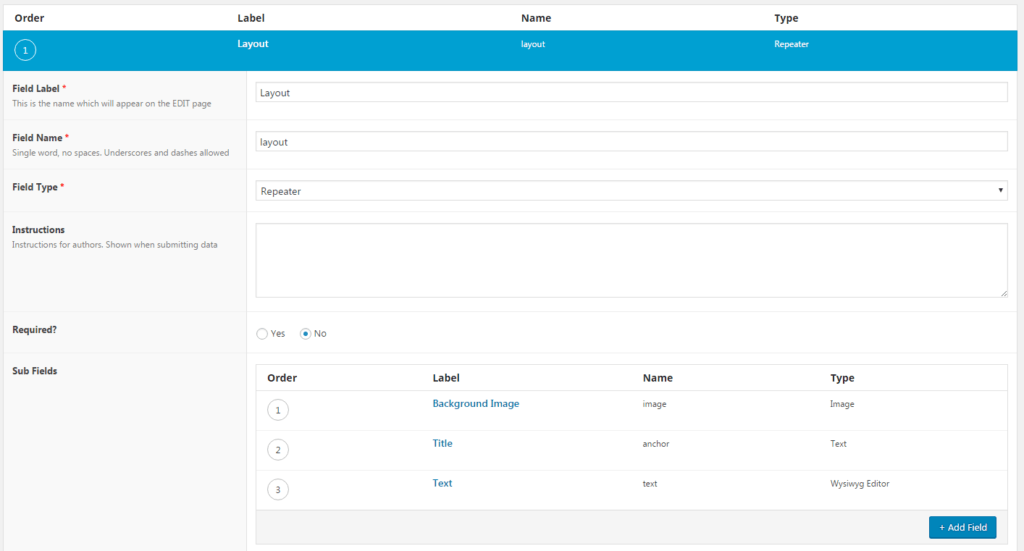
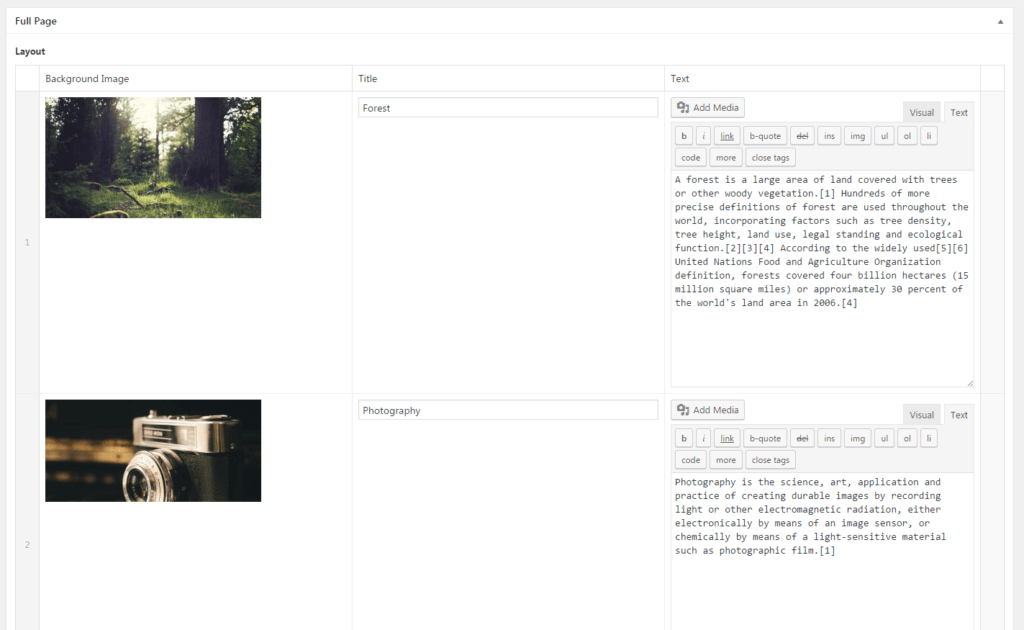
This is where we meet the main idea – Repeater fields for generating fullPage.js pages. Also, I registered few other fields within our Repeater, one for the background image, one for the title and one for text. In order to keep the tutorial short, I will provide you with ACF export file at the end of this article, but this is how the structure looks like – even default values work so there really isn’t anything spectacular here. You’re free to modify the layout of these fields as you wish, but don’t change Field Names, unless you change them within the code as well.

Index.php template
As mentioned earlier, this theme is not to be used for anything else outside the ACF set up – therefore, all the code is in the index.php, even though it could have been in custom page template as well. Let’s examine the code (for article purpose I removed few standard elements, which you can find within full theme zip below the article):
'; endwhile; else : // no rows found endif; ?>

Menus and final demo
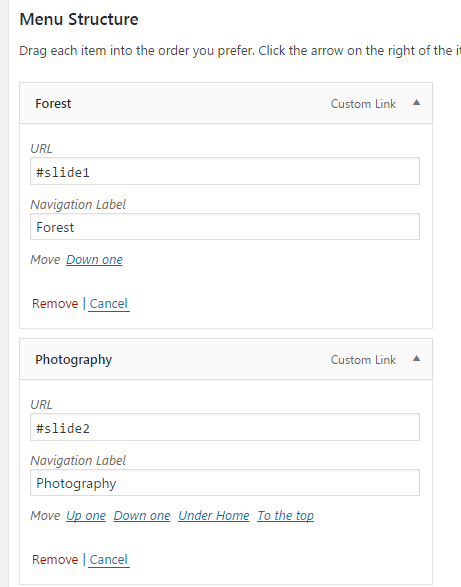
Even though you can create a full page layout without a menu (and this is often the case), I think that retaining the menu was a very important part. Adding menu items is a breeze and is based on anchors (which we set while initializing our own set of functions) and custom data attributes. In our particular example, this is how the menu structure should look like, allowing smooth scrolling between pages:

Naturally, all of this wouldn’t make sense if you can’t see it in action or without a possibility of downloading all the files, so make sure you check the following links:
I really hope you enjoyed this tutorial and I hope even more that you will use my starter theme for creating your next awesome theme for your clients!
Need a new WordPress theme or any theme customizations? Hire an ACF Developer from Codeable today.
 Dream It
