



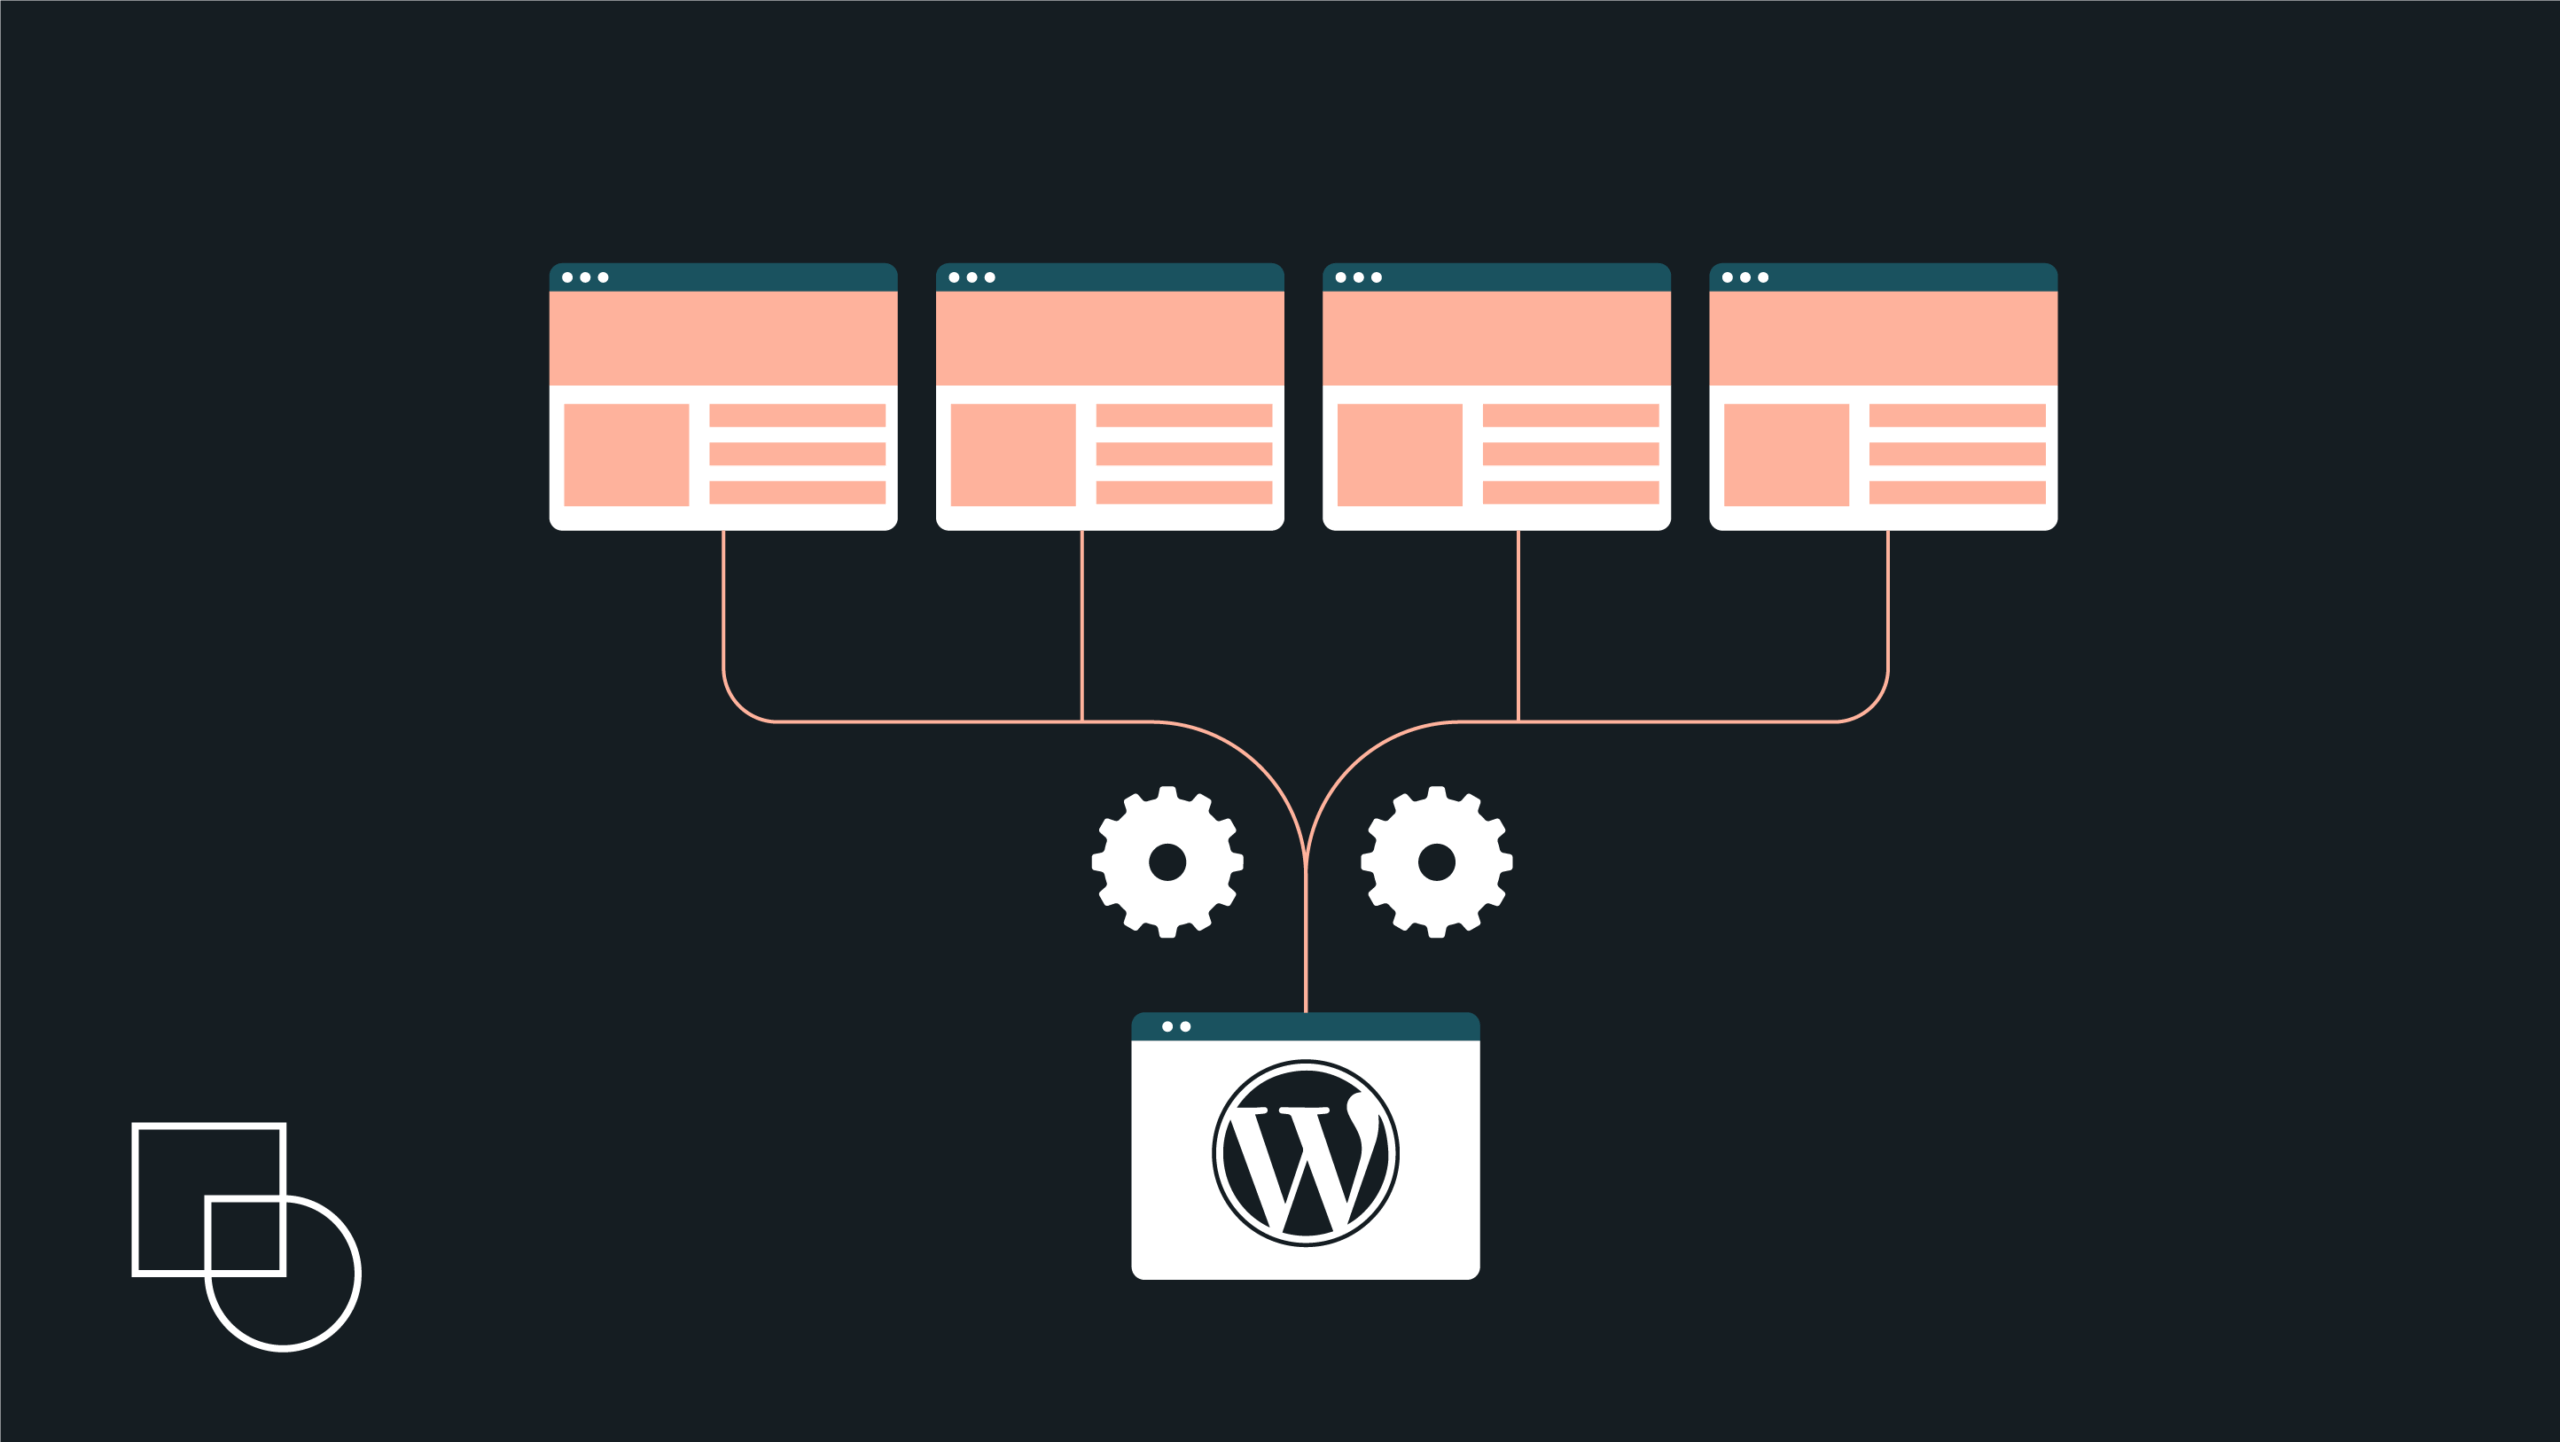
Running five WordPress sites means five dashboards, five rounds of updates, and five passwords to keep straight. Multisite offers a way out. It runs every site from one install, so they all share the same core files, one database, and one user table. That works nicely when the sites belong to the same team and follow the same rules. It backfires when they don’t, and that warning rarely shows up in online tutorials.
Speaking of tutorials, most of them cover the six setup steps and quit. This guide keeps going. You’ll get the prep checks that stop trouble before it starts, the file edits people fumble by pasting the wrong code, the user roles that catch teams off guard after launch, the database details developers want spelled out, the four errors that break a fresh network, and the security risks that usually get one throwaway line.
There’s a lot to cover, so let’s get started.
How to decide if WordPress Multisite is right for you
WordPress Multisite is a built-in feature that runs several separate websites from a single WordPress installation. It has been a part of WordPress core since version 3.0 landed in 2010, back when the old WordPress MU project was folded into the main software. In other words, you don’t need to install anything else. It’s just a question of flipping the switch. The harder question is whether you should switch it on at all, so let’s settle that first before you touch a single file.
Start by looking at who uses the feature well.
BBC America gives each of its shows its own subsite. The University of British Columbia hosts a blog network for faculty and students. Every one of these networks has the same thing in common. The sites share an owner, follow the same standards, and carry the same tolerance for risk. That shared foundation is what makes Multisite click.
To pressure-test your own plan, borrow the variance scoring model from Rivulet IQ. Rate your intended sites across five factors.
- Design variance: Measures how different the sites need to look from one another.
- Plugin variance: Covers how much their individual feature and plugin needs diverge.
- Release cadence: Tracks whether they update on the same schedule or on completely different ones.
- The editor model: Looks at who publishes content and how much freedom those people need.
- Risk tolerance: Weighs how much a problem on one site can be allowed to reach the others.
Score high on two or more of these, and separate installs are almost always the smarter path.
Multisite is the wrong tool for unrelated client sites bundled under one network. Pulling a subsite out later turns into database surgery, since every subsite stores its tables inside the one shared database everyone else is using.
What to do before you enable Multisite
Almost every “my setup broke” story traces back to a step that got skipped before Network Setup ever ran. The good news is that the prep work is short, and each item on it heads off a specific failure you’d otherwise be debugging later. Walk through all four before you open wp-config.php.
- Back up your database and files. Turning on Multisite edits two core files and rewrites parts of your database structure. A full backup gives you a clean way to roll things back if a step goes sideways.
- Turn on pretty permalinks and switch off your plugins. The installer expects permalink rewriting to already work, and active plugins can interfere with the process and throw it off course. Check Settings > Permalinks first, then deactivate every plugin before you begin.
- Lock in your URL structure and prep DNS if you’re going with subdomains. This choice gets written as a constant in wp-config.php, so it needs to be made now rather than mid-setup. Subdomain networks also need a wildcard DNS record, which means an A record using an asterisk as the hostname, pointed at your server’s IP address. That record is what lets brand-new subsites resolve the moment you create them.
- Confirm your hosting can handle it. Apache reads the .htaccess file, while Nginx ignores it and needs those same rewrite rules added to the server block instead. One more thing to keep in mind: if your WordPress install is more than 30 days old, WordPress blocks the subdirectory option, a safeguard that stops new subsite URLs from colliding with post slugs you’ve already published.
Refer to WordPress’s developer documentation for detailed guidelines on what you should and should not do before enabling multisite.
How to enable Multisite and choose your URL structure
With the prep work done, turning on Multisite comes down to three moves. The whole thing takes a few minutes, and none of the steps are hard on their own. The place where people get burned is the code, so the plan here is to get you activated first, then handle the file edits carefully in their own section.
Step 1: Switch on Network Setup. Connect to your site via FTP or your host’s file manager, then open wp-config.php. Add this line directly above the line that reads /* That’s all, stop editing! */:
define( ‘WP_ALLOW_MULTISITE’, true );
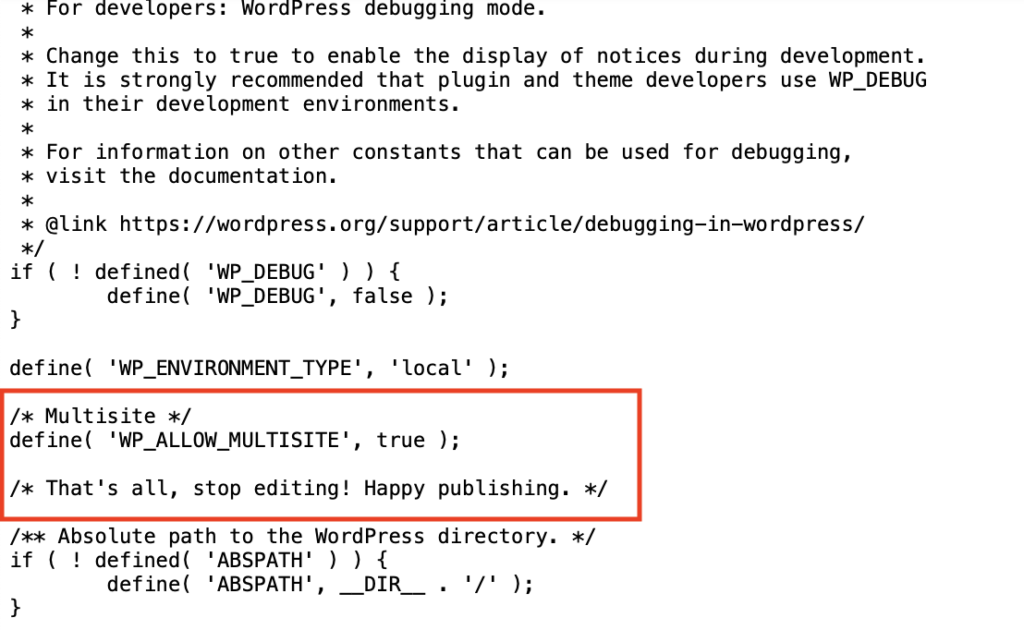
Save the file and refresh your dashboard. A fresh “Network Setup” item shows up under Tools, which tells you WordPress is ready for the next step.
Step 2: Run Network Setup. Head to Tools > Network Setup. Here you’ll pick either subdomains or subdirectories, and the criteria for that call sit in the subsection just below. Fill in a network title and an admin email, then click Install. WordPress now builds two blocks of code that are specific to your installation, which is exactly why you shouldn’t grab this code from anywhere else.
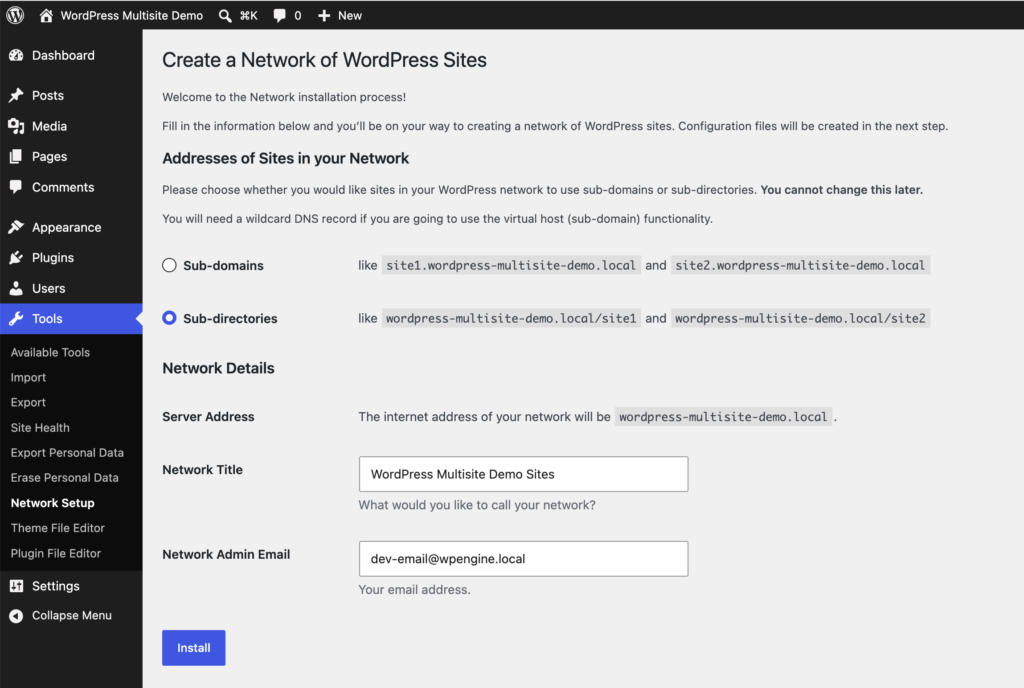
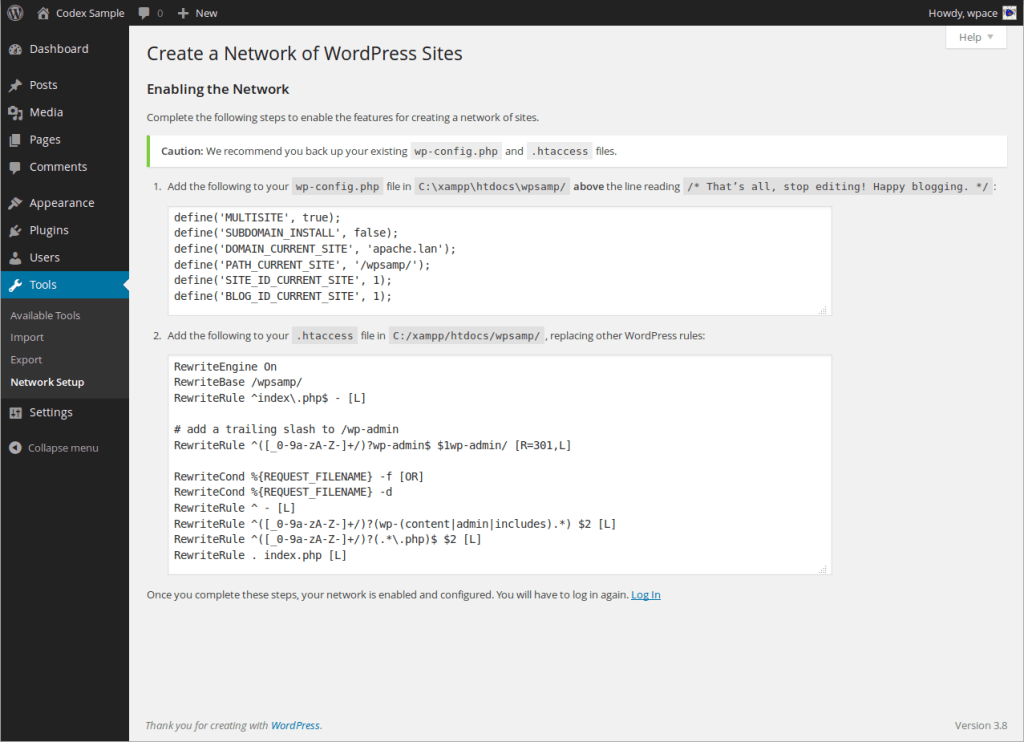
Step 3: Paste the generated code. WordPress hands you those two blocks and asks you to add them to two files. That edit gets its own walkthrough next because badly edited core files are the single most common reason a setup falls apart. Once the code is in place, log out and log back in. When the “My Sites” menu appears in your admin toolbar, your network is officially live.
One question comes up a lot at this stage, and it’s worth answering now. What if you want each subsite to run on its own custom domain rather than a subdomain or folder? Modern WordPress handles that natively through domain mapping. You assign the custom domain when you create the subsite, then point that domain’s DNS at your server. The full domain mapping walkthrough lives in the URL structure companion piece, so we’ll keep this to the short version and stay focused on getting your network stood up.
How to pick between subdomains and subdirectories
Reach for subdomains when your sites are distinct projects, when you want open registration, or when you need per-site SSL flexibility (site1.network.com).
Choose subdirectories when the sites are closely related content under one brand (network.com/site1). WordPress records your pick as the SUBDOMAIN_INSTALL constant, and it’s tough to reverse once sites exist. If you plan to map custom domains onto every subsite anyway, the internal choice barely shows to visitors. The full SEO trade-off breakdown lives in the URL structure companion piece.
How to edit wp-config and htaccess
Network Setup generates two code blocks built around your exact domain, and that detail matters more than any other in this whole process. Never copy these blocks straight from a tutorial. Generic snippets carry placeholder values that don’t match your site, and they’re the usual cause of the “Incomplete Multisite network detected” error covered later in troubleshooting.
The first block goes in wp-config.php. WordPress builds it from six constants, and this is the order it uses for a subdirectory network.
define( 'MULTISITE', true );define( 'SUBDOMAIN_INSTALL', false );define( 'DOMAIN_CURRENT_SITE', 'yourdomain.com' );define( 'PATH_CURRENT_SITE', '/' );define( 'SITE_ID_CURRENT_SITE', 1 );define( 'BLOG_ID_CURRENT_SITE', 1 );Each line has a job. MULTISITE switches the network on.
- SUBDOMAIN_INSTALL records your URL choice, and it reads false for subdirectories or true for subdomains.
- DOMAIN_CURRENT_SITE holds your real domain, which is the one value you most need to match to your own site instead of copying from an example.
- The last three constants (PATH_CURRENT_SITE, SITE_ID_CURRENT_SITE, and BLOG_ID_CURRENT_SITE) point WordPress at your original root site.
Paste the whole block directly above the /* That’s all, stop editing! */ line, right next to the WP_ALLOW_MULTISITE constant you added earlier. Keep the order as shown, since the installer produces it this way on purpose and the official handbook lists the same sequence.
The second block goes in .htaccess, and this is where a small slip causes a big mess. Swap your entire existing WordPress rewrite block for the new one. Do not paste it below the old rules, because leaving both sets active makes every subsite URL return a 404 error. This is the block for a subdirectory network.
RewriteEngine OnRewriteRule .* - [E=HTTP_AUTHORIZATION:%{HTTP:Authorization}]RewriteBase /RewriteRule ^index\.php$ - [L]# add a trailing slash to /wp-adminRewriteRule ^([_0-9a-zA-Z-]+/)?wp-admin$ $1wp-admin/ [R=301,L]RewriteCond %{REQUEST_FILENAME} -f [OR]RewriteCond %{REQUEST_FILENAME} -dRewriteRule ^ - [L]RewriteRule ^([_0-9a-zA-Z-]+/)?(wp-(content|admin|includes).*) $2 [L]RewriteRule ^([_0-9a-zA-Z-]+/)?(.*\.php)$ $2 [L]RewriteRule . index.php [L]
Subdomain networks get a slightly shorter version, since the rules don’t need to account for a folder path in the URL.
RewriteEngine OnRewriteRule .* - [E=HTTP_AUTHORIZATION:%{HTTP:Authorization}]RewriteBase /RewriteRule ^index\.php$ - [L]# add a trailing slash to /wp-adminRewriteRule ^wp-admin$ wp-admin/ [R=301,L]RewriteCond %{REQUEST_FILENAME} -f [OR]RewriteCond %{REQUEST_FILENAME} -dRewriteRule ^ - [L]RewriteRule ^(wp-(content|admin|includes).*) $1 [L]RewriteRule ^(.*\.php)$ $1 [L]RewriteRule . index.php [L]
A quick note for anyone running Nginx or a local stack like Local, Docker, or MAMP with Nginx. The .htaccess file does nothing on those setups. The same rewrite logic instead goes into your Nginx server block configuration. Managed Nginx hosts usually take care of this for you automatically.
How Multisite stores subsite data and media
Multisite keeps every site’s data inside one shared database, and knowing how that data is organized saves you real pain at backup and migration time. The moment you activate a network, WordPress adds seven new tables to handle network-wide information. They are wp_blogs, wp_blog_versions, wp_registration_log, wp_signups, wp_site, wp_sitemeta, and the optional wp_sitecategories. At the same time, wp_users and wp_usermeta stop belonging to a single site and go network-wide. That shared user table is the reason that a single Super Admin account getting compromised is a problem for the entire network at once, not just one site.
Then there are the tables for each individual subsite. Every time you add a site, WordPress creates 11 more tables and stamps them with that site’s numeric ID. The second site you create gets wp_2_posts, wp_2_options, wp_2_comments, wp_2_postmeta, and so on. The third gets the wp_3_ versions. Your very first site is the exception, since it keeps the plain wp_ tables with no number attached.
The numbers add up faster than most people expect. A network with 20 subsites carries more than 220 site-specific tables sitting on top of the network tables. Your backup tool has to capture that whole set. Miss part of it and your restore comes back incomplete.
Media files follow their own pattern. Uploads for each subsite are stored in /wp-content/uploads/sites/N/, where N is that subsite’s ID. This is worth remembering if you ever need to pull a subsite out of the network, because you’d have to move its entire folder tree along with its database tables. That two-part move is a big part of why extracting a subsite is so tricky, and it’s one of the clearest reasons to be sure Multisite fits before you commit.
How Super Admin and Site Admin roles differ
Multisite introduces a second tier of administration that regular WordPress doesn’t have. The network gets one Super Admin who controls everything across every site, and each subsite gets its own Site Admin who runs that single site and nothing beyond it. Sorting out who holds which powers before you build the network saves you from awkward permission surprises down the road.
Here’s how the two roles compare on the tasks that come up most.
| Capability | Super Admin | Site Admin |
| Install plugins and themes | Yes | No |
| Activate available plugins on their site | Yes | Only if the Super Admin made it available |
| Manage all subsites | Yes | Their own subsite only |
| Edit network settings | Yes | No |
| Add new subsites | Yes | No |
| See the Plugins > Add New screen | Yes | No |
The biggest shift for anyone used to running a normal WordPress site is that Site Admins can’t install anything. The Plugins > Add New screen simply isn’t there for them. They can only switch on the plugins the Super Admin has already installed and released to their site.
That releasing part has two flavors, and the difference trips up plenty of teams.
- Network Enable makes a plugin available so Site Admins can turn it on or off for their own subsite whenever they like.
- Network Activate is firmer. It forces the plugin to be live on every site at once, and Site Admins can’t switch it off.
So the smart move is to map out how your team works before you flip anything on. If your Site Admins need the freedom to pick their own plugins, this locked-down model will constantly get in their way. If you want every site running the same setup with no exceptions, that same lockdown stops being a limit and becomes the whole point.
How plugins and themes behave across a network
Plugins and themes work differently on a network than they do on a standalone site, and two of those differences can bite you if nobody warns you first. The install process runs on two levels. Only the Super Admin can add a plugin, and that happens once at the network level. From there, each plugin can be Network Activated across every site, Network Enabled so Site Admins turn it on themselves, or left sitting there switched off.
Risk 1: compatibility. Not every plugin knows how to behave on a network. Some save their settings to site-specific tables and never set up those settings properly for each subsite when they get network-activated. Plugins that build their own database tables during activation are the usual culprits, since they have to be written with multisite in mind to work right. Before you install anything, scan the plugin’s documentation for the words “multisite” or “network.” If neither shows up, treat that as a sign it was never tested on a setup like yours.
Risk 2: licensing. Most commercial plugin licenses are sold per site, and on a network, each subsite usually counts as its own site. Take one premium license and Network Activate it across 10 subsites, and you’ve broken the terms on nine of them. So when you’re weighing a paid plugin, read the license for “multisite,” “network,” or “unlimited sites” before you buy.
Sorting all of this out ahead of time takes real WordPress knowledge. If you need a custom plugin built for a network or want someone to check whether your plugin stack is safe for multisite before you commit, Codeable’s WordPress experts handle plugin development and network-aware customization.
Common Multisite errors and how to fix them
Even a careful setup can hit a snag, and a handful of the same problems show up again and again once the file edits are done. The four below cause the large majority of “I followed every step, and something still broke” cases. Each one comes with a clear symptom to recognize it, the cause behind it, and a fix you can apply straight away.
Incomplete Multisite network detected
Symptom: a notice reading “Incomplete Multisite network detected” that appears after your file edits and locks you out of the dashboard.
What it means: the constants in wp-config.php are out of order, entered twice, or still carry placeholder values copied from a tutorial.
Fix: check that the constants Network Setup generated match your real domain, delete any duplicates, and make sure the order lines up with the official handbook.
404 errors after .htaccess changes
Symptom: every subsite URL returns a 404 right after you update .htaccess.
What it means: three things tend to cause it. The new rewrite rules were added below the old ones instead of replacing them, pretty permalinks aren’t turned on, or mod_rewrite isn’t active on the server.
Fix: swap the entire WordPress rewrite block for the multisite version Network Setup gave you, confirm pretty permalinks are on, and ask your host to verify mod_rewrite is enabled.
Cookie domain issues on subdomain networks
Symptom: “Cookies are blocked or not supported by your browser” error that stops you from logging in on a subdomain network.
What it means: a missing COOKIE_DOMAIN constant, or a wildcard cookie mismatch between the network and its subsites.
Fix: add four cookie constants to wp-config.php, which are ADMIN_COOKIE_PATH, COOKIEPATH, SITECOOKIEPATH, and COOKIE_DOMAIN.
SSL problems on subdomain networks
Symptom: a browser SSL warning on subsites you just created in a subdomain network.
What it means: an absent wildcard SSL certificate covering *.network.com, since your root certificate only protects the apex domain.
Fix: provision a wildcard certificate, or install a separate certificate for each subdomain by hand. Managed hosts like Kinsta and WP Engine set up wildcard SSL for you automatically.
P.S. These recommendations are based on quality and are irrespective of any affiliations Codeable may have.
Security and performance risks worth planning for
The same design that makes Multisite efficient is what makes it risky. One install, one database, and one shared user table are wonderful for day-to-day management, right up until something breaks and that shared setup spreads the damage everywhere at once.
The three risks below are the spots where “everything is connected” stops being a convenience and starts being a liability. None of them should scare you off Multisite. They’re just the things worth planning for before they surprise you.
Shared blast radius across subsites
When your sites share code, they also share their weak points. A bad network-activated plugin update, a stolen Super Admin password, or a flaw in a shared theme doesn’t stay contained. It reaches every subsite in the network at the same time because they all run off one set of plugin files, one set of theme files, and one user table.
It’s important to plan for these three failure surfaces. A compromised plugin update can spread across the whole network. A phished Super Admin account can expose every subsite’s data. A vulnerability in a Network Activated theme can open an attack path on every site at once.
Some of the things you can do to reduce that exposure are,
- Keep the number of Network Activated plugins as low as you can.
- Limit Super Admin accounts to the few people who truly need them.
- Require two-factor authentication on every Super Admin login.
- Review plugin and theme code before you activate anything across the network.
Plugin update propagation and staging discipline
A network-activated plugin pushes its updates to every subsite the moment you click ‘Update’. If that plugin runs on 20 subsites and the new version has a breaking change, all 20 sites break together.
The trouble is that most teams update plugins straight in production, mostly because spinning up staging for a network is harder than it is for a single site. However, that shortcut can cost you dearly and leads to most production incidents.
A little discipline prevents almost all of it. Run a staging environment that mirrors your network structure, set scheduled windows for updates, and test each update on a representative subsite before you promote it to production. You can also choose hosting platforms that offer multisite-aware staging, which makes this far less painful.
Resource contention on shared hosting
Every subsite draws from the same database and the same pool of server resources. So when one subsite gets a traffic spike or fires off a runaway query, the slowdown doesn’t stay on that site. It drags down performance for every site on the network.
Shared hosting makes this worse. The CPU and memory limits apply to your entire Multisite install rather than to each subsite, which means one busy site can crowd out all the others inside your own network.
Match your hosting to your needs. Shared hosting is fine for low-traffic networks with steady, predictable usage. A VPS or managed WordPress hosting gives each site its own walled-off slice of resources, so a single subsite can’t starve the rest.
When to bring in a vetted WordPress expert
Multisite isn’t a one-and-done setup. It’s a network you’ll keep running, with a risk profile that follows it for as long as it’s live. That makes the real question less about whether you can flip it on and more about whether your team can look after it once it’s on.
Run through this quick gut check.
- Are you confident about whether Multisite even fits your project?
- Can you edit wp-config.php and .htaccess on a live site?
- Do you know how to audit plugin licenses across every subsite?
- Can you push network-activated updates without a staging workflow?
- Will you be able to keep an eye on Super Admin security over time?
If more than two of those feel outside your team’s comfort zone, that’s a fair signal to bring in help.
This is where a specialist is important. Codeable developers specialize in WordPress, WooCommerce, and Multisite development. The platform has a six-stage vetting process that accepts only about 2.2% of applicants. Its single-price estimates skip the bidding wars entirely, and every project carries a 28-day bug-fix warranty that covers the exact post-setup window that the troubleshooting and security sections above walked you through.
If you want to see what these experts handle beyond networks, take a look at Codeable’s WordPress development services. And when you’re ready to hand the work to someone, you can browse vetted multisite developers and start from there.

Get matched with the developer
that is perfect fit for your WordPress or WooCommerce needs.
Start a project
 Dream It