Widgets are small, customizable blocks in WordPress that display content or features like recent posts, search bars, or social media feeds. They can be easily added to sidebars, footers, or other widget-ready areas without coding, giving you more control over site layout and functionality.
Custom WordPress widgets are an excellent way to add unique features to your site without needing to dive into complicated code after the initial setup.
Creating one is surprisingly simple if you have the right skills, and it gives you full control over how the content looks and behaves. Plus, they can be styled to match your site’s design, making things feel more cohesive and professional.
If you’re looking to make your WordPress site more dynamic, here’s the best place to start!
Creating your first custom widget: Structure and requirements
Here’s what you need to build your custom widget:
- The widget class is the foundation, and you must create a PHP class that extends the WP_Widget class to integrate your widget with WordPress.
- The constructor method initializes the widget by setting its name, description, and other parameters that define how it appears in the admin panel.
- The form method handles user input by displaying the form fields in the admin area, allowing users to customize the widget’s content, such as text or links.
- The update method processes and sanitizes the form input, ensuring that the data entered by users is safe and properly saved when the widget is updated.
- The display method outputs the widget’s content on the frontend, showing the user-defined settings and data to site visitors.
To register your widget, you need to hook into the widgets_init action in your theme’s functions.php file to ensure WordPress loads it.
Finally, sanitizing and validating input lets you protect your site from security vulnerabilities, like cross-site scripting (XSS) attacks, by ensuring any user input is clean and safe.
Building your first custom widget: Step-by-step code implementation
We’re going to build a simple text-based widget that allows you to enter contact information and display it on the frontend.
For this to work, you’ll need to add custom code to your site’s functions.php that:
- Registers a widget by calling the register_widget() function with the class Contact_Info_Widget.
- Adds the my_contact_info_widget function to the widgets_init action hook to initialize the widget when WordPress loads.
- Defines the Contact_Info_Widget class, extending WP_Widget to create a custom widget.
- In the constructor, calls the parent constructor to set the widget’s ID, name, and description.
- Implements the widget() method to output the HTML for the widget, including phone, email, and address from the widget’s settings.
- In the form() method, displays the widget’s settings form with fields for title, phone, email, and address.
- Implements the update() method to sanitize and save the widget’s settings (title, phone, email, and address) when the widget is updated.
Here’s a code snippet that does all this:
function my_contact_info_widget() {register_widget( 'Contact_Info_Widget' );}add_action( 'widgets_init', 'my_contact_info_widget' );class Contact_Info_Widget extends WP_Widget {function __construct() {parent::__construct('contact_info_widget', // Base ID'Contact Info Widget', // Namearray( 'description' => 'A simple widget to display contact information.' ));}public function widget( $args, $instance ) {echo $args['before_widget'];if ( ! empty( $instance['title'] ) ) {echo $args['before_title'] . $instance['title'] . $args['after_title'];}?><div class="contact-info"><p><strong>Phone:</strong> <?php echo esc_html($instance['phone']); ?></p><p><strong>Email:</strong> <?php echo esc_html($instance['email']); ?></p><p><strong>Address:</strong> <?php echo esc_html($instance['address']); ?></p></div><?php echo $args['after_widget'];}public function form($instance){$title=isset($instance['title'])?$instance['title']:'';$phone=isset($instance['phone'])?$instance['phone']:'';$email=isset($instance['email'])?$instance['email']:'';$address=isset($instance['address'])?$instance['address']:''; ?><p><label for="<?php echo $this->get_field_id('title'); ?>">Title:</label><input class="widefat" id="<?php echo $this->get_field_id('title'); ?>" name="<?php echo $this->get_field_name('title'); ?>" type="text" value="<?php echo esc_attr($title); ?>" /></p><p><label for="<?php echo $this->get_field_id('phone'); ?>">Phone:</label><input class="widefat" id="<?php echo $this->get_field_id('phone'); ?>" name="<?php echo $this->get_field_name('phone'); ?>" type="text" value="<?php echo esc_attr($phone); ?>" /></p><p><label for="<?php echo $this->get_field_id('email'); ?>">Email:</label><input class="widefat" id="<?php echo $this->get_field_id('email'); ?>" name="<?php echo $this->get_field_name('email'); ?>" type="text" value="<?php echo esc_attr($email); ?>" /></p><p><label for="<?php echo $this->get_field_id('address'); ?>">Address:</label><input class="widefat" id="<?php echo $this->get_field_id('address'); ?>" name="<?php echo $this->get_field_name('address'); ?>" type="text" value="<?php echo esc_attr($address); ?>" /></p><?php }public function update($new_instance,$old_instance){$instance=$old_instance;$instance['title']=strip_tags($new_instance['title']);$instance['phone']=strip_tags($new_instance['phone']);$instance['email']=strip_tags($new_instance['email']);$instance['address']=strip_tags($new_instance['address']);return $instance;}}
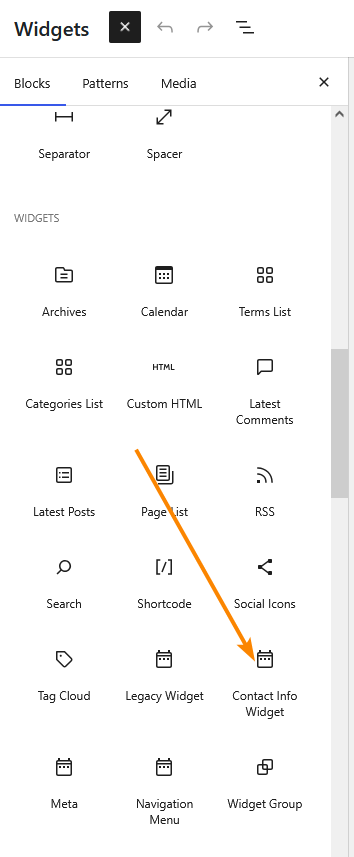
After adding it to functions.php, go to Appearance > Widgets and look for it in the list:
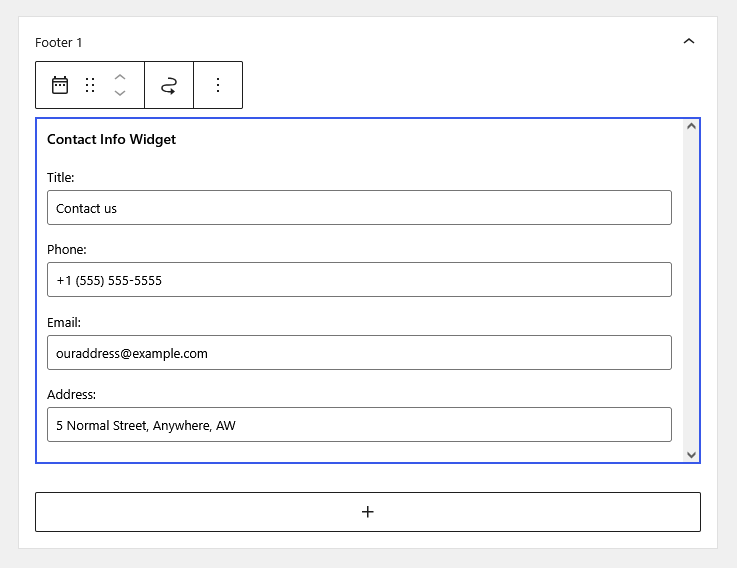
Drag it where you want it to appear – for this walkthrough, we’re going to use it on the footer – and fill in the details:
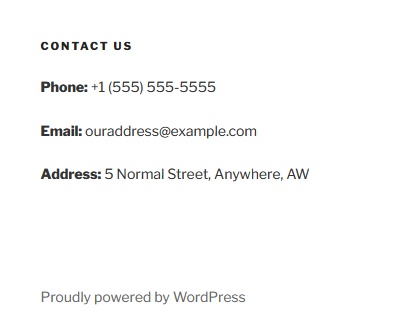
Save your changes and visit your site, where the widget should be outputting your data on the frontend:
Essential widget class methods with code examples
The WordPress widget class provides several essential methods to manage and display custom widgets, including:
- __construct() is the widget’s constructor, where you define the widget’s ID, name, and description. It’s called when the widget is initialized.
function __construct() {parent::__construct('contact_info_widget', // Base ID'Contact Info Widget', // Namearray( 'description' => 'Displays contact information' ) // Description);}widget() outputs the widget’s frontend display. It uses $args (theme wrappers) and $instance (widget settings) to display dynamic content.public function widget( $args, $instance ) {echo $args['before_widget'];echo $args['before_title'] . $instance['title'] . $args['after_title'];echo '<p>' . esc_html( $instance['phone'] ) . '</p>';echo $args['after_widget'];}form() generates the widget’s admin form. It displays fields for settings like title, phone, and email, pre-populated with existing values.public function form( $instance ) {$title = isset( $instance['title'] ) ? $instance['title'] : '';?><p><label for="<?php echo $this->get_field_id( 'title' ); ?>">Title:</label><input class="widefat" id="<?php echo $this->get_field_id( 'title' ); ?>" name="<?php echo $this->get_field_name( 'title' ); ?>" type="text" value="<?php echo esc_attr( $title ); ?>" /></p><?php}update() saves widget settings when they are updated in the admin form. It sanitizes the input before saving.public function update( $new_instance, $old_instance ) {$instance = $old_instance;$instance['title'] = strip_tags( $new_instance['title'] );return $instance;}
Creating the widget admin form: Fields and data handling
If you’re going to use your custom widget for data input, here are some things to consider:
- Use proper field types for inputs like text (e.g., title, phone, email, address) and text areas for longer content (e.g., descriptions).
- Sanitize user input with functions like esc_attr() for text fields, esc_url() for URLs, and sanitize_email() for email addresses to ensure security.
- Pre-populate form fields by retrieving existing settings with $instance[‘field_name’] so users can see their saved data when editing the widget.
- Label fields clearly using <label> tags with descriptive text, making sure users understand the information needed (e.g., “Shipping address” instead of just “Address”).
- Set default values for fields (e.g., set a default empty title or “Contact Info” if it’s left blank) to make the form more user-friendly.
- Generate unique field IDs and names using $this->get_field_id() and $this->get_field_name() to ensure data is correctly handled and submitted.
- Validate inputs (e.g., using is_email() for email fields) to check for correct data format before saving or displaying.
- Structure the form clearly by grouping related fields together in <p> tags, ensuring each field has a label and input for better readability.
Implementing widget display and output functionality
To implement widget display and output functionality, start by using the widget() method, which handles rendering the frontend output. This method receives two parameters, $args and $instance:
- $args provides theme-specific HTML wrapper tags, like $args[‘before_widget’] and $args[‘after_widget’], allowing you to wrap the widget’s content consistently.
- Use $instance to access and display widget settings, ensuring data is sanitized with functions like esc_html() and esc_url().
Display dynamic content by outputting values from the widget’s settings, such as phone numbers or email addresses, ensuring each field is sanitized before being displayed. Implement conditional logic to check if a value exists before rendering it – this avoids displaying empty or unnecessary fields (e.g., show email only if it’s set).
Structure the widget output using clear HTML. Wrap content in a <div> for the widget container, and use <p> for text fields like phone or address. Emphasize labels with <strong> to make them stand out (e.g., “Phone:”). This provides a more readable layout.
When dealing with multiple widget areas, ensure that the widget’s output adapts to different layouts by adjusting HTML as needed. You may also add custom CSS styling for the widget, either inline within the widget or through an external stylesheet, to match the theme’s overall design.
Lastly, consider caching the widget output if it displays content that doesn’t change frequently. This reduces the load time and improves performance, particularly for content-heavy or dynamic widgets.
Widget registration and placement: Integrating with WordPress themes
To integrate a custom widget with WordPress themes, you first need to register the widget using register_widget() within a function hooked to the widgets_init action. Do this within your theme’s functions.php.
For example, call register_widget(‘Your_Widget_Class’); in a function like my_custom_widget() and add it to the action hook:
add_action(‘widgets_init’, ‘my_custom_widget’);
Once registered, the widget becomes available in the WordPress widget administration area under the Appearance > Widgets section, where you can drag and drop it into available widget areas.
To ensure the widget is placed correctly, theme developers should define widget areas (sidebars) using register_sidebar() in functions.php. This makes specific areas of the theme available for widgets. Here’s how to register a sidebar:
register_sidebar( array('name' => 'Main Sidebar','id' => 'main_sidebar','before_widget' => '<div class="widget">','after_widget' => '</div>','before_title' => '<h2>','after_title' => '</h2>',) );In the theme template files, insert the widget area using dynamic_sidebar('sidebar_id') wherever you want the widget to appear:<?php if ( is_active_sidebar( 'main_sidebar' ) ) : ?><div id="sidebar"><?php dynamic_sidebar( 'main_sidebar' ); ?></div><?php endif; ?>
Need custom WordPress widget development? Let Codeable experts help
Custom WordPress widgets let you make your site truly yours, with a unique identity and bespoke functionality that meets unique needs.
If you have the right skills, creating one is fairly straightforward. If you don’t have the right skills, you could always hire a developer to do it for you, but that’s easier said than done. That is, unless you go through Codeable.
We have a massive team of vetted WordPress developers, all of whom bring years of real-world experience building and maintaining complex projects. We take the guesswork and leaps of faith out of the equation, ensuring whoever you’re matched with is up to the task.
All you need to do is submit your first project and get connected to the right developer!

20 000+ businesses of every shape and size have already trusted us to hire WordPress developers and scale their growth.
 Dream It

