Managing a static HTML website can become a time-consuming task as your site grows. Updating content, adding new pages, and maintaining site consistency turn into major undertakings. This challenge often drives website administrators to explore more efficient ways to manage their online presence.
WordPress offers a powerful solution to these challenges. When converting your HTML frontend to WordPress, you’ll face two major decisions. First, you must choose your foundational technology: the traditional classic theme path, the modern block theme path, or a hybrid approach. Second, you must choose your approach: building it manually, using a starter theme, or using an automated tool.
This guide will walk you through all the options so you can make the best choice for your project.
The first big decision: Classic, block, or hybrid approach?
Before diving into specific methods, let’s explore the key differences between the classic, block, and hybrid approaches:
| Feature / Need | Best path: Classic theme | Best path: Block theme (Full Site Editing or FSE) | Best path: Hybrid |
| Primary skillset | PHP, CSS, HTML | CSS, HTML, Visual Design | PHP, CSS, HTML + Basic Block Knowledge |
| Project goal | Granular code control | Full site client editability | Balance of control and editability |
| Future-proofing | Fully supported | Aligned with WordPress’ future | Best of both approaches |
Before you start: Important considerations
Every successful HTML to WordPress conversion starts with four essential preparation steps:
1. Create a complete backup of your current site. This includes all HTML files, assets, and any associated databases or content.
2. Map out how your content will fit into WordPress. Consider your current content structure and how it will translate to WordPress’s posts, pages, and custom post types.
3. List every feature your current site uses. Document all interactive elements, forms, and custom functionality that need to be preserved.
4. Establish WordPress coding and performance standards. Define optimization requirements and security protocols before beginning the conversion.
These preparations prevent costly setbacks and ensure your conversion delivers the results you need.
The classic theme path
Classic themes represent WordPress’s traditional development approach, providing granular control through PHP templates and functions. This path is ideal for developers who need precise control over their site’s functionality and are comfortable with PHP development.
Method A: Build a classic theme from scratch (the manual method)
Manual theme creation involves converting your HTML structure into WordPress template files. This method provides complete control over your theme’s functionality.
1. Split your HTML into template files
- Open your index.html file in your code editor. Locate the opening <body> tag and all content before your main content area. This typically includes navigation, site title, and opening HTML structure. Cut this section and paste it into header.php.
- In functions.php, add support for WordPress title handling:
add_theme_support('title-tag');- Remove any static
<title>tags from your header.php file. - Locate your footer content starting from where main content ends through the closing </body> tag. Cut this section and paste it into footer.php. Add
<?php wp_footer(); ?>before the closing</body>tag. - If your HTML contains a sidebar within
<aside>tags, cut this content and paste it into sidebar.php. WordPress will call this file when you use<?php get_sidebar(); ?>.
2. Create the main template
- Start index.php with
<?php get_header(); ?> - Add the WordPress Loop (the full code block for displaying posts).
- Close index.php with:
<?php get_sidebar(); ?><?php get_footer(); ?>
- Add essential theme support declarations in functions.php, such as:
add_theme_support('post-thumbnails');add_theme_support('custom-logo');add_theme_support('html5', array('search-form','comment-form','comment-list','gallery','caption'));
- Save all files in your theme folder.
3. Install and activate the theme
- Upload your theme folder to /wp-content/themes/ using SFTP or your hosting file manager. Alternatively, compress the folder into a ZIP file and upload it through the WordPress admin.
- Navigate to Appearance > Themes in your WordPress dashboard. Find your custom theme and click Activate. Visit your site to verify the conversion displays correctly.
Again, this method is the most complex. After you’ve completed the steps above, you’ll still need to do some extra work in the following areas:
- Handling dynamic content: Adapt static pages to WordPress’s dynamic post and page system, especially for complex layouts or frequently updated sections.
- Ensuring responsive design: Modify existing CSS and HTML to create a fluid layout that works across all devices and screen sizes.
- Maintaining SEO settings: Carefully transfer meta tags, preserve URL structures, and implement redirects to retain search engine rankings and traffic.
- Preserving functionality: Replicate custom HTML/JavaScript features using WordPress plugins or write custom PHP code within the WordPress framework.
- Data integration: Migrate static content into WordPress’s database structure, including posts, pages, and custom post types.
- Performance optimization: Implement caching, optimize images, and minimize plugin usage to maintain or improve site speed in the WordPress environment.
Method B: Customize a classic starter theme
Starting with a starter theme accelerates development by providing the essential WordPress theme structure and boilerplate PHP code. This approach saves time on initial setup while maintaining full control over your theme’s functionality.
Popular starter themes include:
- Underscores: WordPress’s official starter theme that provides a minimal, standardized foundation for custom theme development.
- Sage: A modern starter theme featuring Tailwind CSS integration and advanced templating, ideal for teams using current development tools.
- GeneratePress: A performance-focused starter with modular structure, perfect for creating fast, SEO-friendly sites.
Converting your HTML using a starter theme involves three main steps:
1. Install your chosen starter theme in WordPress.
2. Customize style.css to match your HTML site’s design.
3. Modify the existing template files to reflect your HTML structure.
Method C: Use an automated HTML import plugin
Plugin import methods convert individual HTML pages into WordPress pages or posts. This approach works best for simple sites with static content that doesn’t require dynamic features.
Several plugins handle HTML imports:
- WP File Manager allows direct file uploads to your WordPress directory.
- WP All Import processes complex HTML structures with custom field mapping.
Depending on what exactly you’re trying to achieve, converting HTML into a full-on theme might be overkill (tools like Pinegrow Theme Converter exist for that purpose), and that’s where this method makes the most sense.
For example, suppose you have a couple of static landing pages and a few others for things like the about, services, and FAQ sections but you also want a blog. You can import the existing pages into WordPress as is, and create a separate blog section, which you can manage with WordPress.
You’ll usually need to do each page individually, but it’s more beginner-friendly than any other option on this list so far.
Here’s how to import HTML pages into your WordPress site with WP File Manager:
1. With the plugin installed and activated, go to your admin dashboard and click on WP File Manager from the menu on the left.
2. Click on the root folder of your installation, then create a new folder using the icon along the top menu.
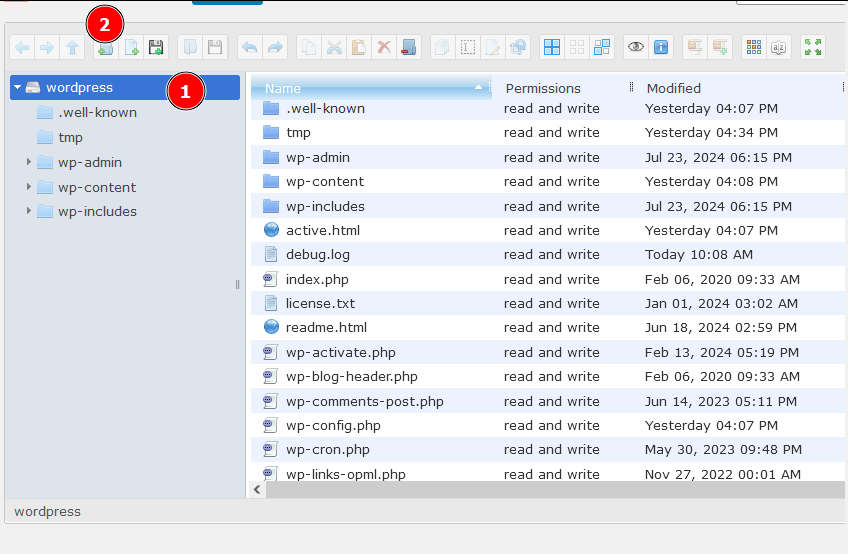
⚠️ Don’t assign the new folder the same name as a page that already exists on your WordPress site because that might cause a conflict.
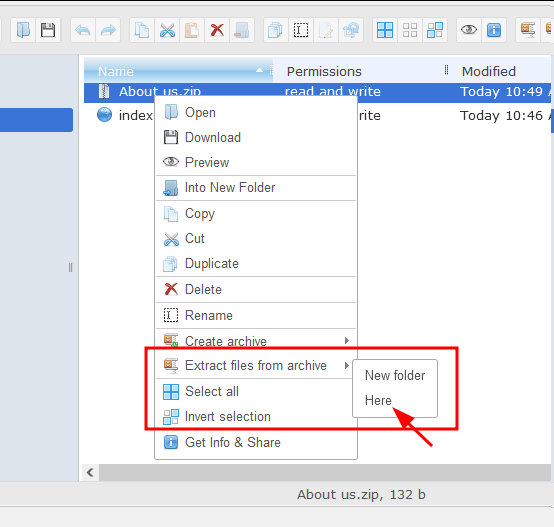
3. Drag and drop the files and folders for each static HTML page into the corresponding folder.💡 Depending on what browser you’re using, you might need to copy them over in a .zip archive and then unzip them. To do this, just right-click on the archive then go to Extract files from archive > Here > Yes.
4. Navigate to https://yoursite.com/folder-name, and you should see the static page there.
Plugin limitations
While plugin imports offer simplicity, they come with some trade-offs worth considering:
- Import plugins don’t create actual WordPress themes. Your imported pages remain static HTML files. This means you won’t automatically get WordPress’s dynamic features like comments, search functionality, or user management.
- JavaScript functionality can be hit or miss. If your HTML pages include complex scripts or interactive elements, they might not work properly after import. It’s always wise to test these features thoroughly once your pages are in WordPress.
- SEO metadata requires manual migration. Meta descriptions, title tags, and other SEO elements don’t transfer automatically. Additionally, your URL structure might change during import, so setting up 301 redirects becomes essential to maintain your search rankings.
- This method works best for simple content pages. Think about pages, contact forms, or basic landing pages. But if your site relies on complex functionality or dynamic features, you’ll likely need to explore manual conversion or consider bringing in professional help.
The modern block theme path
WordPress block themes, also known as Full Site Editing (FSE) themes, represent a fundamental shift in how WordPress themes are built and customized. Unlike traditional classic themes that rely heavily on PHP templates and the WordPress Customizer, block themes use blocks for all parts of a website and rely on the Site Editor for visual customization.
The core components of block themes include:
- Templates: HTML files that define page layouts.
- Template parts: Reusable components like headers and footers.
- Block patterns: Pre-designed sections of blocks.
- Global styles: Site-wide design settings managed through theme.json.
Method A: Build a block theme from a blueprint
While “manual” in name, this method focuses on translating your design into WordPress’s block architecture rather than writing code. You’ll work primarily through WordPress’s visual interfaces while maintaining precise control over your design implementation. The process involves:
1. Setting up your theme folder: Create a new folder in wp-content/themes/ and name it appropriately (e.g., my-block-theme). Inside this folder, create the following essential files:
| my-block-theme/ ├── style.css ├── theme.json ├── index.php (blank file for compatibility) ├── functions.php (optional) ├── templates/ │ ├── index.html │ ├── single.html │ ├── page.html │ ├── archive.html │ └── 404.html ├── parts/ │ ├── header.html │ └── footer.html └── patterns/ (optional) |
2. Transfer your CSS: In style.css, include the required theme information at the top, followed by your existing CSS styles. This file controls the visual appearance of your site.
3. Create the theme.json file: Define global styles, settings, and block-specific configurations in the theme.json file. This file enhances the customization capabilities of your theme.
4. Convert HTML to block templates: Divide your static HTML into dynamic block templates:
- header.html – contains the site’s header structure.
- footer.html – contains the site’s footer structure.
- index.html – serves as the main template, incorporating the header and footer.
Use WordPress block markup within these files to define dynamic content areas. For example:
<!-- Original HTML --><h1>My Heading</h1><!-- Block markup --><!-- wp:heading {"level":1} --><h1 class="wp-block-heading">My Heading</h1><!-- /wp:heading -->
5. Configure functions.php: If needed, use functions.php to add theme support for features like block styles or custom templates. This file allows you to extend the functionality of your theme.
6. Activate your theme: Once your theme files are in place, go to the WordPress dashboard, navigate to Appearance > Themes, and activate your new block theme. You can then customize your site using the Site Editor.
Method B: Customize a block starter theme
This approach offers the fastest path to a professional block theme while maintaining flexibility. Starting with an established theme framework saves time on basic setup and configuration.
Here are some recommended starter themes:
- Twenty Twenty-Five: WordPress’s latest default theme, ideal for modern designs.
- Frost: A dedicated block-first starter with an extensive pattern library.
Follow these steps to implement your theme:
1. Install your chosen starter theme.
2. Use the Site Editor and Global Styles to match your HTML design.
3. Modify existing block patterns and templates to reflect your structure.
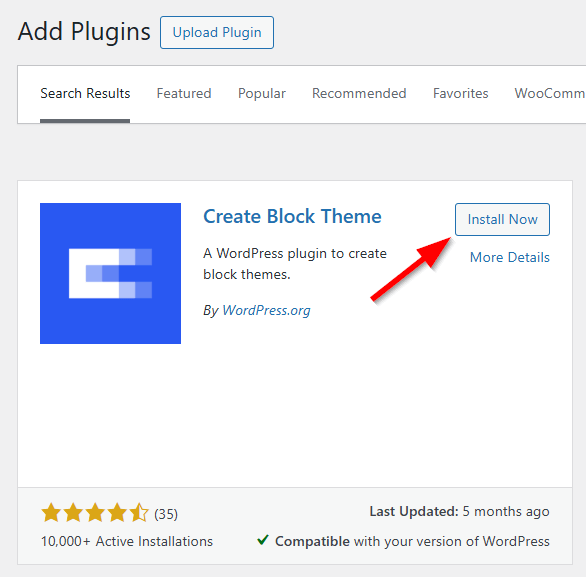
Method C: Use the Create Block Theme Plugin
The Create Block Theme plugin (included in the Site Editor) bridges the gap between manual and starter theme approaches, letting you build visually and export a complete theme package. Here’s what you’ll need to do:
1. Install and activate the Twenty Twenty-Five theme or any other block theme of your choice as your base.
2. Install and activate the Create Block Theme plugin.
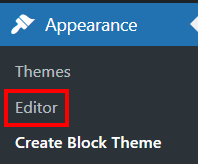
3. Navigate to Appearance > Editor to access the Site Editor.
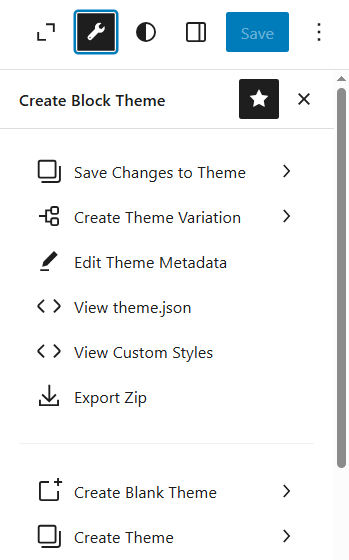
4. Look for the wrench icon in the top-right corner next to the Save button. This method provides full plugin functionality within the visual editing environment
5. Make all customizations through the Site Editor interface.
This method is particularly useful if:
- You prefer visual design to coding.
- You need to create multiple similar themes.
- You want to build a distributable block theme without deep technical knowledge.
The hybrid path: Combining classic and block features
For many sites, choosing between classic themes and modern block themes feels like an all-or-nothing decision.
Hybrid themes offer an elegant middle ground, maintaining the traditional PHP template file system while incorporating modern capabilities like theme.json, block patterns, and selective Full Site Editing features. This approach lets you gradually adopt new WordPress capabilities while maintaining existing functionality.
To implement a hybrid approach:
1. Start with your existing theme structure or create the following folder structure:
| my-hybrid-theme/ ├── style.css ├── functions.php ├── index.php ├── header.php ├── footer.php ├── single.php ├── page.php ├── theme.json (added for hybrid features) ├── parts/ (for block template parts) │ ├── header.html │ └── footer.html └── patterns/ (optional block patterns) |
2. Use classic template structure (PHP): Keep your classic HTML/PHP template files like header.php, footer.php, and index.php. These files will work with dynamic content like post content, navigation, and widgets. For example, in header.php, you might have:
<header><nav><?php wp_nav_menu( array( 'theme_location' => 'primary' ) ); ?></nav></header>
3. Block templates (HTML): In addition to the classic PHP files, you’ll need to create block templates for the FSE part of your theme. These templates will use blocks to allow easy editing through the WordPress block editor. For example, create an index.html file in your theme folder. This file will contain blocks like the header, footer, and main content area.
4. Use theme.json for global styles and settings: You’ll need to include a theme.json file, which is used by block themes to configure styles, settings, and block properties. For example:
{"version": 3,"settings": {"custom": {"color": {"primary": "#ff5733"}}},"styles": {"color": {"background": "#f0f0f0"}}}
The theme.json file gives you control over global settings, like color schemes and typography, in your block theme.
5. functions.php for theme features: In functions.php, you can register features for both classic and block-based themes.
6. Block-based widgets and custom post types: You can add support for block-based widgets and custom post types by modifying your functions.php as needed. For instance, you can register a block-based widget area:
function my_classic_block_theme_widgets_init() {register_sidebar( array(;'name' => 'Footer Widget Area','id' => 'footer-widget-area','before_widget' => '<section class="widget">','after_widget' => '</section>',) );}add_action( 'widgets_init', 'my_classic_block_theme_widgets_init' );
7. Activate the theme: After setting up your theme with both the block and classic templates, activate it from Appearance > Themes. You can then customize it using the Site Editor for the block parts.
When working with hybrid themes, remember to follow these best practices:
- Maintain clear separation between classic and block-based features, and document which parts of your site use which approach.
- Test regularly, especially when adding new block features, and keep your theme.json file updated to ensure proper block support.
- Always consider future compatibility when choosing which features to implement.
The universal alternative – hiring a WordPress expert
Converting HTML to WordPress – whether through classic, block, or hybrid approaches – requires significant technical knowledge and time investment. For many businesses, professional development offers a more efficient solution and here’s why:
- Time savings: Experts complete the conversion quickly, freeing you to focus on core business activities.
- Custom theme benefits: Professional developers create tailored themes, offering more control and flexibility.
- Efficiency and expertise: Experienced developers ensure clean code, follow best practices and optimize for performance and security.
- Future-proofing: Professionals build scalable solutions that accommodate future growth.
- SEO preservation: Experts maintain your site’s search rankings during the transition.
While this method may have higher upfront costs, it often proves cost-effective by avoiding common pitfalls and ensuring a high-quality result.
The Codeable advantage
Codeable connects you with verified WordPress experts who specialize in HTML to WordPress conversions. The process begins with a thorough evaluation of your HTML site, where experts assess your needs and recommend the most suitable conversion path – whether that’s classic, block, or hybrid development.
During development, your Codeable expert maintains your site’s design while implementing WordPress best practices. Regular communication ensures the project stays aligned with your vision, and comprehensive testing guarantees quality at every step.
The final delivery includes a fully tested WordPress installation, complete documentation, and post-launch support to ensure your team can effectively manage the new site. Whether you need custom functionality, visual editing capabilities, or a combination of both, Codeable experts ensure a smooth transition to WordPress.
Get expert help for your HTML to WordPress conversion
Converting an HTML site to WordPress opens up powerful possibilities for content management and site functionality. Each conversion path offers distinct advantages: the classic path provides granular code control, the block path enables visual editing capabilities, and the hybrid approach allows for a gradual transition. Your success depends on matching the method to your project’s specific needs.
The classic path remains valuable for projects requiring complex custom functionality or when your team has strong PHP development skills. The block path offers a modern, visual-first approach that’s particularly powerful for content-focused sites and client editability. The hybrid approach provides a pragmatic middle ground, letting you adopt modern features while maintaining existing functionality.
While each path offers different methods, the key is choosing an approach that aligns with your technical capabilities, timeline, and long-term maintenance plans.
For many projects, professional development through Codeable offers the most efficient path forward, regardless of which approach you choose. Expert developers can guide you through the decision-making process and ensure your conversion is handled professionally, setting your site up for long-term success.
Ready to start your HTML to WordPress conversion? Connect with a Codeable expert today and take the first step toward a more powerful, flexible website.
Get matched with the developer
that is perfect fit for your WordPress or WooCommerce needs.
Start a project
 Dream It

